Payara 5
1 Introduction
This document describes some detailed configuration settings for running publishing server and priint planner on Payara 5 application servers.
The default settings after a publishing server installation are a good start for developer systems.
For production systems, some tuning may be needed depending on the special requirements for the project. E.g. number of InDesign Server Instances, number of scheduled jobs vary largely between customer projects.
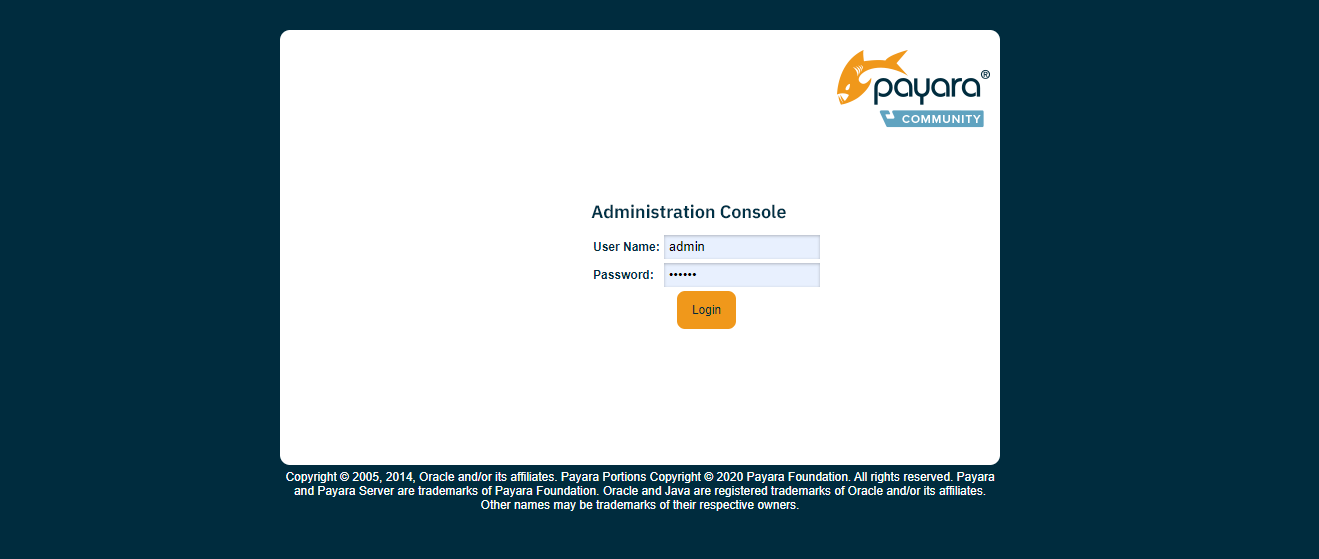
1.1 Login into Payara Administration
| Field | Default Value | Comment |
| URL | https://localhost:40048/ | Schema (http vs https), server address and port vary between systems. |
| User Name | admin | Admin user exists by default after an installation. |
| Password | Comet4 | Password is “Comet4” by default after an installation. |
2 Prerequisites
The information contained in this document applies to versions 4.4 and all newer.
3 JVM Options
JVM Options can be found in payara server. Path to options is:
Configurations -> server-config -> JVM Settings -> JVM Options
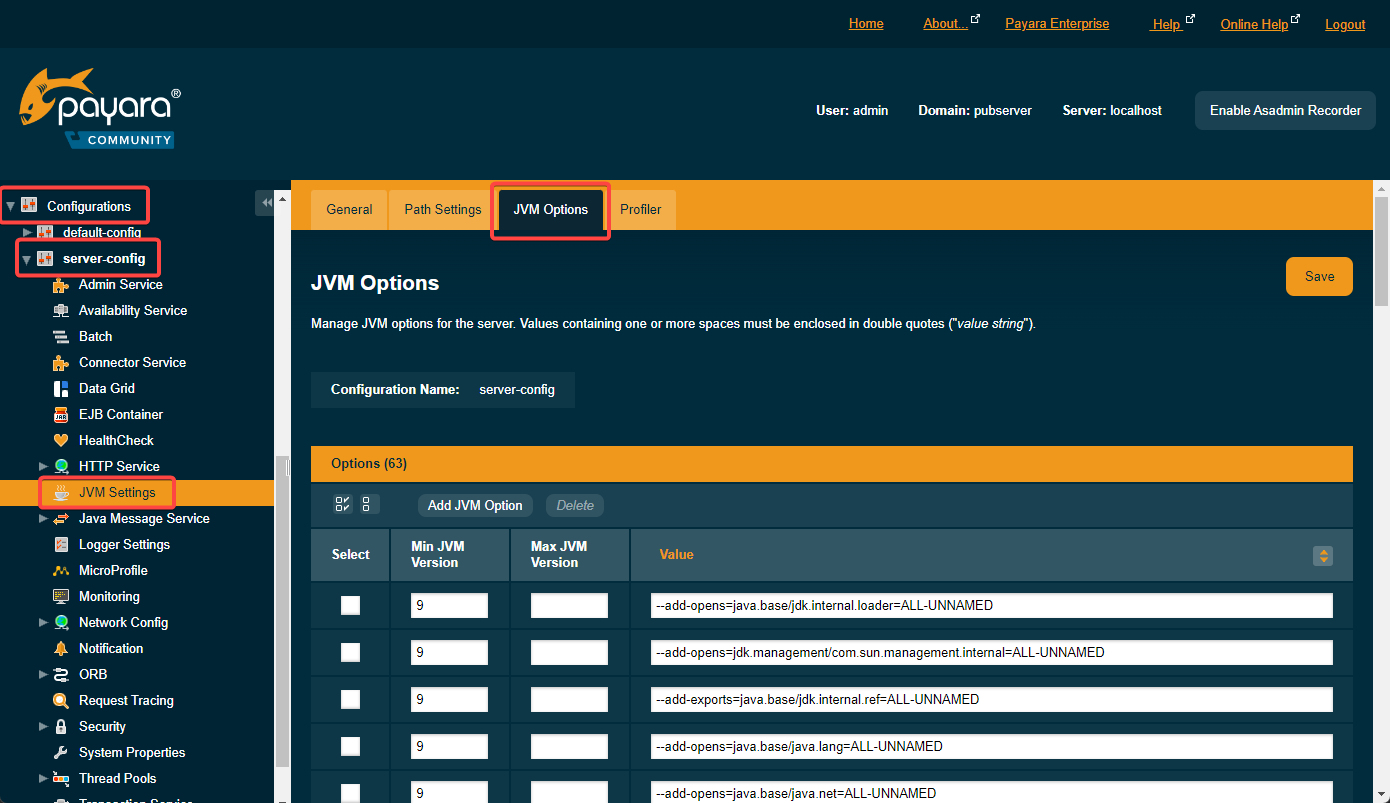
Use this to customize Java Virtual Machine options running on Payara.
Prominent settings are:
| Field | Default Value | Comment |
| -Xmx | -Xmx2g | Java Heap Space Size. Default is “2g”, i.e. 2 GB of RAM reserved for Java Heap. You could also write it “-Xmx2048m” for sizing in units of 1 MB.On a Windows machine reserve at least 4 GB for the OS. So, if you have 16 GB available, never set Xmx to a value beyond 12g. |
| ‑Dcom.sun.enterprise.server.logging.max_history_files | 10 | Number of logfiles that are written in the log file rotation. |
\-server -Xmx2g
\-Xms512m -XX:MaxPermSize=512m
\-XX:+UseParallelGC
\-XX:+UseParallelOldGC
\-XX:ParallelGCThreads=16
\-XX:+AggressiveOpts
\-Dcom.sun.enterprise.server.logging.max\_history\_files=10 -Dlogback.configurationFile=file:///${com.sun.aas.instanceRoot}/config/logback.xml -Dfile.encoding=UTF8
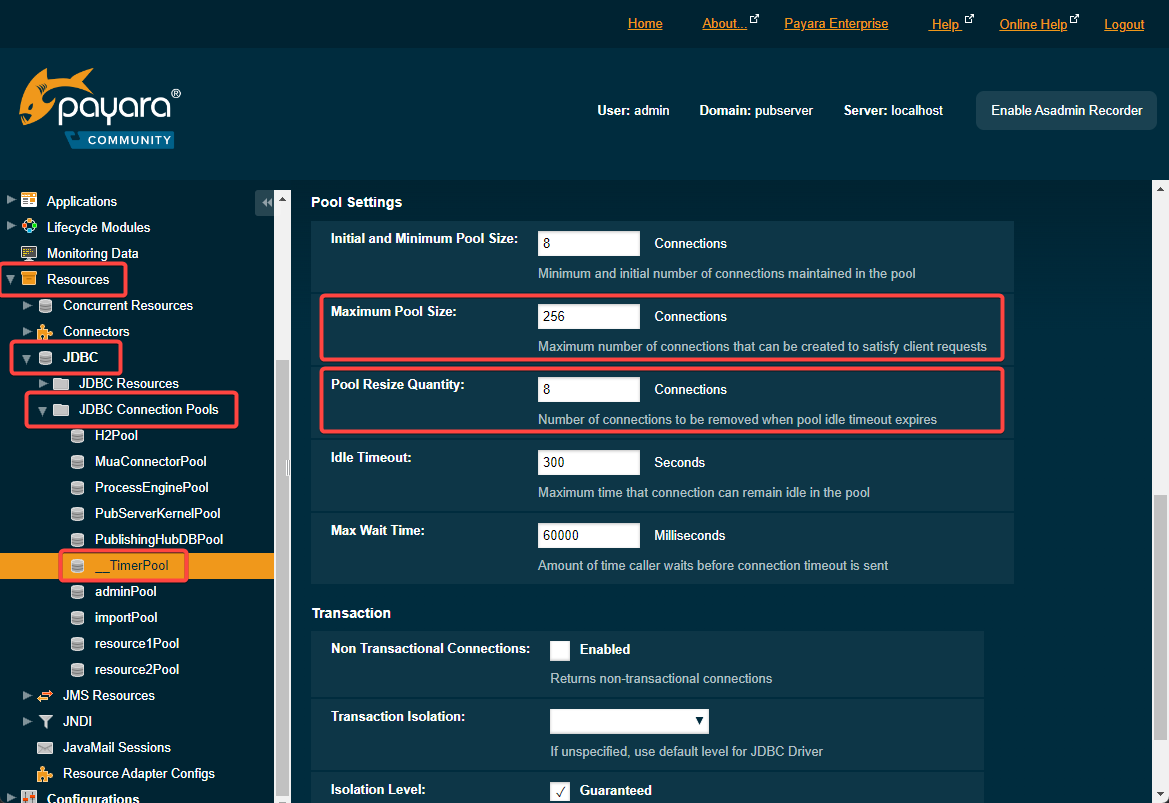
4 JDBC Connection Optimization
Update the maximum pool size of the JDBC Connection __TimerPool.
Payara Default is 32 with resize quantity 2.
If there are many timed jobs in your project, you may wish to update this setting to a higher value. Via print planner hundreds or thousands of timed jobs can be created and possible set to the same start value.
Best values depend on your project requirements. Values larger than 10.000 are possible.
Change this setting only if you get the following message in the log file:
“Internal Exception: java.sql.SQLNonTransientConnectionException: No current connection”
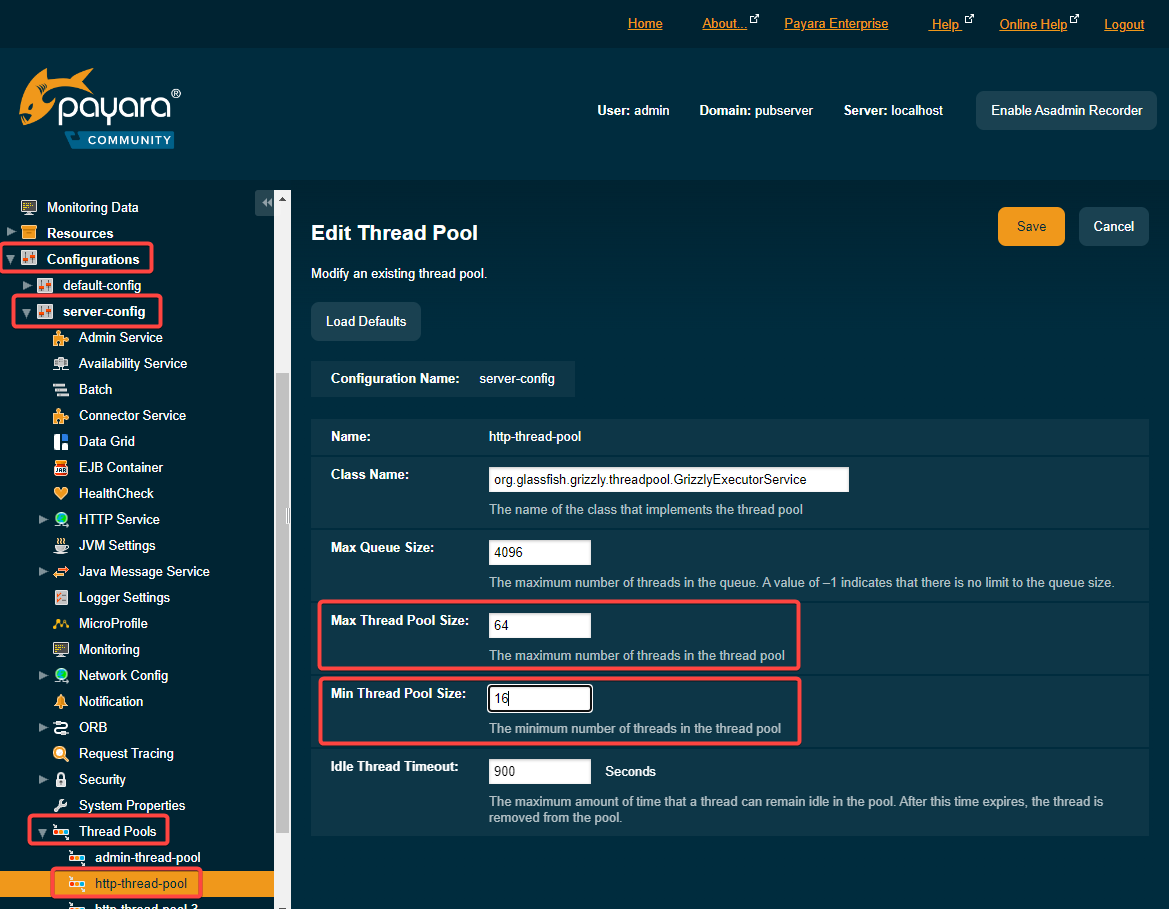
5 Thread Pool Configuration
5.1 HTTP Service Configuration
On Payara Web console navigate to:
server-config -> Thread-Pools -> http-thread-pool
Check the Max Thread Pool Size. (Payara default is 5). For a smooth working with priint planner, you should increase it to e.g. 64.
6 InDesign Server Thread Pool
On servers where there is a heavy load on the connection between publishing server and InDesign server, it is advisable to create a separate Thread Pool for InDesignServer connections. Otherwise, you may see a slowdown of priint suite performance because priint suite web services are competing with comet server connections. (“cometserver” is the internal component connecting to InDesign Server and comet server plugins).
There are three steps to do
- Create a new Thread Pool
- Create a new HTTP Listener Using this Thread Pool
- Bind the Comet Bridge address in priint planner to the port of the new HTTP Listener.
Each step is shown in a screenshot.
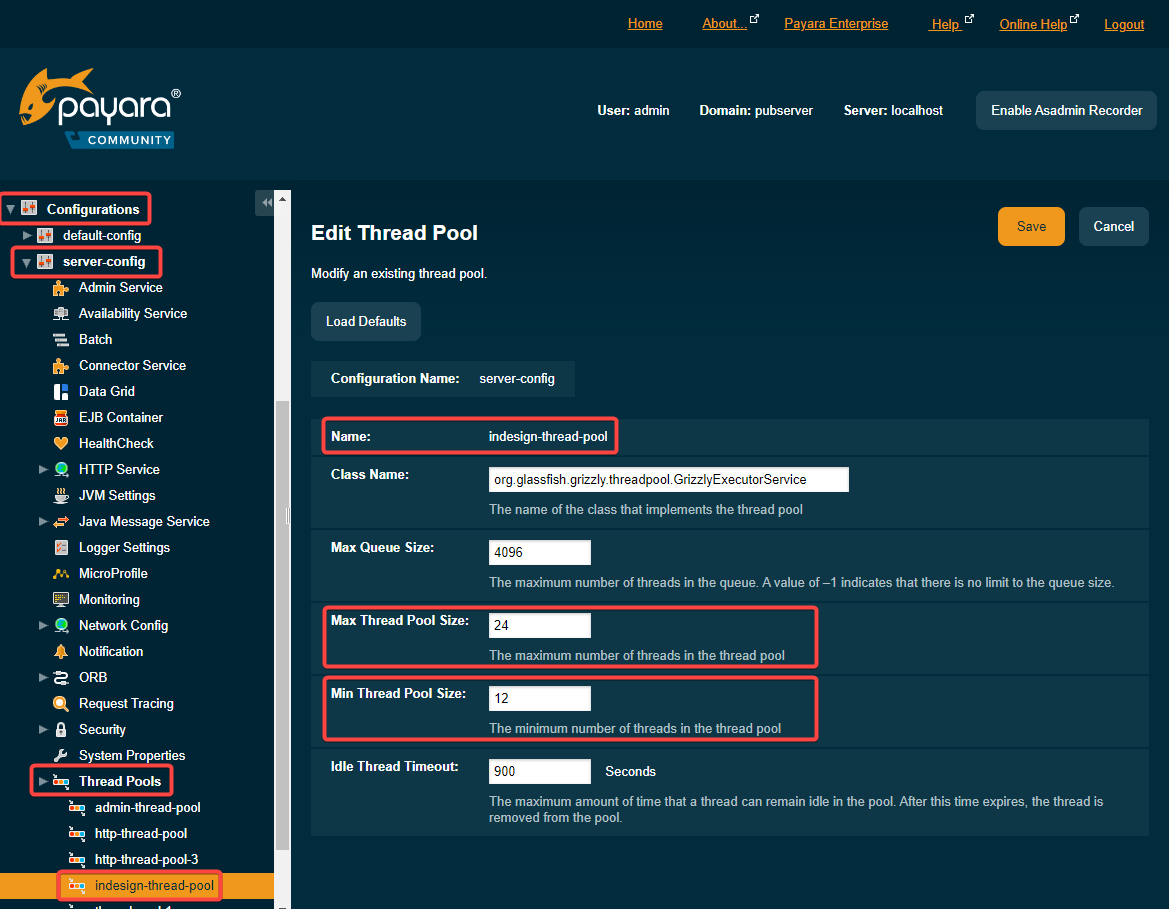
6.1 Thread Pool Creation
In the Payara web console:
Go to Configurations -> server-config -> Thread Pools
Add a new Thread Pool called “indesign-thread-pool”.
Set pool size to an appropriate value depending on the InDesign Server Instances you have.
Set the min pool size to e.g. half of the maximum, so that half of the threads will be started right away.
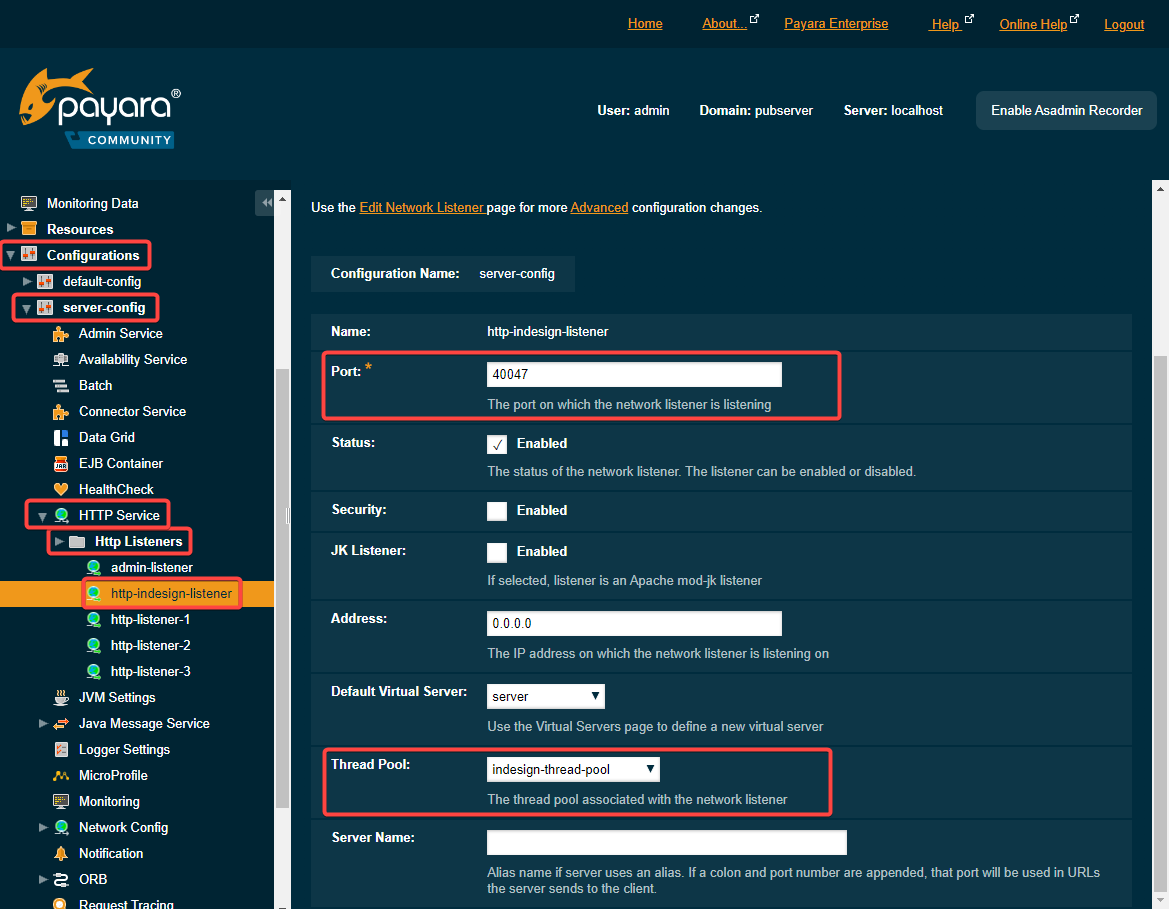
6.2 Create HTTP Listener
In the Payara web console:
Go to Configurations -> server-config -> HTTP Service -> Http Listeners
Add a new HTTP listener called “http-indesign-listener”.
Set the port to a new value, e.g. “40047”.
Set the Thread Pool to the previously created thread pool named “indesign-thread-pool”.
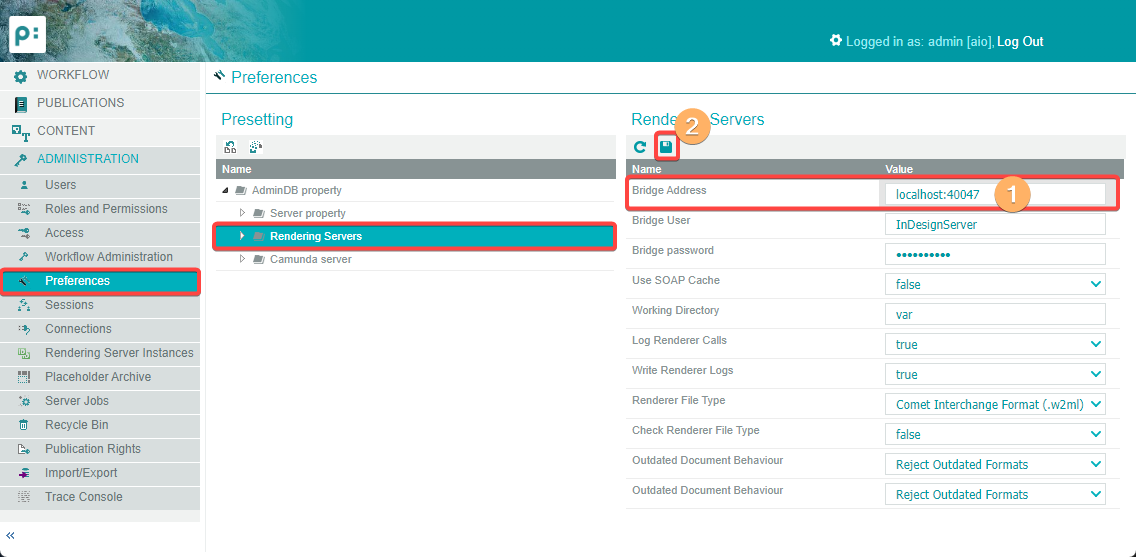
6.3 Bind Comet Bridge to HTTP Listener
In priint planner, login as “admin”.
Then go to Administration -> Preferences -> AdminDB -> InDesign Servers
Bridge Address has to be set to the new HTTP listener port. “40047” in the example.
7 EJB Thread Pool for Many Worker Jobs
The version 4.4 of priint:suite has introduced a new kind of jobs. Many jobs can be planned in advance. Hundreds of jobs can be created at the same time (external service tasks). In most probable case of rendering jobs - the parallel execution of jobs is restricted by the number of Rendering worker service instances that are available. Each job will be handled by worker in a separated thread. Also, asynchronous methods will compete with these threads.
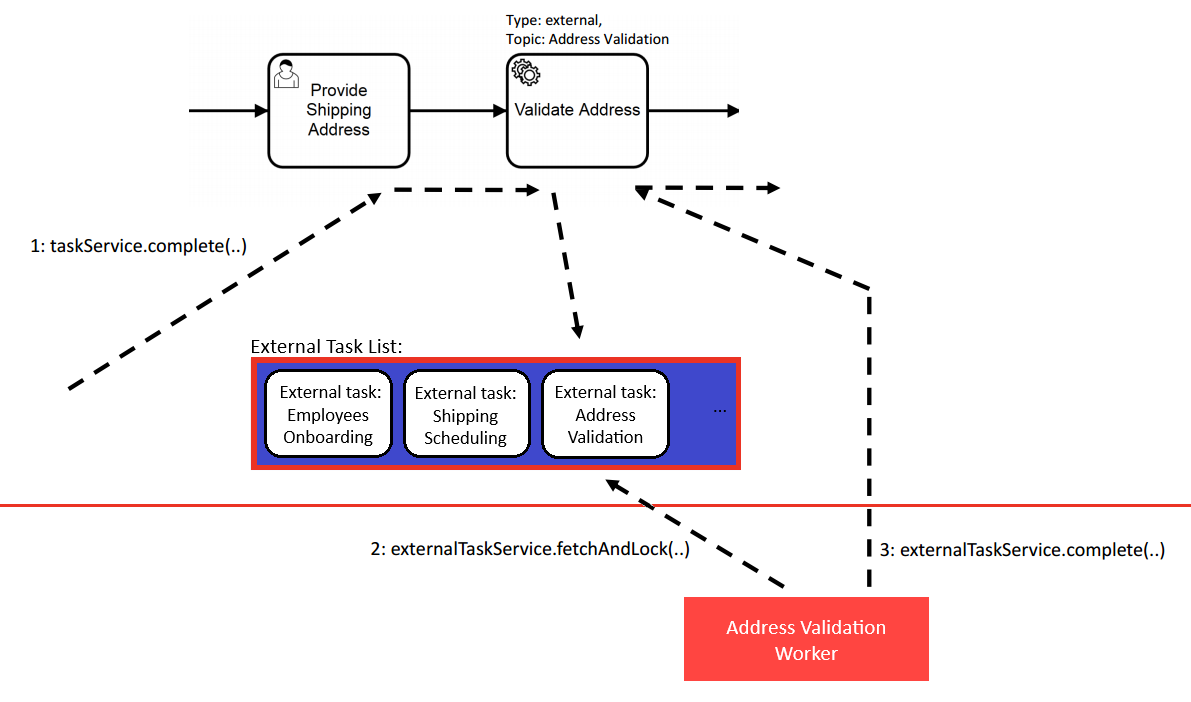
- Process Engine: Creation of an external task instance
- External Worker: Fetch and lock external tasks
- External Worker & Process Engine: Complete external task instance
When the process engine encounters a service task designated for external handling, it initiates the creation of an external task instance and includes it in a queue of pending external tasks (step 1).
Each task instance is assigned a specific topic that signifies the type of work to be done. At a later point, an external worker can select and lock tasks associated with particular topics (step 2) to prevent multiple workers from accessing the same task simultaneously, a timestamp-based lock is applied upon task retrieval. Only when this lock expires can another worker access the task.
Upon completing the assigned task, the external worker can notify the process engine to proceed with the process execution after the service task (step 3).
The question is: What is a good maximum thread pool size? Or how to find a good compromise between general job execution performance and non-blocking CScript jobs?
The following formula can give a hint to find a good value for “thread-max-pool-size”. But be aware: It is only a hint. E.g. customer specific plug-ins may raise an additional burden to the server that has to be taken into account.
Plan 5 threads as reserve.
thread-max-pool-size = rendering_server_instances + plugin_method_workers + async_calls + 5
Example (8 Rendering worker service Instances, 10 Jobs, 0 asynchronous methods):
thread-max-pool-size = 8 + 10 + 0 + 5 = 23
How to configure this in Payara and priint planner?
To start more than the default workers at the same time, you have to configure two things:
- EJB Container Optimization in Payara (esp. thread-max-pool-size)
- Increase the plugin-method-workers-count setting in priint planner.
- Increase the legacy-plugin-method-workers-count setting in priint planner (not recommend to use).
- Increase the legacy-download-workers-count setting in priint planner (not recommend to use).
It is demonstrated in commented screenshots.
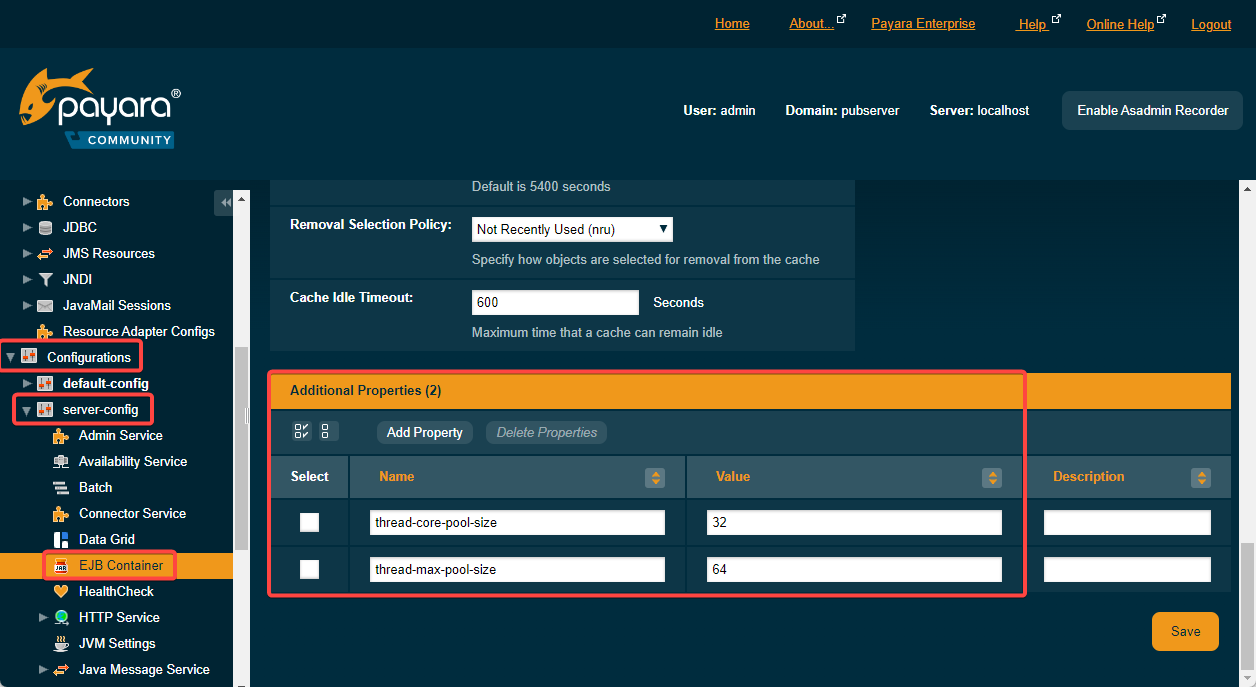
7.1 Optimize EJB Container Thread Pool
In Payara web console:
Go to Configurations -> server-config -> EJB Container
Scroll down and add some properties.
The listing can be found below.
| Property Name | Example Values | Comment |
| thread-core-pool-size | 70 | Default 16. |
| thread-max-pool-size | 100 | Default 32. This is the most important setting to speed up worker jobs. |
| thread-queue-capacity | 2147483647 | 2147483647 (MAX_INT) |
| thread-keep-alive-seconds | 60 | Default 60. |
| allow-core-thread-timeout | false | Default false. |
| prestart-all-core-threads | false | Default false. |
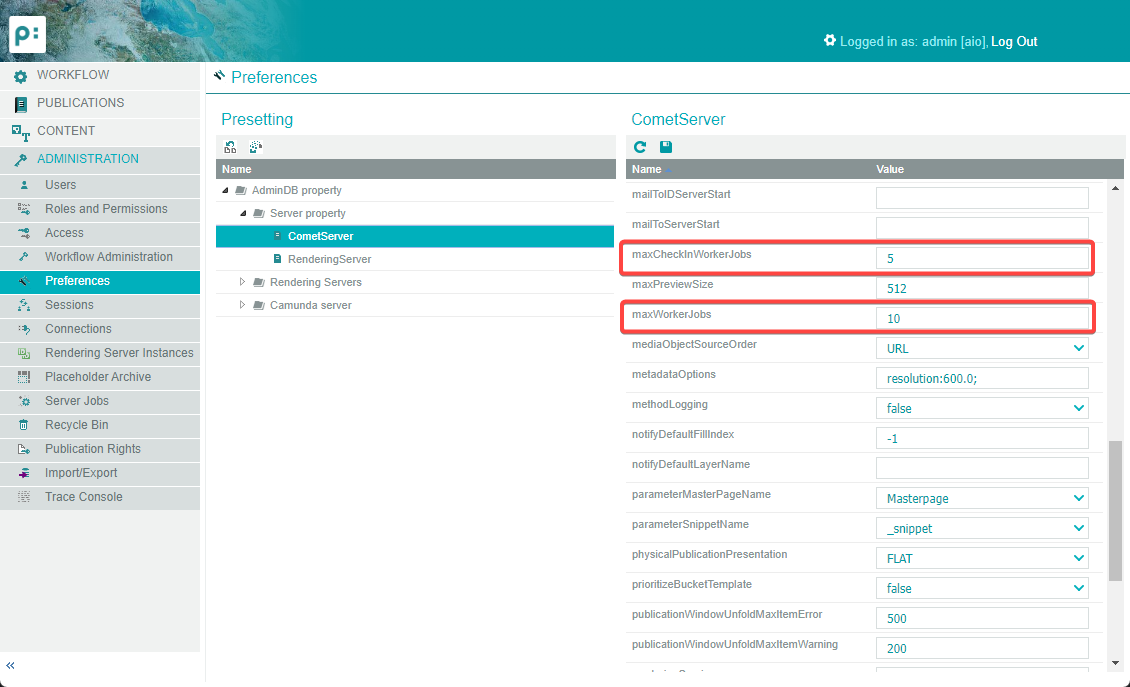
7.2 Set max workers in priint planner
In priint planner, login as “admin”.
Go to Administration -> Preferences -> AdminDB -> Server Property > Comet Server
Scroll down in the Details panel. Modify the maxWorkerJobs and/or maxCheckInWorkerJobs settings according to your needs.
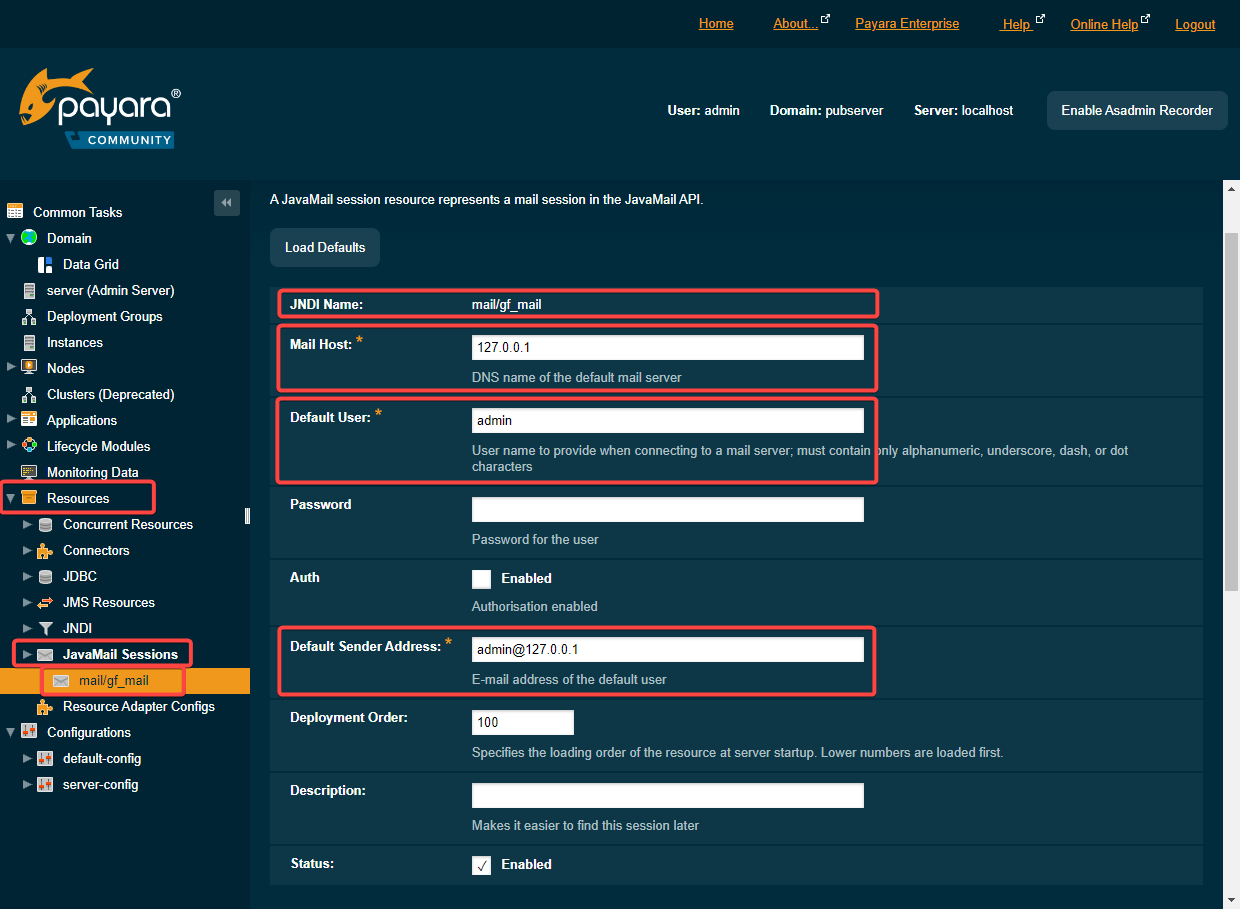
8 JavaMail Configuration
Go to: Resources > JavaMail Sessions > mail/gf_mail
If not already existing, create a mail session with JNDI name “mail/gf_mail”.
| Field | Default Value | Comment |
| JNDI Name | mail/gf_mail | Important: do not change this name |
| Mail Host | 127.0.0.1 | DNS name of the default mail server, e.g. mail.example.com |
| Default Sender Address | admin@127.0.0.1 | E-mail address of the default user, e.g. priint-suite@example.com. |
| Default User | admin | User name to provide when connecting to a mail server; must contain only alphanumeric, underscore, dash, or dot characters. e.g. priint-suite |
Add special properties as needed:
| Property | Default Value | Comment |
| mail.smtp.auth | true | If users should be authenticated. Typically set to “true” and provide smtp password for the user. |
| mail.smtp.port | 465 | Port of the SMTP service. 587 is preferred default for authenticated users. 25 is old default for open servers. 465 is default for SMTPs. |
| mail.smtp.user | priint-suite@example.com | SMTP mail user |
| mail.smtp.password | ************ | Password for the user. |
To work with secured SMTP Server using SSL/TLS, you need to set additional properties (see: https://blog.payara.fish/how-to-configure-the-email-notifier-with-payara-server-171-gmail)
| Property | Default Value | Comment |
| mail.smtp.socketFactory.port | 465 | Port of the SMTP service. |
| mail.smtp.socketFactory.class | javax.net.ssl.SSLSocketFactory | Factory class for secured connections |
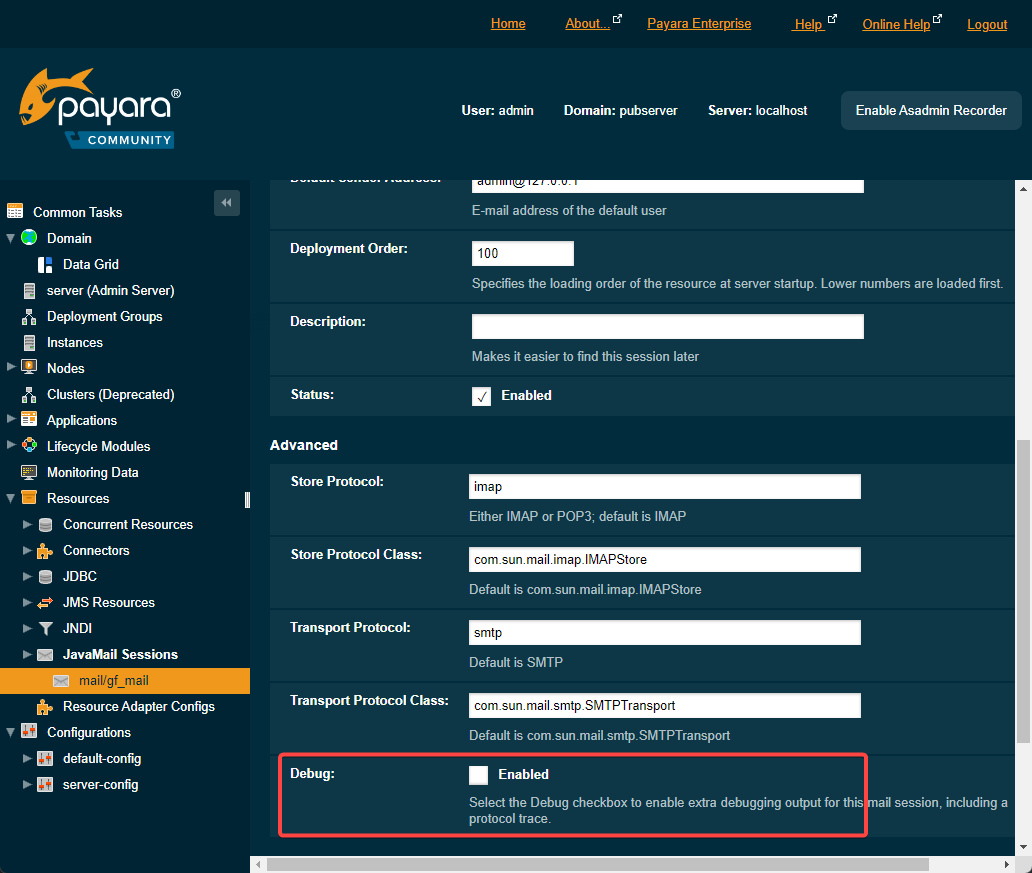
Hint:
Select the Debug checkbox to enable extra debugging output for this mail session, including a protocol trace.
9 Administrative Users
9.1 Default admin
Per default, a user “admin” with password “Comet4” is installed.
If you allow remote access to the administration console, you should change the admin’s password for security reasons.
Go to: WebConsole > Domain > Administrator Password
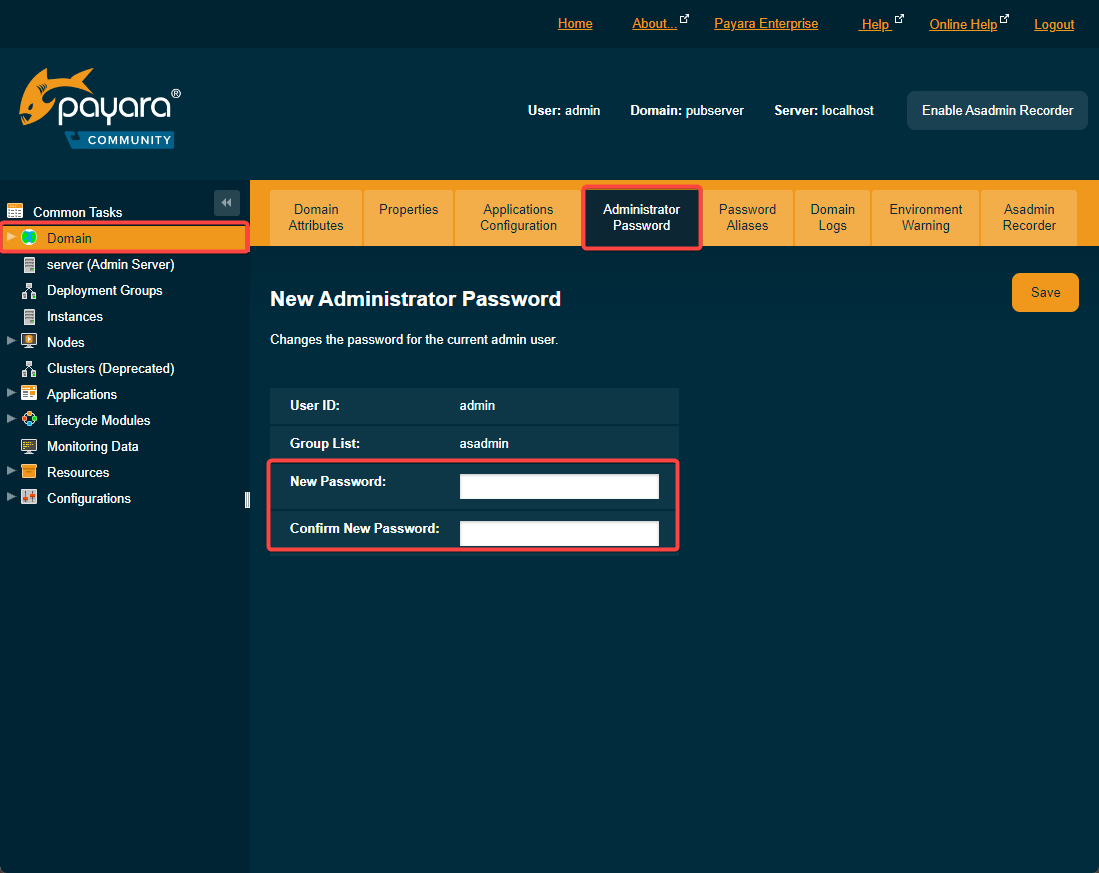
If you change the password, please also change it in the settings.local.bat (property “GlassfishPassword”). This is used by the batch scripts from the PStart menu to start, stop and configure the server. It is also used by the pubserver updater process. The file can be found in <installdir>\\etc.
9.2 Updater admin
During installation, a second admin user with name “pubserver” is automatically created. It has a cryptic password that is only recoverable through the <domain>/pubserver.xml file. Please do not remove this user or change its password. To see the user, please:
Go to: WebConsole > Security > server-config > Security > Realms > admin-realm
Click the “Manage Users” button.
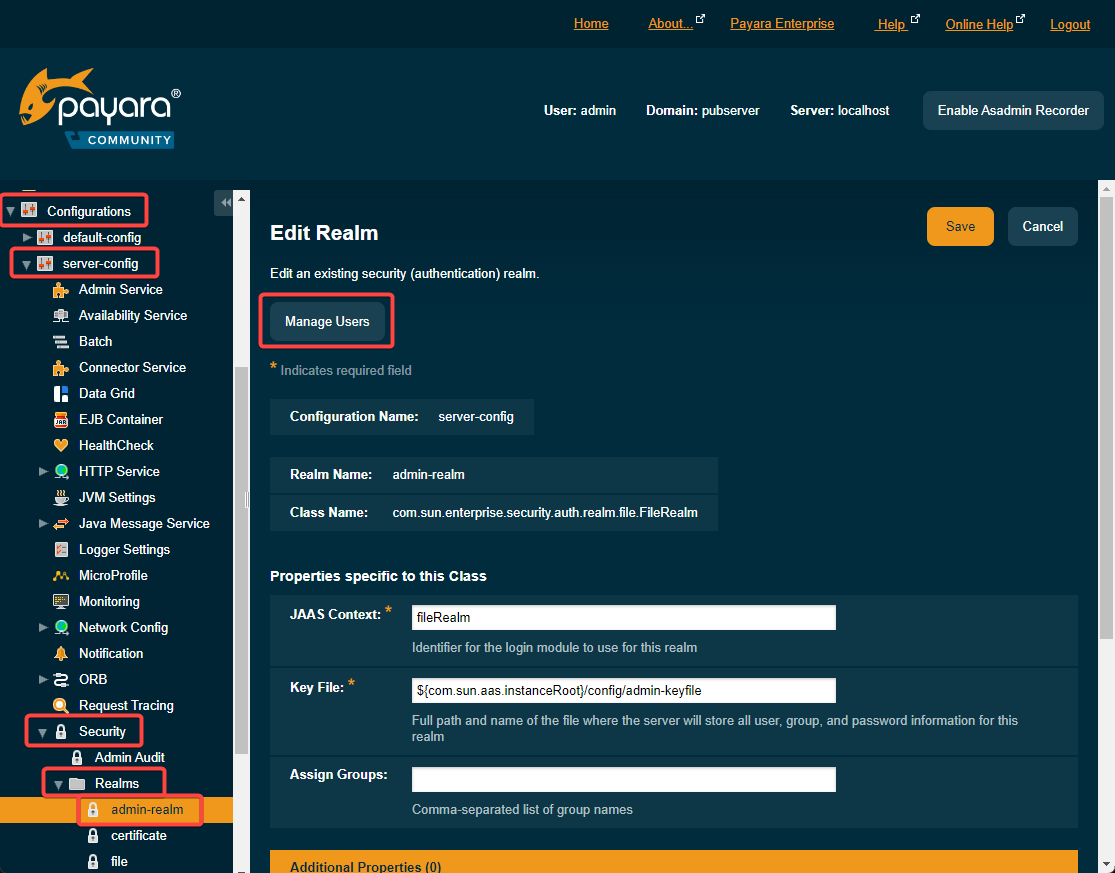
You will see a list of users and can add more users as you wish.

10 Hiding Database Passwords in domain.xml
Database connection pools are typically configured with a user and a password. These passwords are stored in clear text in the domain.xml file of Payara. If this violates your security policy, you can store them cryptographically.
Go to: WebConsole > Domain > Password Aliases
Create a password alias like in the below screenshot.
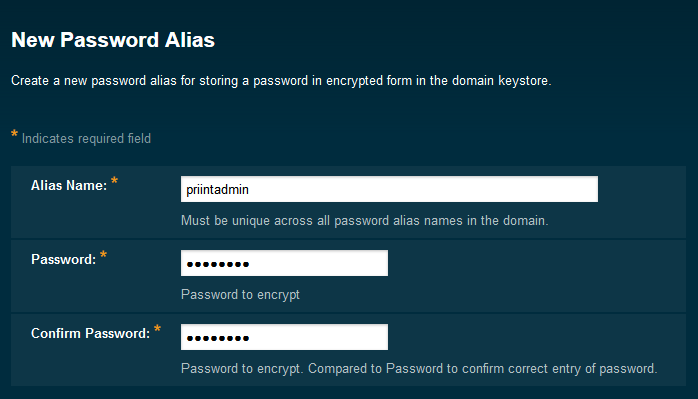
To use the alias, go to the JDBC Connection Pool configuration and edit the additional properties of the related pools like in the screenshot below:
For a password alias named priintadmin, set the password as ${alias=priintadmin}.

Payara will resolve the passwords during runtime from its internal cryptic password store.
11 Running in secure mode
Access to admin console is restricted to localhost if you do not use secure admin, i.e. run web console via HTTPS. To enable secure admin:
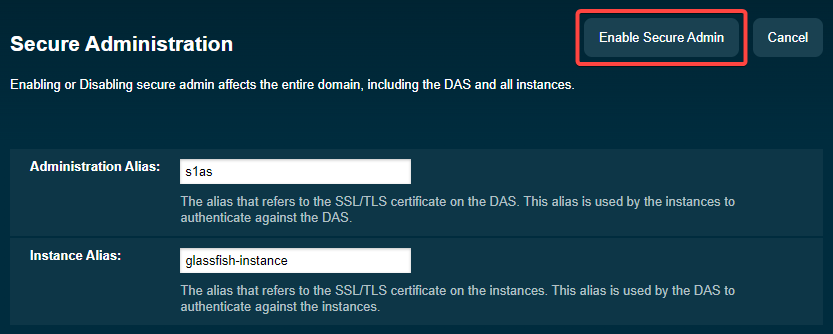
Go to: WebConsole > Domain > Secure Administration
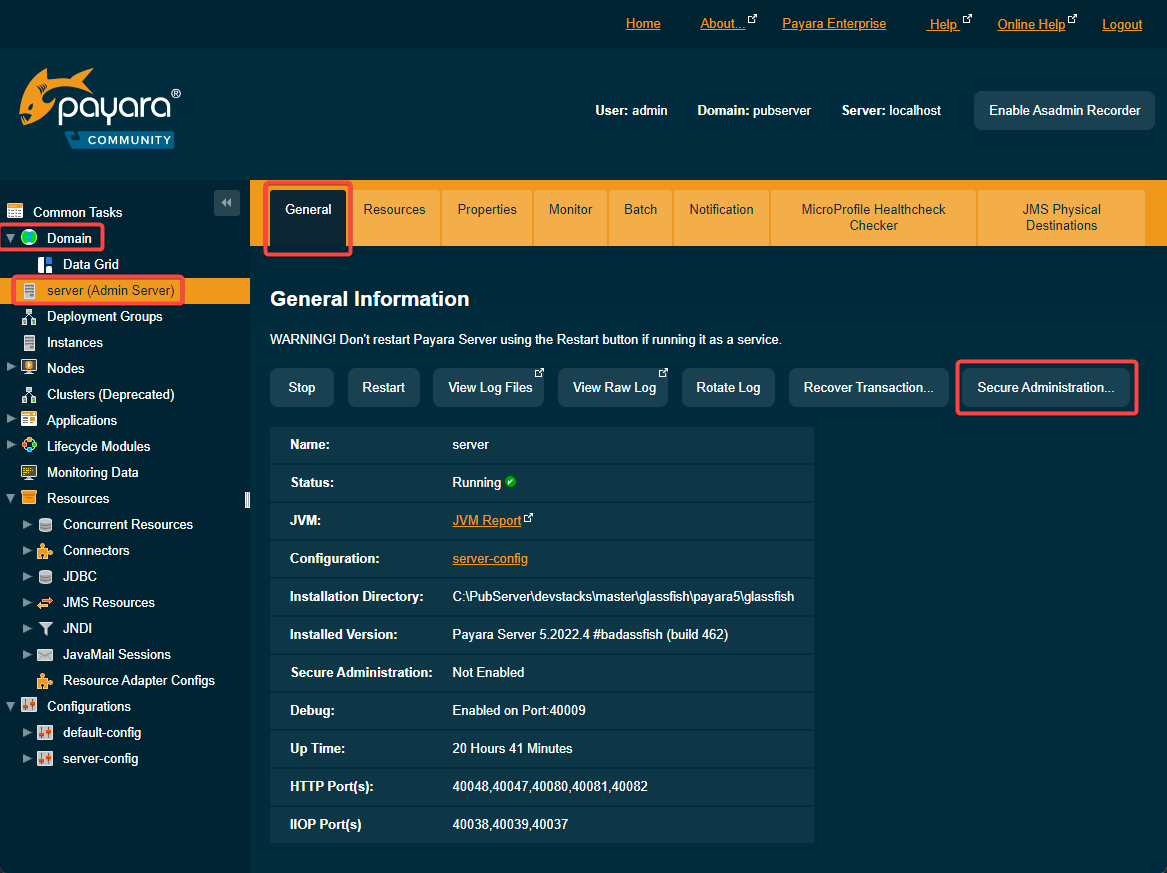
Enable secure admin. Restart the server to activate the setting.
12 Using secure connection for publishing server
To establish a secure connection SSL certificate for publishing server, it must be created, signed, and imported. If the certificate is not signed by a public and trusted Certification Authority (CA), the certificate must be rolled out manually to the clients. Generally we have to go thru 4 steps:
• Create a certificate
• Sign the certificate
• Import a certificate into publishing server
• Roll-out the server certificate to the clients
12.1 Publishing server
Publishing Server is setup on Payara as application server. Installed certificate is needed for pubserver to act as a HTTPS server to send data to clients like web browser or comet plug-ins.
12.1.1 Create a certificate.
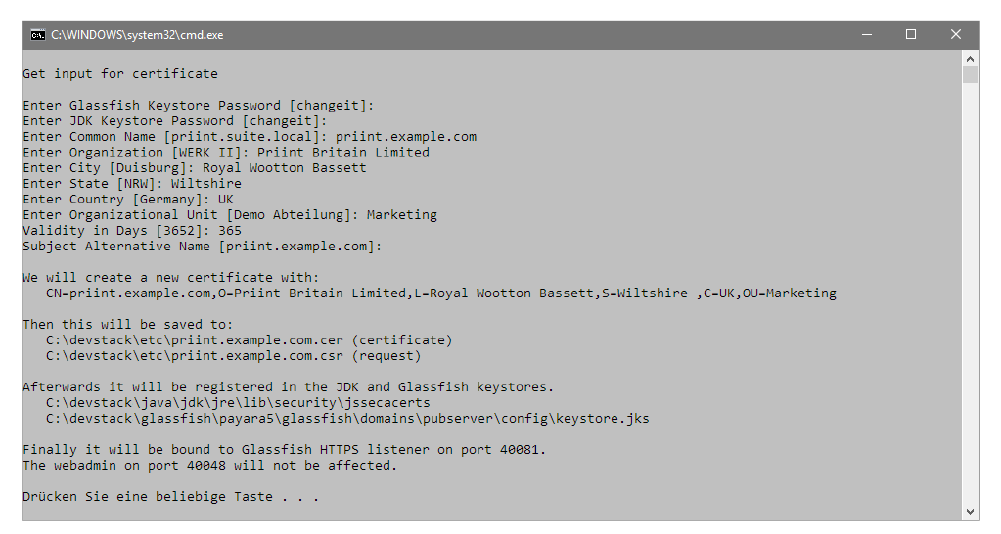
The publishing server distribution contains certificate.create.bat script can be found in:
<installdir>\\etc. and must be called from that directory.
The script creates a new server key in the Payara trust store interactively. It also creates a certificate signing request for that key together with a self-signed certificate for temporary use.
Syntax
<installdir>\\etc\\certificate.create.bat
If you run the script, you will be interactively prompted for the data necessary for creating the server key and certificate. As common name (CN), enter the domain name that will be used to access the service from remote. You will get a summary of the planned actions before they are executed. Please inspect the settings carefully. Wrong or misspelled information will be stamped into the certificate and cannot be changed later.
If you continue, the key and certificate will be created and saved to file and to the key stores of Java and Payara. Existing certificates will be overwritten.
First step after creating these files is move them to a safe – probably encrypted - place for backup.
12.1.2 Sign the certificate.
The previous step results in a csr file (certificate signing request). This will be used by the certification authority (CA) to produce a signed certificate. The detailed process depends on the chosen authority. Please read their documentation. To use the self-signed certificate, you must roll-out the <CN>.cer file to the clients. A description is given for each client in the “Clients” section of this documentation.
12.1.3 Import the (signed) certificate into publishing server.
To handle certificates in server Payara, you will need to use the Java keytool or an alternative tool. Keytool is a command line tool delivered as part of the JDK, and it is a part of the publishing server base package.
12.1.3.1 Importing a Certificate into Key Store
Syntax:
<InstallDir>\\java\\jdk\\bin\\keytool
\-keystore <GlassfishDomainPath>\\config\\keystore.jks
\-alias <Alias>
\-file <CertificateFile>
\-importcert
Parameters:
| <InstallDir> | Installation directory of publishing server, e.g. “c:\pubserver” |
| <GlassfishDomainPath> | Path to GlassfishDomain, e.g. “c:\pubserver\glassfish\payara5\glassfish\domains\pubserver” |
| <Alias> | The name for the certificate as used for import. If you use the certificate.add.bat script, this is identical to the common name |
12.1.3.2 Importing a Certificate into Trust Store
Add a certificate to the list of trusted certificates in Glassfish. Useful for connections to external services as used by RestConnector, IPIMConnector or Cloud Authentication
Syntax
<InstallDir>\\java\\jdk\\bin\\keytool
\-keystore <GlassfishDomainPath>\\config\\cacerts.jks
\-alias <Alias>
\-file <CertificateFile>
\-importcert
Parameters:
| <InstallDir> | Installation directory of publishing server, e.g. “c:\pubserver” |
| <GlassfishDomainPath> | Path to GlassfishDomain, e.g. “c:\pubserver\glassfish\payara5\glassfish\domains\pubserver” |
| <Alias> | The name for the certificate as used for import. If you use the certificate.add.bat script, this is identical to the common name <CN> of the certificate. |
12.1.4 Securing Payara Server
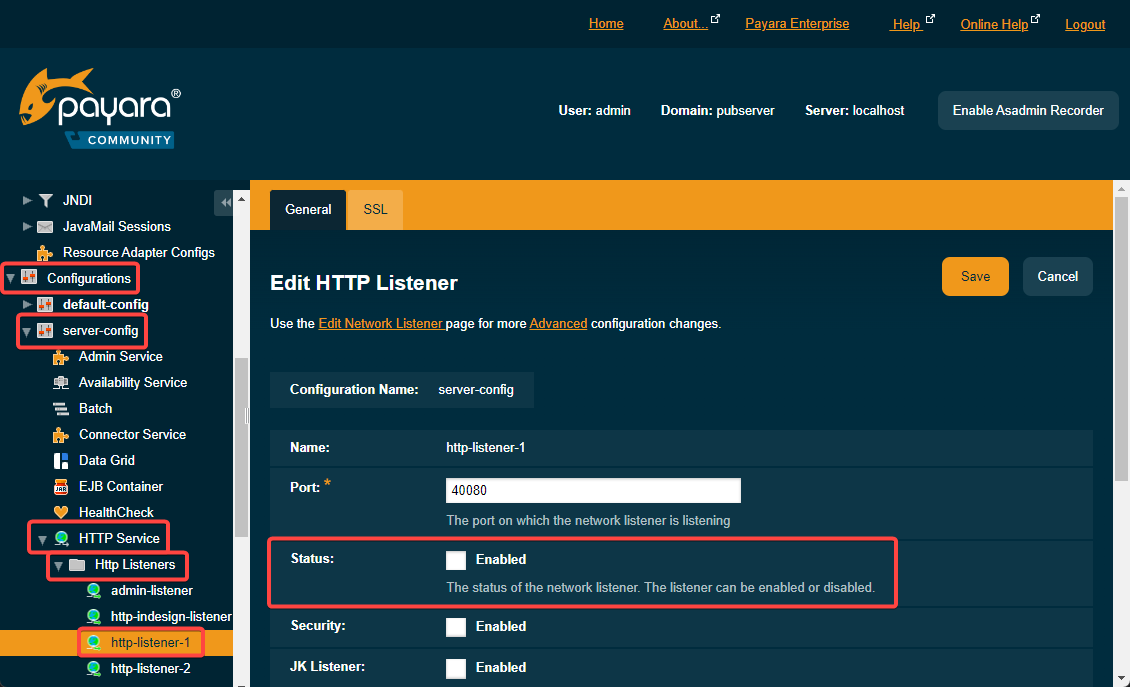
12.1.4.1 Disabling unsecure http-listener-1 in application server
The screenshot below shows where to find the “enabled” status in Glassfish/Payara administration. Uncheck the “enabled” checkbox and save. No restart needed.
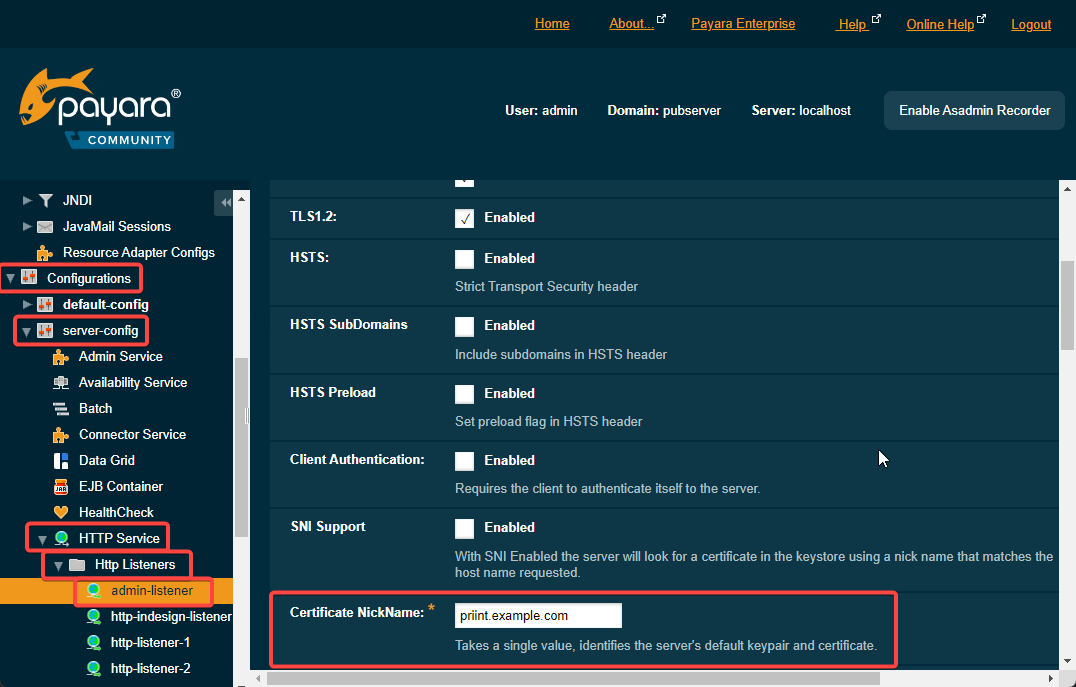
12.1.4.2 Changing the certificate nickname for the “admin-listener”
The screenshot below shows where to find the SSL options for the “admin-listener” in the Glassfish/Payara administration. The default nick name is “s1as”. Change to the same alias that was used for “http-listener-2” and save. No restart needed. If the certificate.create.bat script was used to create the certificate, the name will be the common name (CN) of the certificate.
For more detailed documentation about application server and clients securing please see the document:
13 TimerPool
In case of many workflow jobs, we need to reconfigure Timer JDBC Connection Pool. The reason for this is that DerbyDB used as default database for EJB Timers is not stable and can be corrupted. A good solution for this problem is to switch to regular database MySQL, MSSQL or Oracle.
The procedure of switching to another database system is easy. The developers of the application server prepared database scripts. You can migrate to the new database in 3 simple steps:
- Execute the sql script from
<installdir>\\glassfish\\payara5\\glassfish\\lib\\install\\databasesfolder for your database (E.g.: MySQL, MSSQL, Oracle)
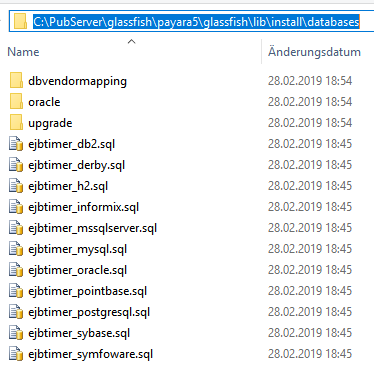
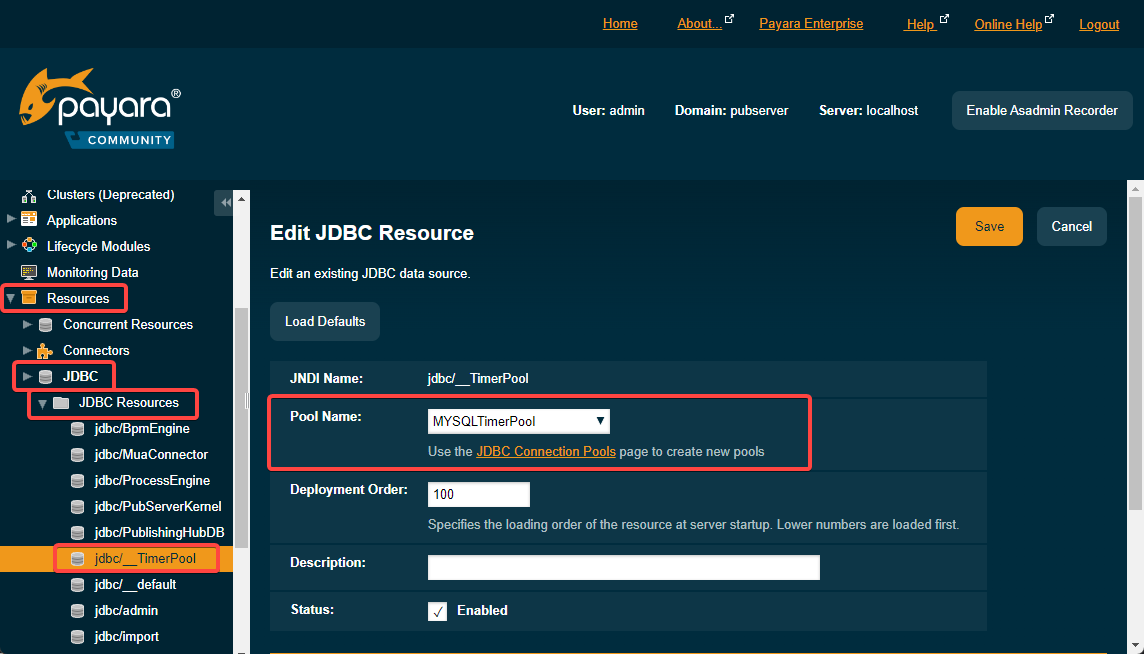
- Create a new JDBC Connection pool example: MYSQLTimerPool

- Switch “jdbc/__TimerPool” JDBC Resource to the new pool

14 JDBC Connection Properties
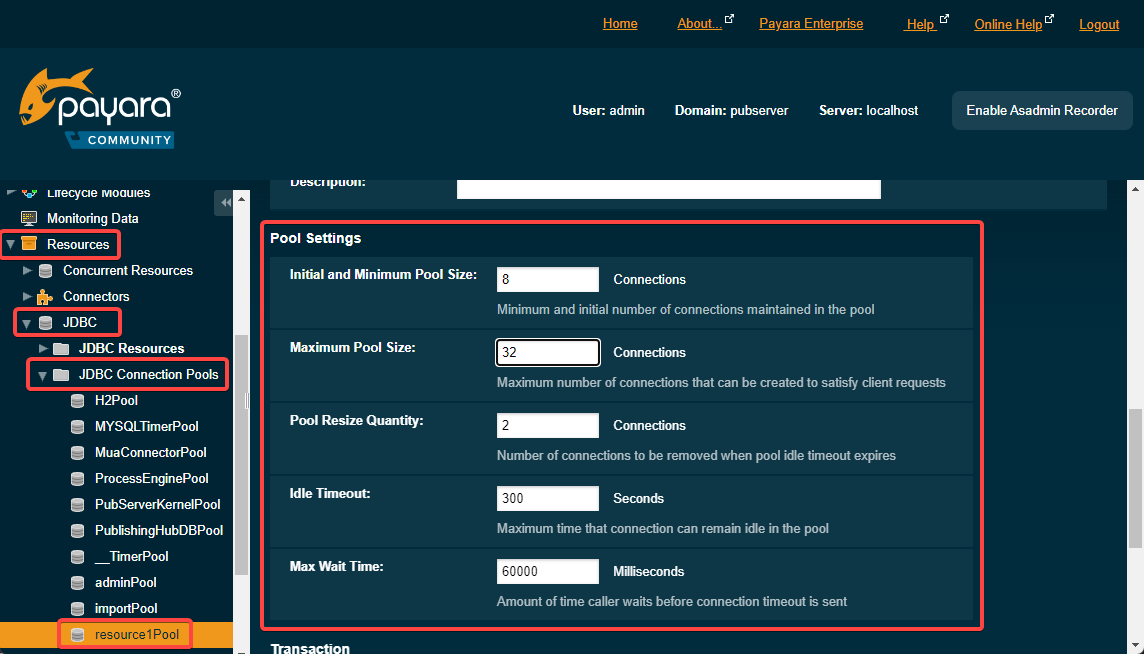
14.1 Connection Pool Sizing
Those settings should be well-balanced and adjusted to individual needs. Advantages and disadvantages of setting those values to low or to high can be found below.
| Connection pool | Pros | Cons |
| Small Connection pool | Faster access on the connection table. | May not have enough connections to satisfy requests.Requests may spend more time in the queue. |
| Large Connection pool | More connections to fulfill requests.Requests will spend less (or no) time in the queue. | Slower access on the connection table. |
To change values of those settings, we can use the Web admin console
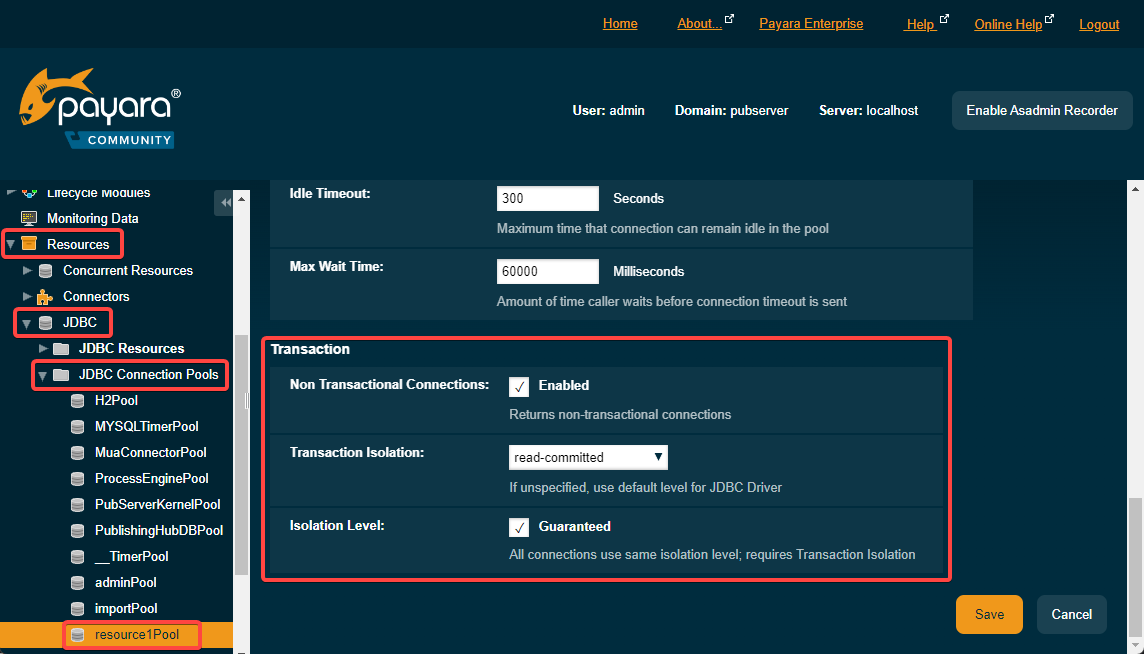
14.2 Using Non-Transactional Connections
Check the Non-Transactional Connections box on the New JDBC Connection Pool or Edit Connection Pool page in the Administration Console. The default is unchecked. For more information, click the Help button in the Administration Console
Typically, a connection is enlisted in the context of the transaction in which a getConnection call is invoked. However, a non-transactional connection is not enlisted in a transaction context even if a transaction is in progress.
The main advantage of using non-transactional connections is that the overhead incurred in enlisting and delisting connections in transaction contexts is avoided. However, use such connections carefully. For example, if a non-transactional connection is used to query the database while a transaction that modifies the database is in progress, the query retrieves the unmodified data in the database. This is because the in-progress transaction hasn’t been committed. For another example, if a non-transactional connection modifies the database and a transaction that is running simultaneously rolls back, the changes made by the non-transactional connection are not rolled back.
Here is a typical use case for a non-transactional connection: a component that is updating a database in a transaction context spanning over several iterations of a loop can refresh cached data by using a non-transactional connection to read the data before the transaction commits.
15 Log File Configuration
Generally we can configure:
- parameters of log file: the size of the logfile and how often rotation of file occurs,
- content of logfile: log level parameter (when entry occurs) and entry format (how entry looks like)
Where configuration is done depends on the configured component.
- for Payara built in components we have the file
<domain>/config/logging.properties, - for individual Pubserver log configuration we have
<domain>/config/logback.xml
15.1 Logging properties
The file can be found in <domain>/config/logging.properties and contains general log file settings and log levels for Payara built in components.
15.2 Web Console
The settings from logging.properties can be set in the file or from the Web console.
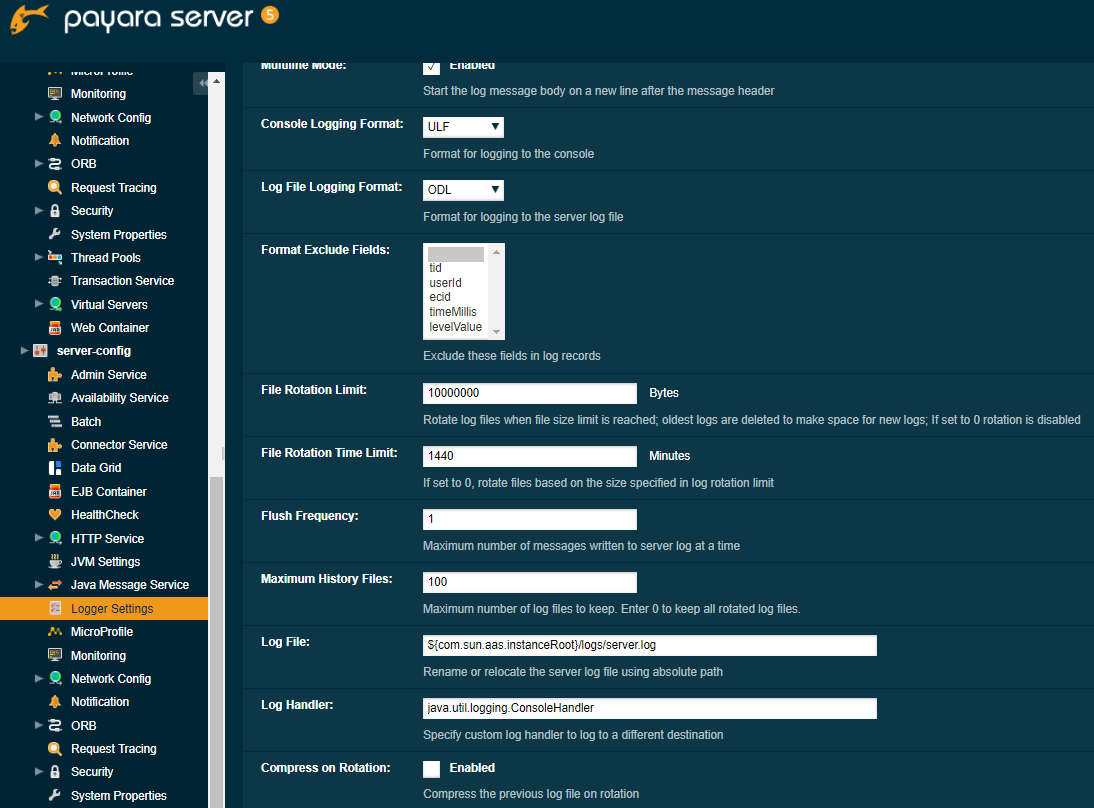
Most often used general log file settings.
| Field | Default Value | Comment |
| File Rotation Limit | 8000000 | WebConsole > Configurations > server-config > Logger SettingsDefault is 8 MB until rotation. |
| File Rotation Time Limit | 0 | If set to 0 (default), this means that File Rotation Limit is active, otherwise files will be rotated related to the time in minutes given in this settings. E.g. 1440 for 1 day. |
| Default Return Address | admin@127.0.0.1 | E-mail address of the default user |
| Default User | admin | User name to provide when connecting to a mail server; must contain only alphanumeric, underscore, dash, or dot characters. |
You can also set the log level for Payara components in the console
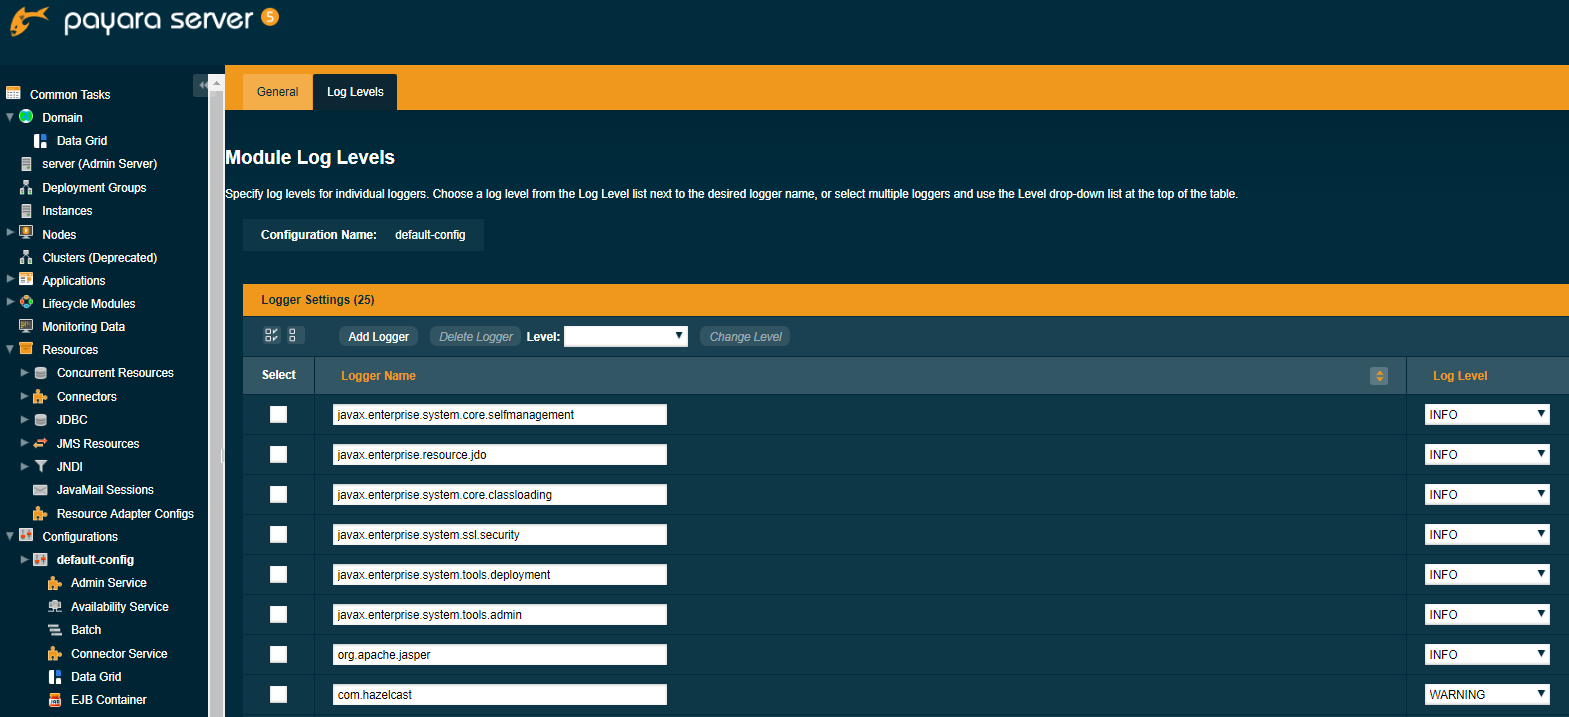
15.3 Configuring individual loggers
Do not use WebConsole > Configurations > server-config > Logger Settings > Log Levels for this task. You can only configure the build-in Payara packages this way. You cannot configure the publishing server related packages here. Please use <domain>/config/logback.xml file to configure individual loggers.
Example 1
Lets assume that we have written new datamapping plugin and we want to test it. We would like to have ALL logs from TabeDataMapping class and only WARNING log level for the rest. We can set root level to WARN and create additional logger for TabeDataMapping class with log level ALL. We use STDOUT appender so it will affect the main log file
<?xml version="1.0" encoding="UTF-8"?>
<configuration debug="true" scan="true" scanPeriod="60 seconds">
    <appender name="STDOUT" class="ch.qos.logback.core.ConsoleAppender">
        <encoder>
            <pattern>%d{HH:mm:ss.SSS}|%thread|%-5level|%logger{48}|%X{HOST}|%X{SESSION}|%X{USER}|%X{REQUEST}|%msg</pattern>
        </encoder>
    </appender>
    <logger name="com.priint.pubserver.plugins.datamapping.examples.tablefromkeyvalues.TableDataMapping" level="ALL" additivity="false">
        <appender-ref ref="STDOUT"/>
    </logger>
    <root level="WARN">
        <appender-ref ref="STDOUT"/>
    </root>
</configuration>
Example 2
We want to have all log entries from the newly created datamapping method in a separate log file. To do this, we should create a new appender “File-Appender” and assign it to the logger which creates entries for our TabeDataMapping class. Restart is not needed because we have " scan="true" scanPeriod="60 seconds" parameters set so changes in config file will be detected
<?xml version="1.0" encoding="UTF-8"?>
<configuration debug="true" scan="true" scanPeriod="60 seconds">
    <appender name="STDOUT" class="ch.qos.logback.core.ConsoleAppender">
        <encoder>
            <pattern>%d{HH:mm:ss.SSS}|%thread|%-5level|%logger{48}|%X{HOST}|%X{SESSION}|%X{USER}|%X{REQUEST}|%msg</pattern>
        </encoder>
    </appender>
    <appender name="File-Appender" class="ch.qos.logback.core.FileAppender">
        <file>C:devstackbranch_415glassfishpayara5glassfishdomainspubserverlogsalternative.log</file>
        <encoder>
            <pattern>%d{HH:mm:ss.SSS}|%thread|%5level|%logger{48}|%X{HOST}|%X{SESSION}|%X{USER}|%X{REQUEST}|%msg</pattern>
            <outputPatternAsHeader>true</outputPatternAsHeader>
        </encoder>
    </appender>
    <logger name="com.priint.pubserver.plugins.datamapping.examples.tablefromkeyvalues.TableDataMapping" level="ALL" additivity="false">
        <appender-ref ref="File-Appender"/>
    </logger>
    <root level="DEBUG">
        <appender-ref ref="STDOUT"/>
    </root>
</configuration>
15.4 Troubleshooting
15.4.1 Logging
If you have problems that logback suddenly stops logging to server.log, try to add
-DlogbackDisableServletContainerInitializer=true
to payara server properties.
16 Payara Server 5 vs Glassfish 5
Source: https://info.payara.fish/migrate-from-glassfish-to-payara-server
| Feature | GlassFish 5.x | Payara Server |
|---|---|---|
| License | Open Source | Open Source |
| Release frequency | Irregular | Quarterly |
| Releases in 2017 | 2 | 22: 4 community stream, 12 stability stream, 6 feature stream |
| Patch releases | For versions < 4.0. only | Monthly for support customers Quarterly for community |
| Security fixes | Infrequent | Instant emergency & backported fixes for support customers |
| Production support | ✗ | ✓ |
| Migration & Project Support | ✗ | ✓ |
| Component Upgrades (e.g. Tyrus, Mojarra) | Irregular | Quarterly |
| Supported IDEs | Eclipse Netbeans IntelliJ IDEA | Eclipse Netbeans IntelliJ IDEA |
| Caching tools | JCache, Domain Data Grid, Payara Scales (additional cost) | |
| Automatic Clustering | ✗ | ✓ via Hazelcast |
| Asadmin command recorder | ✗ | ✓ |
| Slow SQL logging | ✗ | ✓ |
| Healthcheck service | ✗ | ✓ |
| Request tracing | ✗ | ✓ |
| Monitoring logging | ✗ | ✓ |
| Microservices distribution | ✗ | ✓ Payara Micro |
| MicroProfile support | Compatible with MicroProfile 1.2 | |
| Docker support | Community provided | Official images |
| IBM JDK release | ✗ | ✓ Payara Blue |
| HTTP & HTTPS port auto-binding | ✗ | ✓ (Payara Micro only) |
| Generate Uber JAR | ✗ | ✓ (Payara Micro only) |
| Production-tuned domain template | ✗ | ✓ |
| Upgrade tool | ✓ | ✗ Coming soon |
| Java EE certified | ✓ | ✗ |
16.1 Updates
Payara 5 community edition will receive more updates now. If any bug-fix is necessary, it will be installed by the pubserver installer/updater process. Each update package contains a glassfish/modules folder containing fixes for Payara modules that have been approved by WERK II.