ISON Eclipse Plug-In User Guide
Introduction
An important module of the priint:suite kernel is the repository, where all configurations are stored. Currently Apache Jackrabbit is used, an implementation of the Content Repository for Java Technology API.
Examples for configurations are definitions of entity models, all parts of comet projects or configurations of custom plug-ins implemented for specific projects.
ison provides editors and wizards for changing existing configurations and adding new configurations to the repository. It uses the ison SOAP service, an internal API of the priint:suite especially designed for ison. ison is an Eclipse plug-in.
In this document the user can learn how to work with ison. Here you will not find an explanation for every editor and every field, but the general aspects so you can use every ison editor.
Why did we call this application ison? The comet ISON visited the solar system at the time we were developing ison. See Wikipedia about it here.
Prerequisites
The information in the document refers to priint:suite 4.1.6 and all later versions.
Installation and Update
The pubserver base package contains an Eclipse with all necessary extensions for ison installed. If you install a pubserver you can use the included Eclipse with ison. Just do an ison update.
Updating ison is done best using the command Help>Install New Software… in the Eclipse Menu bar.
Every pubserver is automatically an Eclipse Update Site for ison. Add your pubserver once by clicking button Add… and fill this dialog:

Please use the IP and port of your pubserver and a well-chosen name.
Eclipse will show any available update in the dialog. Set the check mark before the new ison version. Make sure, that the option ‘Contact all update sites during install to find required software’ is NOT checked. Click Next >. You will be informed that your request has been modified. An update (not an installation) will be performed. Click Next >.
Review the Licenses displayed on the next screen. Accept them by changing the selection below the license text to “I accept the terms of the license agreement”. Click Finish.
The Security Warning appearing next tells you, that ison is not signed by Eclipse. Continue nevertheless by clicking Install anyway. The next dialog will finalize the update by restarting Eclipse. Click Restart Now. Now your ison is ready for usage again.
You can also install ison into an Eclipse you installed from other sources.
Install Eclipse, using a Java EE variant. Add the following to your Eclipse:
- C/C++ Development Tools (Provider: Eclipse CDT)
- Payara Tools if you want to create custom pubserver plug-ins (Provider: Eclipse.org - Payara Tools)
The archive IsonEclipsePlugins_4n.m.xxxx.ryyyyy.jar can be found in PubServer_Install_Update_4.n.m.x/glassfish/domains/pubserver/deploy/IsonEclipsePlugins.zip/plugins.
Put it into the dropins folder of your Eclipse.
Start Eclipse.
ison Projects
ison is used to change the configuration files inside a pubserver repository. Therefore, ison must be connected to a pubserver. We call this connection an ison project. Do not confuse it with a comet project. In your ison you might have connections to several pubservers. If you delete one of these ison projects only the connection properties (address, port, user and password) are deleted. The pubserver configuration is not changed!
To create a new ison project click File>New>Create a new Ison Project, if available. If not, click File>New>Other…, enter ison in the search field and then select ‘Create a new Ison Project’.

Fill in the following parameters:
- Project name: the name is also used as folder name, mind the used characters.
- Address: IP address or host name where the pubserver is hosted.
- Port of the pubserver. As default HTTPS is chosen. We advise not to change that.
- User: as default user admin is entered already. We advise to create a pubserver user for every person working on it. If you need to find out who changed a specific configuration it is helpful if not the whole team uses the login admin. So, enter your own user here. Creating new users is done in the web application of priint:suite, not in ison!
- Password: password of the user entered above.
- Connection timeout: usually no change is needed. If your connection breaks down often, because your pubserver is under very heavy load increase this timeout.
- Request timeout: usually no change is needed. If your connection breaks down often, because your pubserver is under very heavy load increase this timeout.
Perspectives
ison includes three perspectives:
- Ison: you work on entity models, comet projects and data providers.
- Ison – Administration: Publishing Server Explorer and the very important Repository Explorer, Session and User View.
- Ison – Testing: Data Provider Tester and Configuration Test
As usual in Eclipse you can organize the ison views yourself as you like it.
Explorers, Editors and Wizards
Explorers show you the repository or a part of it. Editors are used to change configuration files. Wizards are used to create configuration files.
Explorers display for every connected pubserver a special part and aspect of the repository. For example, the Entity Explorer shows all entities organized in entity models. The Comet Explorer shows the comet projects and all configurations in them. The Data Provider Explorer shows all data providers defined in a pubserver. The Repository Explorer shows all configurations with their folder like structure in the repository.
| Explorer Name | Purpose | Default Perspective |
| Entity Explorer | Entity Models: creating, changing and testing. | Ison |
| Comet Explorer | Comet Projects: creating and changing them and every aspect of them. | Ison |
| Data Provider Explorer | Data Providers: creating and changing. | Ison |
| Publishing Server Explorer | Pubserver Plug-Ins: see the deployed plug-ins, their registered methods and configuration files. | Ison - Administration |
| Repository Explorer | Creating, changing and deleting all files and folders of the repository. | Ison - Administration |
Every configuration file is a XML file. You can edit it with a XML editor. In the Repository Explorer you can see the structure of the repository, like a file system with folders and files. If you open a configuration file via the Repository Explorer, a common XML editor will be used.
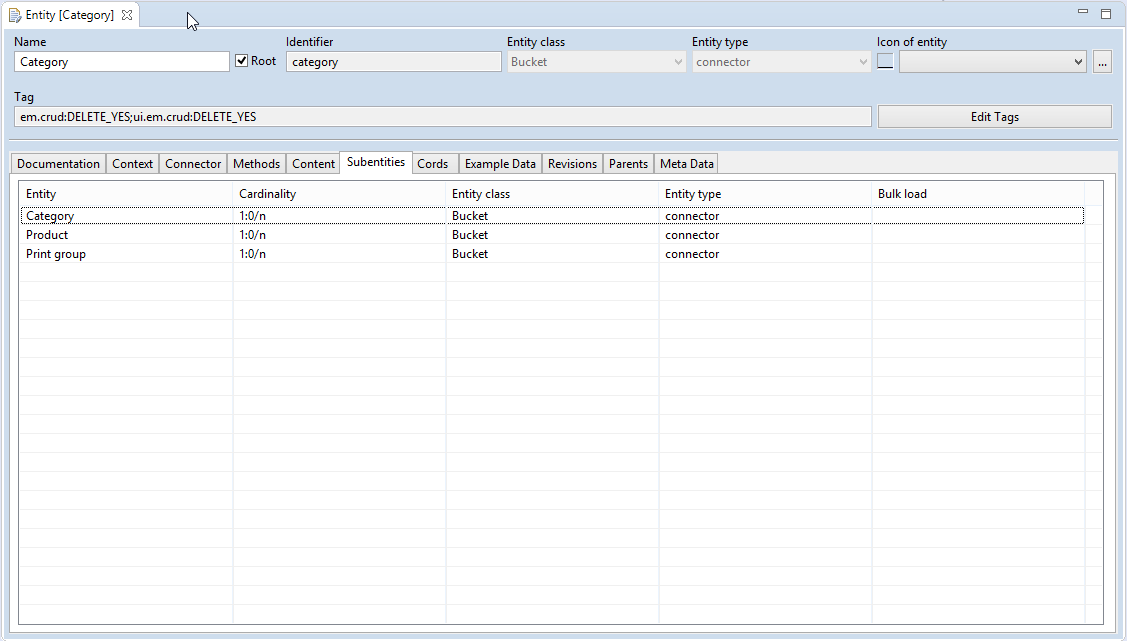
Editing XML manually is possible but troublesome and dangerous. Therefore, for configuration file types changed frequently, ison provides special form editors. See the Entity editor as example:
Generally, each Explorer (except the Repository Explorer) opens its configuration files in specialized editors. Use the specialized editor whenever possible. If you must edit a configuration file type without special editor, you can do it via the Repository Explorer, even if a specialized editor exists.
Wizards are provided for different actions. Creating a new configuration file is most often done via wizard. You start the Creation wizard via content menu command New… on the correspondent Explorer node. In the Repository Explorer you can also create new folders.
Check-in and Check-out
The Jackrabbit repository supports versioning and locking of its content. If you want to change a configuration file, you first must do a check-out. This is only possible if no other user locked the file. It will then lock the file until you do a check-in or unlock.
In ison you can open every file in every explorer by a double-click. This will open the configuration file in read-only mode (not locking it for other users).
If the file should be changed, choose the command Edit from its content menu:
![]()
Ison will lock the file for you, download it to a local folder and open an editor.
In the Explorer an adornment on the file symbol will show its state. The pen denotes an open editor. The star denotes a local change to the file.
Your local change is uploaded to the pubserver with the content command Check in. You must save in the editor before this is possible.
In the first versions of ison it was necessary to close the editor before check in. This is not needed anymore.
You can check in more than one file at a time. Select all the files using Shift or Ctr-click. Several explorer nodes contain the command Check in in their context menu. For checking in all your local changes for a pubserver, choose Check in on the pubserver node directly.
A dialog displaying all files for check-in appears:
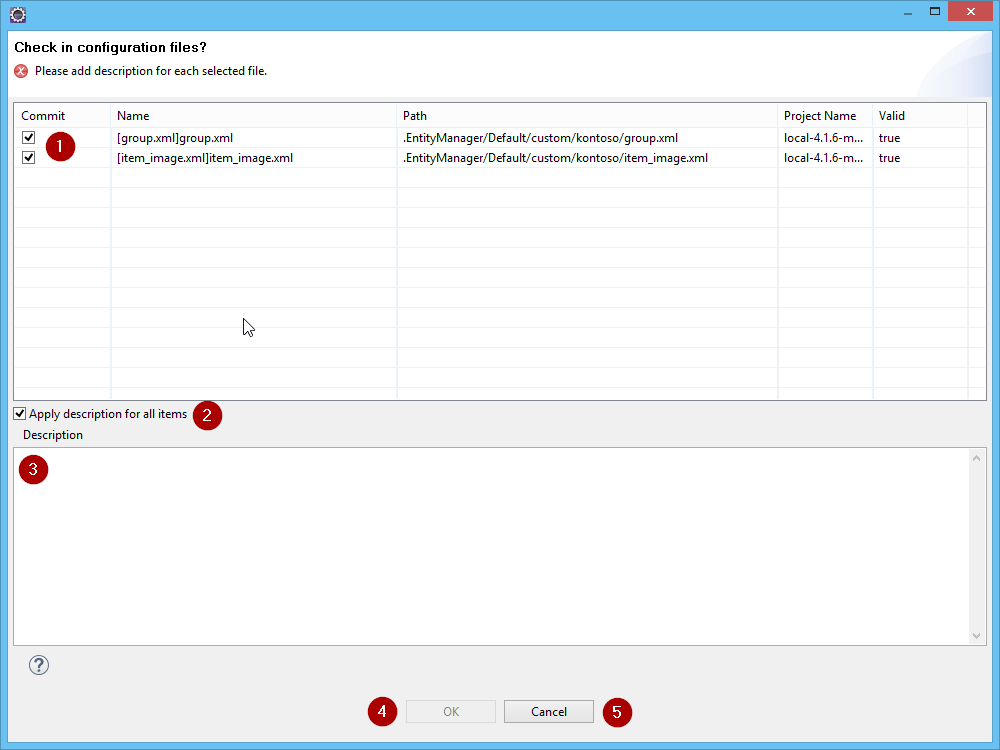
The checkbox column Commit (1) can be used to exclude files from the Check in. If a configuration file is found not to be valid (for example because of invalid XML) or the file is locked on the pubserver, its commit checkbox is not set.
For every version of a file a description (3) is saved in the repository. We strongly suggest using this feature well.
If you check in several files in one step, the checkbox (2) controls whether to use the same description for all files or a specific one for each file.
After entering a description for every check-in, the OK button (4) is enabled and you can execute the check-in. The Cancel button (5) cancels the operation.
If you want to unlock a file without uploading your local changes, use the context command Unlock. It is only available if no editor is open for the file. This will delete the local changes.
Repository Structure
The pubserver repository is hierarchical organized. Every pubserver plug-in can own a folder in it. The folder name is always the mapped name of the plug-in. There is one special folder globals for configuration not belonging to a single plug-in.
The next level folder is always the tenant. Currently only one tenant is supported. The tenant name can be set during installation. The default tenant is Default. Older publishing servers use WerkII as tenant name. The publishing server will allow for several tenants in future. If several tenants are in use it is possible to create one tenant named custom. If created, all other tenants will inherit the configurations of custom.
For the next level there is a convention: if a plug-in only needs a flat list of configuration files, the folder is named default. Please be aware of the case sensitiveness. The plug-in will get its configuration files during initialization from the Configuration Manager. If the plug-in uses a more complex folder structure, the starting folder is named custom. Then the plug-in is responsible for requesting its configuration files from the repository.
See for example a path for a REST connector configuration: com.priint.pubserver.connector.rest.RestConnector/Default/default/kontoso.xml.
The REST connector uses a flat list of files in its default folder.
The path of a placeholder configuration in a comet project could be:
com.priint.pubserver.comet.config.CometConfiguration/Default/custom/aio/placeholder/268520655.xml.
A Comet Project consists of several different types of configuration files in a complex folder structure in the folder com.priint.pubserver.comet.config.CometConfiguration/<tenant>/custom/<cometProject>.
Internally all repository paths must start with /pubserver/pluginconfig/ before the plug-in folder. In some places you can see the whole path.
Search for XML
In the context menus of Entity, Data Provider, Comet and Repository Explorer there is the command Search for XML. This opens a powerful search dialog:
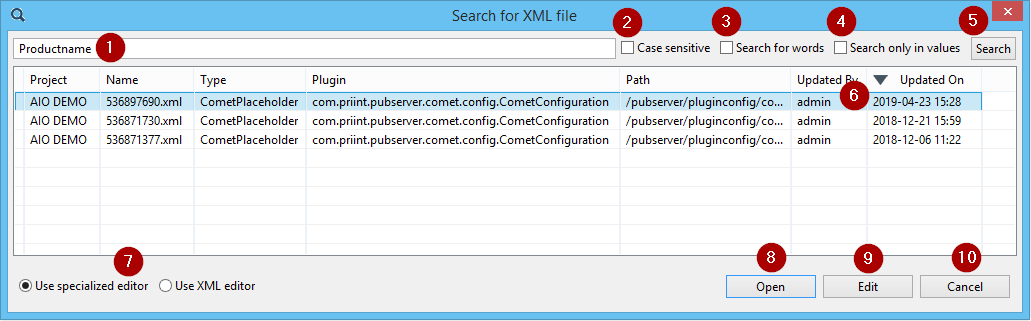
- Text field for the search phrase. The search phrase is compared against the configuration files in the node/folder of the Explorer. The whole XML content is compared, except you select (4).
- Should the search be done case sensitive? Default is case insensitive search.
- Should the phrase be contained as part of a word or as whole word? Default is part of word.
- If checked, do only compare the values of attributes and elements in the XML configuration files, not the attribute and element names.
- Start the search here. (Pressing enter in the text box does the same.)
- The search results are listed in this table. The results can be sorted by all columns. Multi-selection is possible in the results.
- Select here, whether you want the special editor of the explorer or the XML editor, if you open a configuration file.
- Open the selected configuration files in read-only mode, close the dialog.
- Open the selected configuration files for editing, locking them on the server, then close the dialog.
- Close the dialog without opening any configuration file.
Recent XMLs
In the context menus of Entity, Data Provider, Comet and Repository Explorer there is the command Recent XMLs. It provides a search for recently changed configuration files.
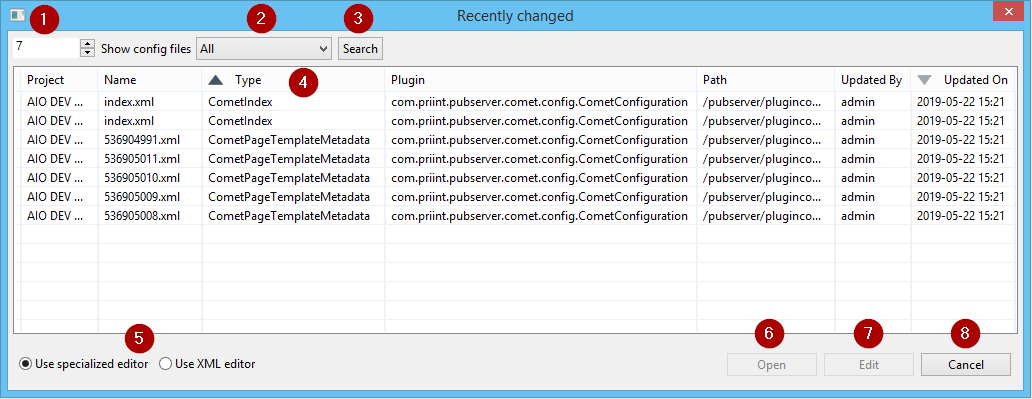
- How many files changed recently should be listed?
- Files changed by which user should be listed. Select All in the drop-down for any user.
- Start the search here. (Pressing enter in the text box does the same.)
- The search results are listed in this table. The results can be sorted by all columns. Multi-selection is possible in the results.
- Select here, whether you want the special editor of the explorer or the XML editor, if you open a configuration file.
- Open the selected configuration files in read-only mode, close the dialog.
- Open the selected configuration files for editing, locking them on the server, then close the dialog.
- Close the dialog without opening any configuration file.
Preferences
In the Eclipse Preferences you will find a section with ison preferences. Open Preferences via Menu Window > Preferences.
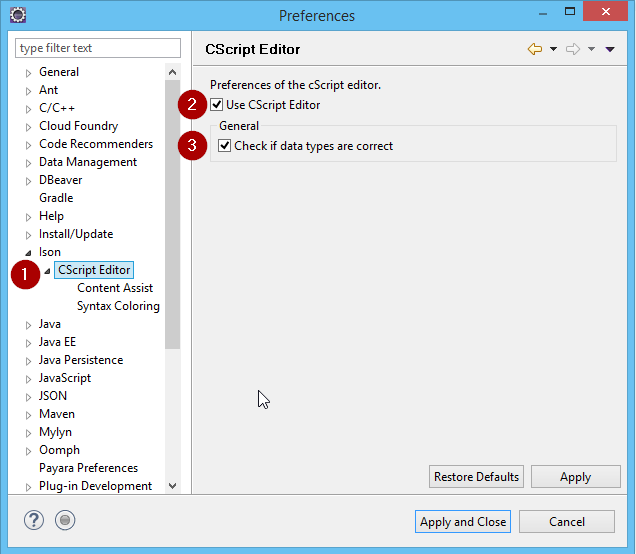
In the left pane select the section Ison. The most important setting concerns the CScript editor. You can decide whether the specialized CScript editor (checkbox checked) should be used for editing CScripts, or a standard text editor (checkbox unchecked). Read the chapter Editing CScripts for the properties of the CScript editor.
Editing CScripts
Many editors for comet project configurations contain a CScript editor.
Here you see an example, a view script for the InDesign Desktop view Productpool.
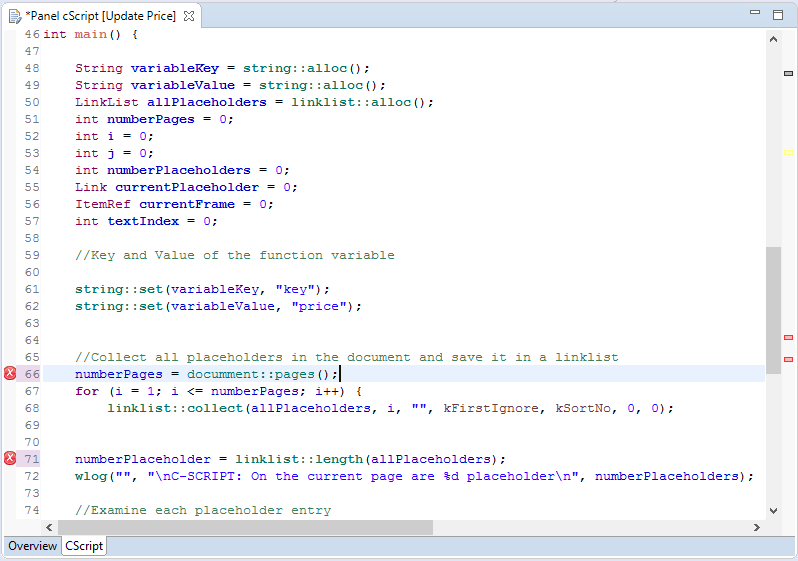
If the specialized CScript editor is enabled (see section Preferences), the following features are available in the editor:
- Syntax highlighting
- Syntax check
- Documentation display for CScript methods
You can see the Syntax highlighting in the screenshot above. Configuring the colors is possible in the Preferences.
The Syntax check shows problems as errors ![]() or warnings
or warnings ![]() in front of the line numbers. If the cursor is above the symbol, a problem description is shown.
in front of the line numbers. If the cursor is above the symbol, a problem description is shown.
Two problems are in the example above:
![]()
Here is a typo in the class name.
![]()
Here is a typo in the variable name.
The editor shows problems also at the right side of the scroll bar. Note the red and grey bars in the image above.
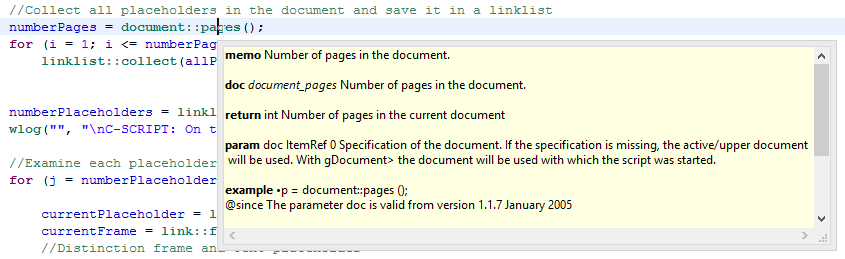
The documentation of the CScript API is also available in the editor. Set the cursor into an API element and shortly wait. A tool tip will display the explanation of the element.
If you are working with the CScript editor, the view Outline will show all functions in the current script. A double click on a function will move the cursor to that function. This is especially handy if working in a script library with many functions.

Custom Variants of Configuration Files
There are several configuration files, which are included in the first installation and updated every time, a pubserver is updated. One example is the file translations.xml in folder com.priint.pubserver.plugins.priintplanner.PriintPlannerPlugin/custom. Sometimes a project needs adjustments to these files. Now how can you keep such adjustments when updating a pubserver? The solution is not updating the file itself, but the custom variant of it. The custom variant is a file in the same folder which is named as the original file with the prefix custom_. So if you would need to change translations.xml, create a file custom_translations.xml in the same folder and do the change there. The pubserver updater will never import custom_ files.
Special Views
History
The view History displays all revisions of the currently selected configuration file. The column Description contains the check-in message.
Double clicking a revision will open it with an XML editor. You can use this to revert changes done since that revision. Copy the content of the revision, open the configuration file in head revision via Repository Explorer for editing and replace the current content with the previous content. Save and check-in.

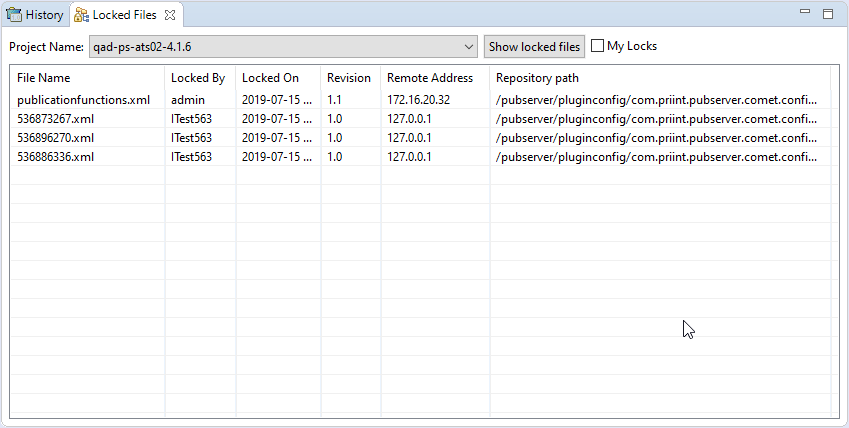
Locked Files
The view Locked Files displays all files locked in a pubserver. Select the ison project in the drop-down and click the button Show locked files. If the check box My locks is checked you will only see the files locked by you.
The context menu of every entry contains the command Unlock. It will unlock the file on the server. The user currently editing the file will get an error message. Use the command only if the lock cannot be removed otherwise.
Session and Trace
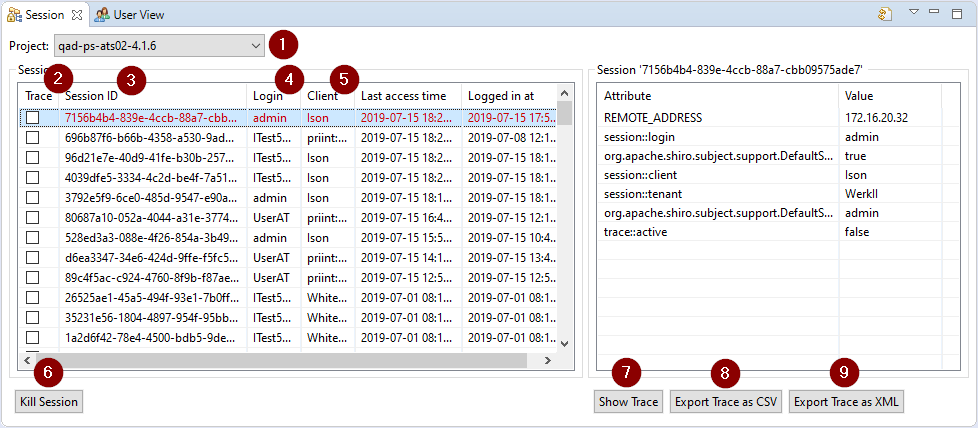
The view Session lists all current sessions on a chosen pubserver (1). The red one is used from the active ison. The right part of the view shows the session attributes of the selected session. The first column (2) shows whether tracing is active for the session. Here you can activate and deactivate tracing. Next columns show session identifier (3), login (4) and client application (5).
The button Kill Session (6) can be used to close any session. Do closing with care since a running application might stop to function correctly if its session is closed.
The button Show Trace (7) will open the view Trace. There you can see all tracing messages created in the session. Use the buttons Export Trace as CSV (8) or Export Trace as XML (9) for working with the tracing messages in another application.
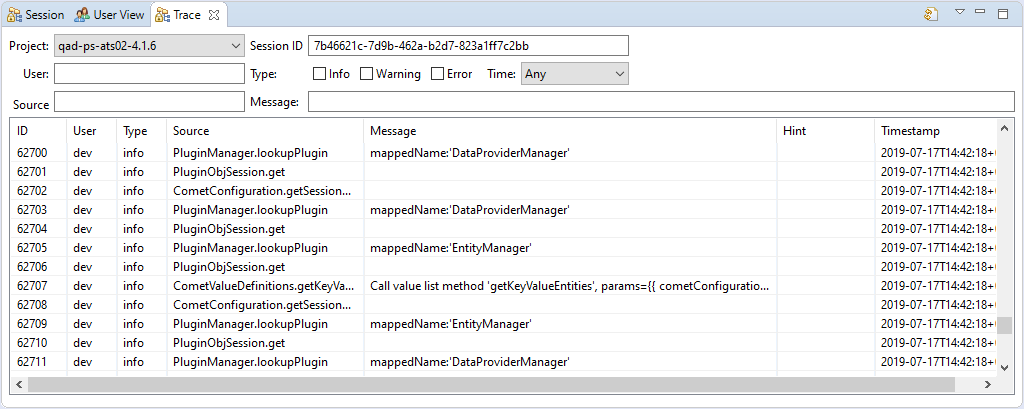
The view Trace shows tracing messages from the executed methods for a selected session. The fields in the upper part can filter the messages.
User View
The User View displays all logins for a selected pubserver. For every pubserver login there is a configuration file in the repository and an entry in the database table comet_admin.serveruser. For changes on logins use the priint:suite panel Admistration>Users.

Special Commands
Entity Explorer: Duplicate Entity Model
The command Duplicate Entity Model is found in the context menu of each entity model in Entity Explorer. In the dialog you must enter an identifier for the new model. In the drop-down Connector : Instance you might select a connector with an instance for the new model. In all new entities the connector given in the original model will be replaced by the selected connector.
The new model will be named with its identifier. You can change the name later.
Entity Explorer: New entity model out of PublishingHubDB
The command New entity model out of PublishingHubDB is found in the context menu of each tenant in Entity Explorer. It analyses the data in a PublishingHubDB and creates a entity model for the data. This is for the rare case that PublishingHubDB data exists without the entity model. This automation is possible since the data structure in PublishingHubDB is exactly the data structure of pubserver entities.
Comet Explorer: Duplicate Project
The command Duplicate Project is found in the context menu of each comet project in Comet Explorer. In the dialog you must enter a project name and a project identifier. You can change the description. The other fields are not changeable.
Comet Explorer: Duplicate Placeholder
The command Duplicate Placeholder is found in the context menu of each placeholder in Comet Explorer. In the dialog you must enter a label/name for the new placeholder. The checkbox Open in editor controls whether the new placeholder is opened for editing immediately or not.
Comet Explorer: New cScript example
Comet Explorer has an entry Script examples in the root level of each pubserver connection. There examples for most script types can be created. If you create a script of such a type, you can select one of the examples as a blueprint. The new script will be a copy of the example.
For creating an new example, open Script examples, and find your script type in the tree below. The command New cScript example is found in the context menu of the script type. Fill the requested fields. If you check Open in editor, you can edit the example script with the help of the CScript editor.
Comet Explorer: Apply predefined metadata
The command Apply predefined metadata is found in the context menu of each page template in Comet Explorer. Page templates and their elements need some specific metadata for the briefing module. For save and easy creating you can prepare sets of metadata. Do this with Repository Explorer: Edit Metadata Predefined Values, see below.
If there is at least one predefined set already, you can apply it to a page template by this command. In the first page of the wizard select the appropriate set. Click Next. Then confirm the change. The page will show page template label and id in red, if your change will overwrite already existing values. After confirmation you need to check-in the page template.
Comet Explorer: Apply predefined metadata for elements
The command Apply predefined metadata for elements is found in the context menu of each page template in Comet Explorer. Page templates and their elements need some specific metadata for the briefing module. For save and easy creating you can prepare sets of metadata. Do this with Repository Explorer: Edit Metadata Predefined Values, see below.
If there is at least one predefined set already for elements, you can apply it to the elements of a page template by this command. In the first page of the wizard select the appropriate set. Click Next. Then confirm the change. The page will show page template label and id in red, if your change will overwrite already existing values. After confirmation you need to check-in the page template.
In the page template editor you can apply predefined metadata to a single element (or some of the elements). Go to the Elements tab and select the element (or some). In the context menu you find the command Apply predefined metadata to page template element.
Publishing Server Explorer: Disconnect from Publishing Server
The command Disconnect from Publishing Server is found in the context menu of each pubserver connection (= ison project) in Publishing Server Explorer. It removes the connection to a pubserver from your ison.
Please note, that every pubserver connection creates a folder in the workspace of Eclipse. The folder is not deleted automatically by disconnecting. If you want to create a new pubserver connection with the same name, please delete the according folder in workspace first.
Publishing Server Explorer: Connection Properties
The command Connection Properties is found in the context menu of each pubserver connection (= ison project) in Publishing Server Explorer. Here you can change all connection properties except the name of the connection.
Repository Explorer: Export and Import
The command Export is found in the context menu of each file and folder in Repository Explorer. The commands Import and Import from zip are found in the context menu of each pubserver connection (= ison project) in Repository Explorer.
With Export one or more configuration files can be exported (the latest version). Select any number and combination of files and folders in Repository Explorer, using Shift and/or Ctr keys. Advice: Only select files and folders from a single pubserver! Then choose Export in the context menu. The following dialog will appear:
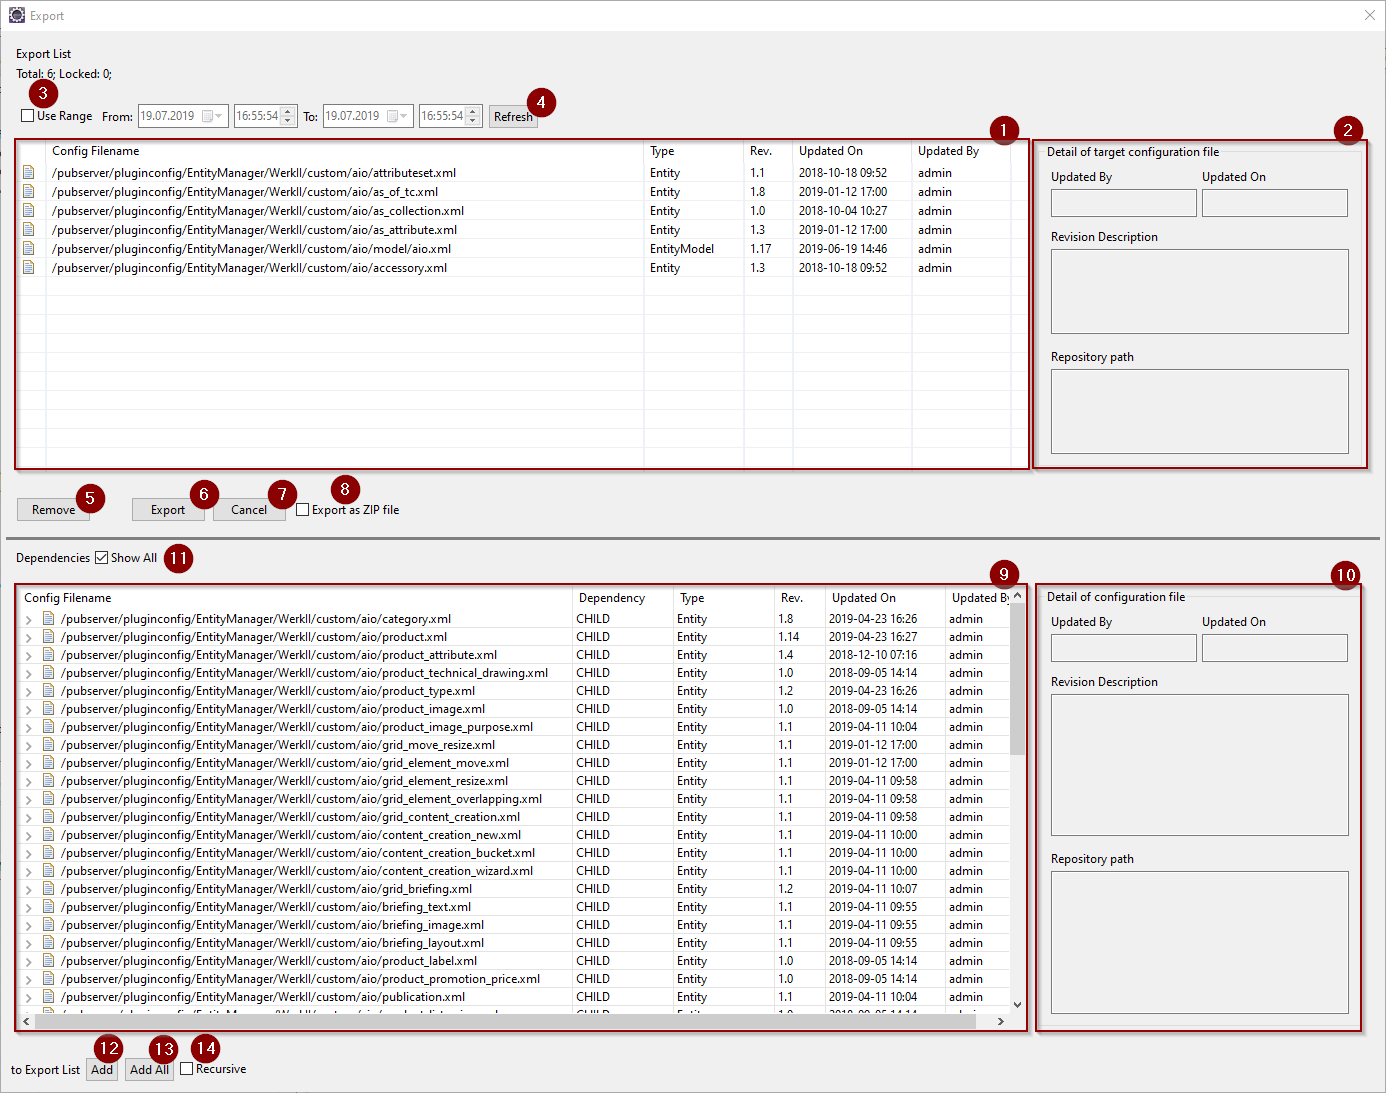
The upper table Export List (1) contains all files you selected either directly or in the selected folders. If you select a file in it, details about the file are displayed in the right panel (2). Checking Use Range (3), giving dates and times From and To and Refresh (4) will filter the configuration files according to their last update.
With Remove (5) you remove a selected file from the list. With Export (6) you finish the selection of files to export. Cancel (7) cancels the export. Checking Export as ZIP file (8) will create a single ZIP file as export result. If not checked, you will get several files and folders. We advice to always create exports as ZIP files.
The lower table Dependencies (9) helps you to find all dependent configuration files. If Show All (11) is set, it lists all dependent files for all files in the Export List. If not set, it only lists the dependent files of the selected files in the Export List. You can add files from the lower list to your export set with Add (12), adding the selected files in the Dependencies table, or Add All (13), adding all files in the Dependencies table. Setting Recursive (14) controls, how the dependencies of the dependent files are handled. If set, these are also added to the Dependencies table.
After clicking Export (6) you are asked for a export directory. In this folder either the ZIP file or a folder structure is created.
If you create a single ZIP, you need the command Import from zip for importing, else the command Import. Both are found on pubserver level in the Repository Explorer. You do not need to know where in the repository structure the import should be placed, because this information is included in the export.
Using Import will ask you for a folder next. It is important to select the correct folder! Do not choose a folder below the main folder of the export. You can recognize the folder by its name. It always starts with date and time and ends with _isonExport. If you select a wrong folder, the import will create configuration files nevertheless, but the pubserver will not use them, because their path in the repository is wrong.
Using Import from zip will ask you for the ZIP file next.
The following dialog lets you select once more which files to import:
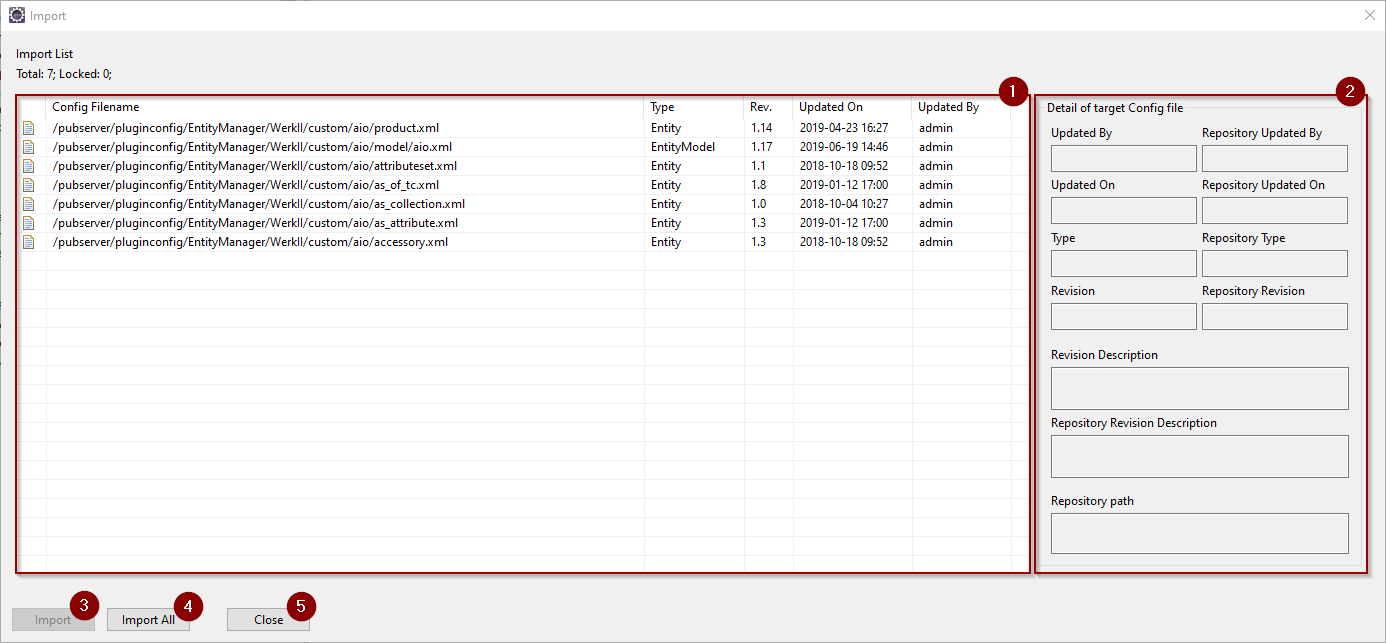
The Import List (1) shows all files found in ZIP or folder structure. If a entry is selected, in (2) details about the files are shown. The details stem from the file metadata.xml. You can import selected entries with Import (3), or import all files with Import All (4). Files you imported are removed from the list. You must close the dialog with Close (5).
The next step for each file import is the usual check-in dialog, compare Check-in for documentation.
Repository Explorer: Import Images
The command Import Images is found in the context menu of each folder in Repository Explorer. It provides a fast way for converting several images into the pubserver configuration file format and uploading them into the repository. Select the folder where the images reside. All images of that folder will be processed. Each image is converted and put into the repository. If the repository folder already contains a file with the same name, that file is replaced.
Repository Explorer: Edit Image
The command Edit Image is found in the context menu of each image in Repository Explorer. It displays the image.
Repository Explorer: Export Image
The command Export Image is found in the context menu of each image in Repository Explorer. It saves the original image in the selected folder.
Repository Explorer: Execute Packaging
The command Execute Packaging is found in the context menu of each package configuration file in Repository Explorer. See documentation here about deployment packages.
Repository Explorer: Edit Metadata Predefined Values
The command Edit Metadata Predefined Values is found in the context menu of each configuration file for predefined metadata in Repository Explorer, in the folder com.priint.pubserver.comet.config.CometConfiguration/<tenant>/custom/<comet project>/pagetemplate/metadata/predefined_values for the files page_templates.xml and page_template_elements.xml.
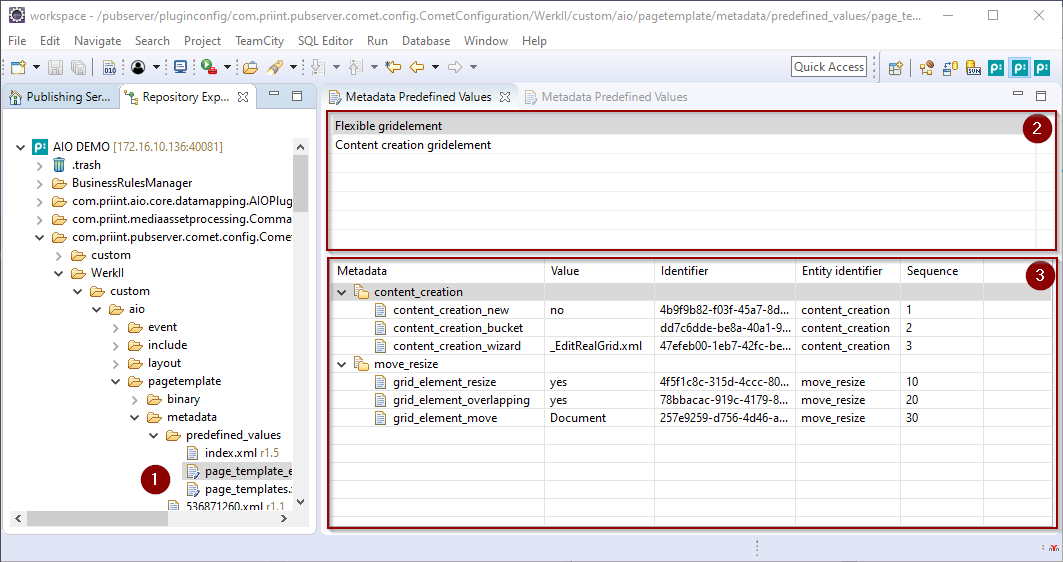
The file page_templates.xml contains the sets for page templates, and the file page_template_elements.xml contains the sets for the page template elements (1).
The upper list (2) shows the value sets already defined. In the context menu you can
- Add a new value set. Choose a good name in the next dialog.
- Edit the name of the value set.
- Remove an existing value set.
For each page template respective page template element content metadata entity in the entity model linked to the comet project the view shows a folder in the Metadata table (3), if you select a row in (2).
A content metadata entity becomes a page template content metadata entity by adding the tag METADATA_PAGE_TEMPLATE to it. For page template element content metadata entities you must add the tag METADATA_PAGE_TEMPLATE_ELEMENT. See the documentation about configuring the briefing modules for more details.
Add a new key value to an entity via context commend Add on the entity (folder). The context menu of an existing key value allows for editing it and deleting it.
As usually, you must save and check-in your changes.