How-To Deployment Package
1 Introduction
This manual describes how to create a deployment package as a ZIP file which is part of the concept of delivering out of the box functionality. The deployment package contains:
- Publishing Server plugins as deployable jar files
- Java Libraries for Glassfish domain lib folder.
- PluginConfig XML files.
- Xml data file(s) containing content data acceptable by EntityDataService
The ZIP is later processed by the PubServer Updater, which installs the files and plugins from the ZIP file.
Deployment packages can be used as well to transfer configurations from one installation to another installation, for example from the development system to the acceptance and production systems.
To create a deployment package is more work than to export some configuration files but for regular processes you should consider using them. The process is less error prone than export and import via ison. Furthermore, deployment packages have the convenient feature that the tenant (called client in older publications) is converted automatically. So moving of configurations is easy between two systems which use a different tenant.
2 Prerequisites
Familiarity with ISON configuration is needed.
3 Create deployment package
3.1 Prepare Data
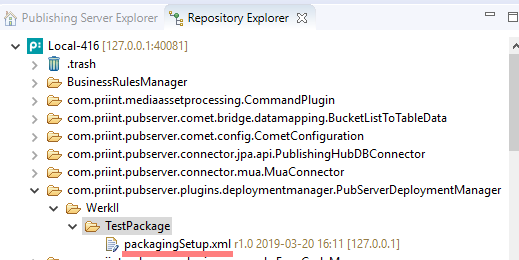
To create a package, the user must create a folder in the repository folder of the Deployment Manager plugin. This folder includes other folders which contain uploaded files like Publishing Server plugin, libraries or import scripts. This is a standard functionality of ISON Repository Explorer.
The first step is creating a folder structure for the packaging which includes the uploaded files and the deployment package config XML. The folder structure can be arbitrary.
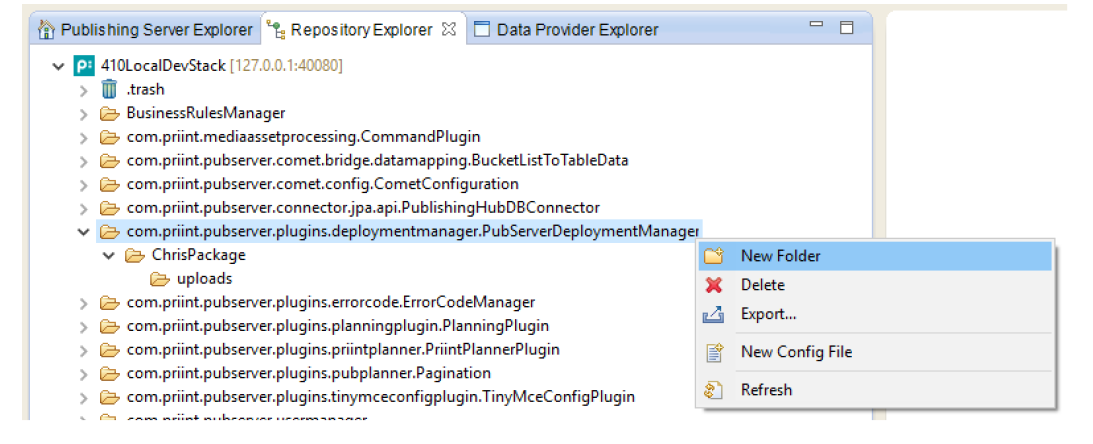
Repository folder of pubserer deployment manager
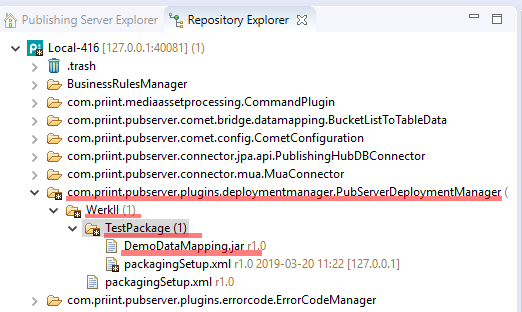
The next step is to upload files to the package folder(s). There is a new type of config file geared towards deployment package needs - binary.
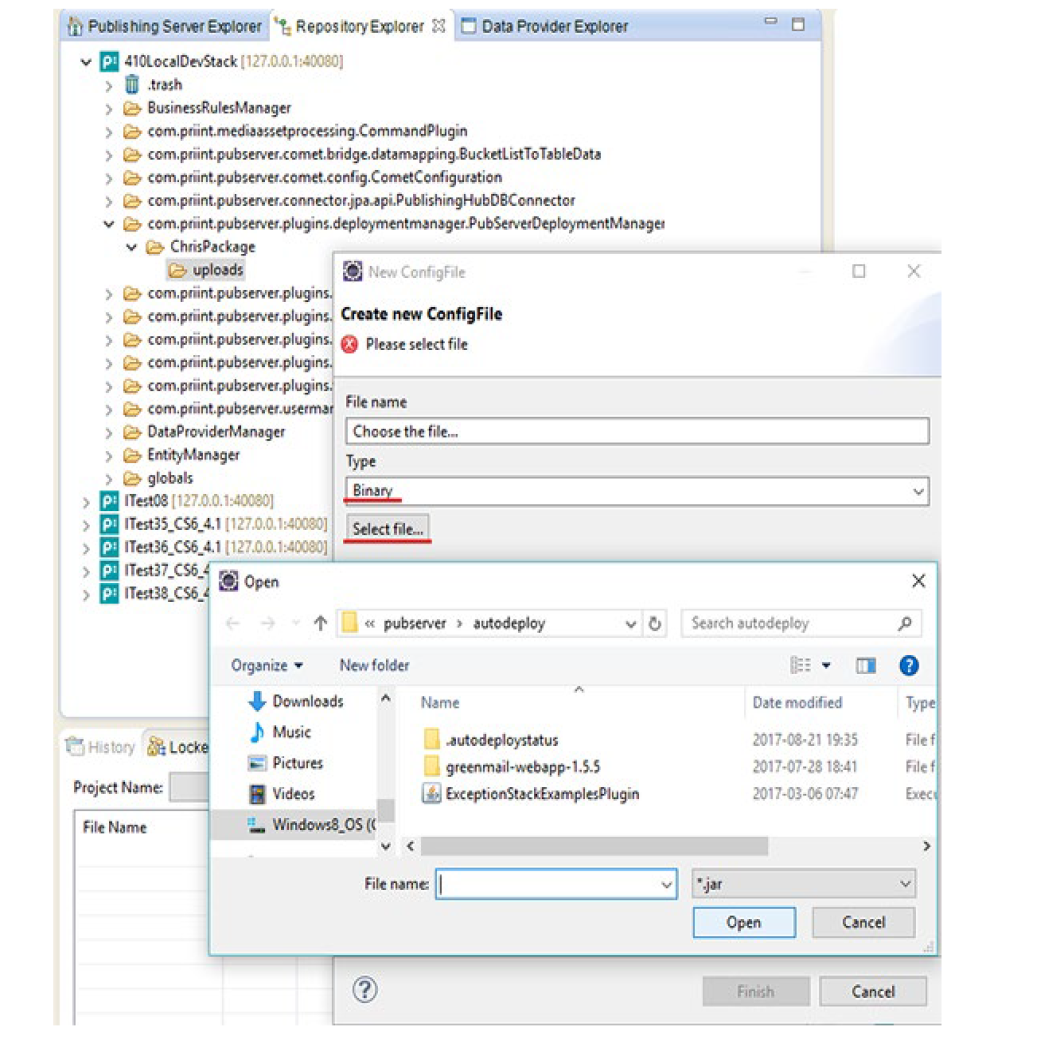
Upload binary file to repository folder of pubserer deployment manager
The file is wrapped into the standard config file XML structure.
3.2 Create deployment setup configuration file
The Deployment Manager Plugin gets the information about the files it has to package in a plugin configuration file which is stored in the configuration folder of the plugin. For each package (zip file), there is a separate config file.
To create a deployment package which includes a set of files which should be deployed, the user has to create a config file for the DeploymentManager plugin. There is no wizard which supports the creation of such a file in the first version. The user must use the standard ISON functionality of the Repository Explorer to create a config file.
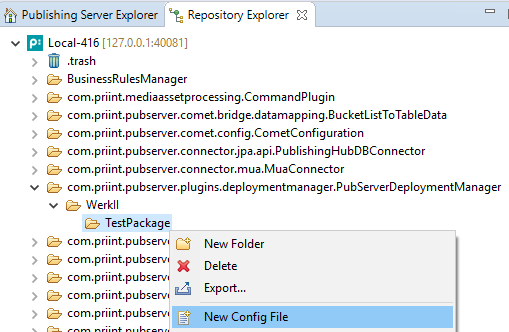
After the creation:
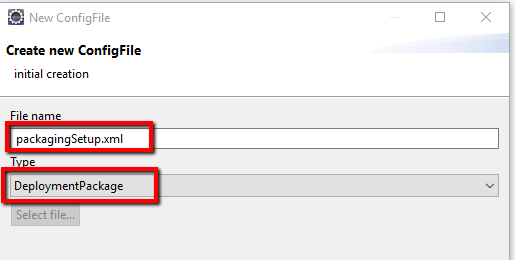
The new config file can be opened in an XML editor. It should have this XML wrapper, which makes it to a plugin config file. The type of the configuration is set to DeploymentPackage.
<con:PluginConfig xmlns:con="com.priint.pubserver.config.manager/20130620" xmlns:usr="com.priint.pubserver.plugin.deployment">
    <con:name>packagingSetup.xml</con:name>
    <con:type>DeploymentPackage</con:type>
    <con:description>This is an Deployment Package</con:description>
    <con:custom>
        <dep:deploymentpackage >
            ....
        </dep:deploymentpackage >
    </con:custom>
    <con:dependencies/>
    <con:instances/>
</con:PluginConfig>
The DeploymentPackage config file has a few attributes and four separate lists which point to files on the file server or repository designated for the deployment package:
| Tag | Type | Description |
| name | Attribute | Name of the package (package name cannot contain underscore character ‘_’) |
| version | Attribute | Version number of the package |
| description | Element | Description of the package |
| jarFiles | Element | List of jarFile elements (see below) |
| dbimports | Element | List of DBImport elements (see below) |
| pluginconfigfiles | Element | List of PluginConfig elements (see below) |
| pluginconfigfilestodelete | Element | List of PluginConfigFileToDelete elements (see below) |
3.2.1 Defining jar file(s )
The JarFile section describes one of the plugin jar files which should be a part of the deployment package:
| Tag | Type | Description |
| jarType | Attribute | There are two types of jar files which can be added to the package: application (plugin) jar which are deployed as an application to the application server or a library file which is copied to the domain lib folder of the application server. There are two possible values:
|
| path | Element | There are two possible sources of the jar files:
|
For the file from the repository (repository prefix) the path should start from the folder of the plugin where the file is located. This is what we see in ISON tree – please look at the screenshots below.
Examples:
Uploaded plugin:
repository:com.priint.pubserver.plugins.deploymentmanager.PubServerDeploymentManager/WerkII/ChrisPackage/uploads/plugins/DemoDataProcessing.jar
Uploaded lib:
repository:com.priint.pubserver.plugins.deploymentmanager.PubServerDeploymentManager/WerkII/ChrisPackage/uploads/SomeThirdPartyLib.jar
active Domain Lib Library:
server:SomeThirdPartyLib.jar
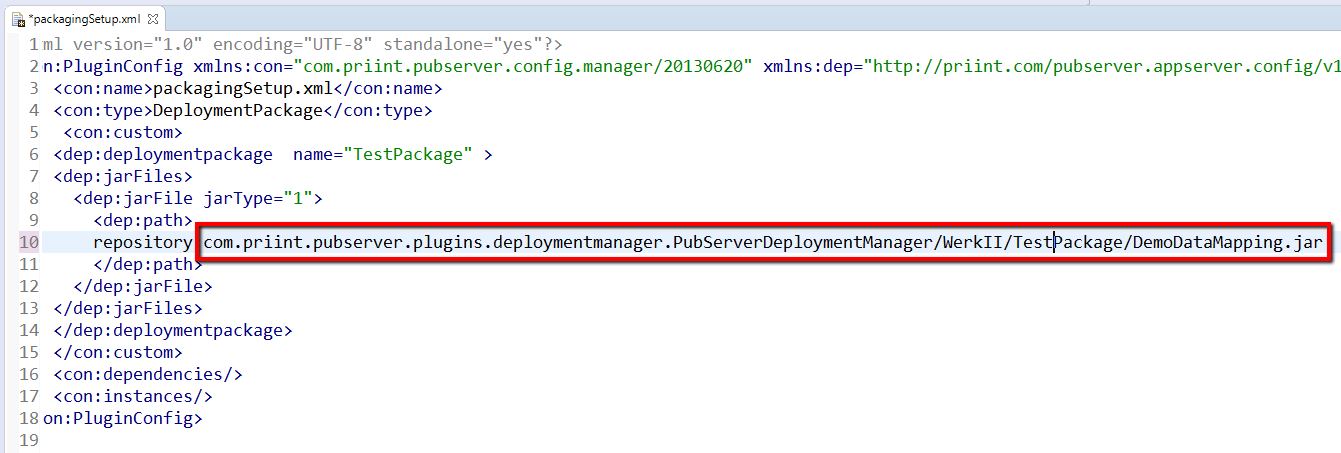
Example:
<dep:jarFiles>
  <dep:jarFile jarType="1">
        <dep:path>
               repository:com.priint.pubserver.plugins.deploymentmanager.PubServerDeploymentManager/WerkII/TestPackage/DemoDataMapping.jar
        </dep:path>
  </dep:jarFile>
</dep:jarFiles>
3.2.2 Defining repository config files
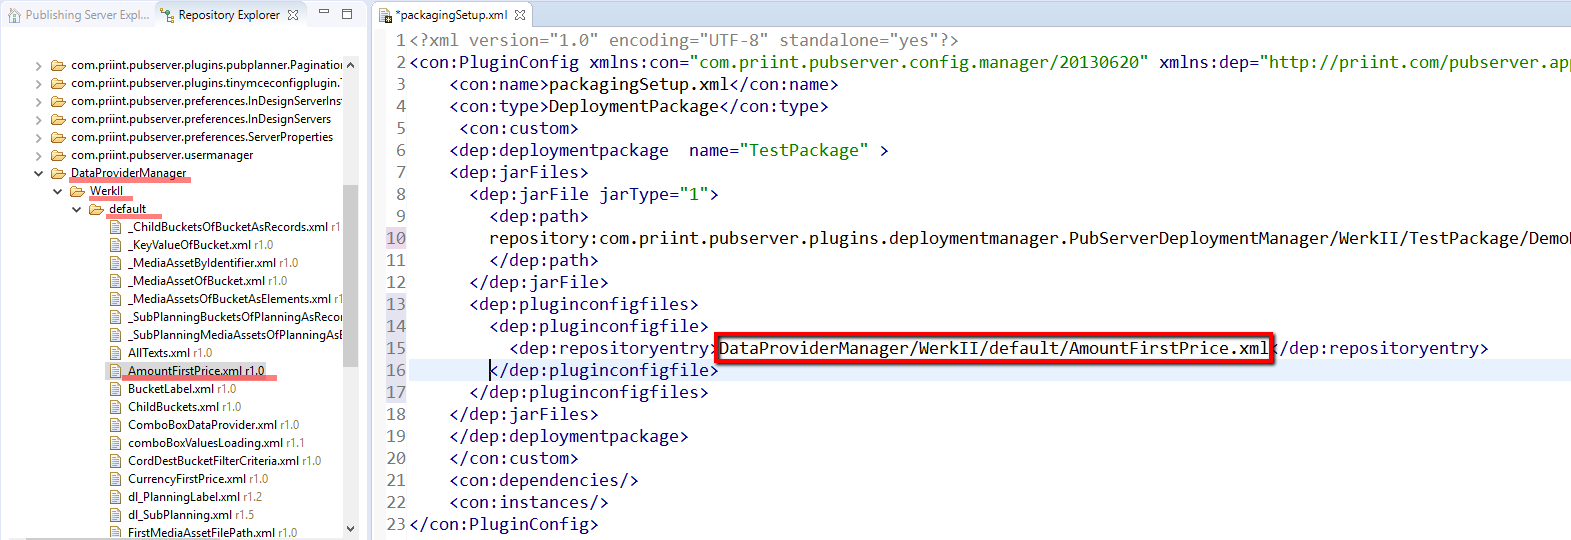
The PluginConfigFile section describes one of the config files located in the Publishing Server Repository which should be a part of the deployment package:
| Tag | Type | Description |
| repositoryentry | Element | Repository path |
The path should start from the folder of the plugin where the file is located.
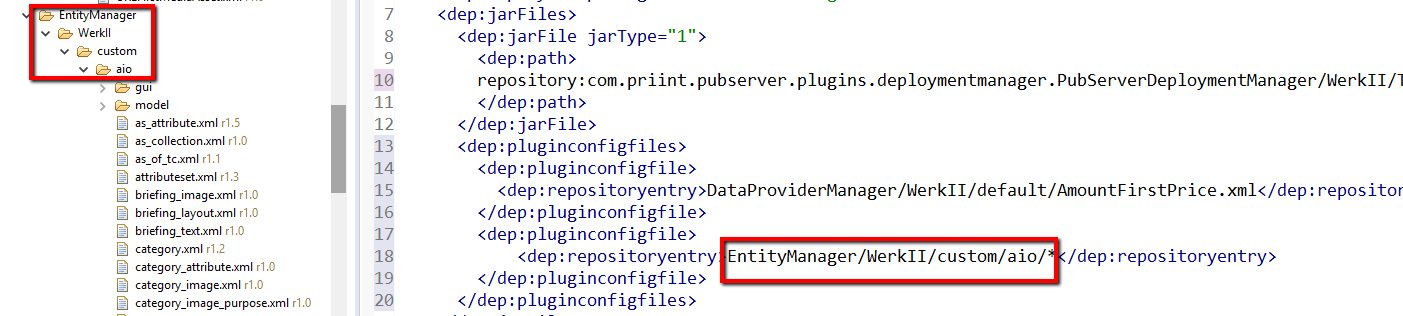
Additionally, there is a possibility to export all files (and subfolders) of the specified plugin folder. To do this, we need to end the path with ‘/’ which means that it is a folder (we can also use ‘/*’ at the end of the path).
Example:
<dep:pluginconfigfiles>
   <dep:pluginconfigfile>
     <dep:repositoryentry>
               DataProviderManager/WerkII/default/AmountFirstPrice.xml
     </dep:repositoryentry>
   </dep:pluginconfigfile>

   <dep:pluginconfigfile>
     <dep:repositoryentry>
               EntityManager/WerkII/custom/aio/
     </dep:repositoryentry>
   </dep:pluginconfigfile>
</dep:pluginconfigfiles>
3.2.3 Defining repository file(s) to delete
During package deployment, one may want to delete some files from the repository.
A package can contain list of repository configuration files to delete if existing on the target system. Files can be deleted before uploading repository files from the package (p. 3.2.2)) or after.
| Tag | Type | Description |
| afterupload | Attribute | A flag to decide when it is deleted (after upload (true) or before (false) |
| repositoryentry | Element | Repository path |
Example:
<dep:pluginconfigfilestodelete>
    <dep:pluginconfigfiletodelete afterupload="false">
        <dep:repositoryentry>EntityManager/WerkII/custom/aio/
        </dep:repositoryentry>
    </dep:pluginconfigfiletodelete>

    <dep:pluginconfigfiletodelete afterupload="true">
        <dep:repositoryentry>EntityManager/WerkII/custom/aio/kp.xml
        </dep:repositoryentry>
    </dep:pluginconfigfiletodelete>
</dep:pluginconfigfilestodelete>
3.2.4 Defining DBImport file(s)
The DBImport section describes one of the DB import files which should be a part of the deployment package:
| Tag | Type | Description |
| type | Attribute | Type of the DB import file. Possible values:
|
| order | Attribute | A number describing the order to execute of dbimport files |
| path | Element | Subfolder(s) and file name of the DB import file |
The file with XML data acceptable by Entity Data Service should be uploaded to the package repository folder as a binary file and added to packagingSetup.xml.
Example:
<dep:dbimports>
   <dep:dbimport order="0" type="ENTITY_DATA_SERVICE">
     <dep:path>
com.priint.pubserver.plugins.deploymentmanager.PubServerDeploymentManager/WerkII/AioModel3/import/AIOData.xml
     </dep:path>
   </dep:dbimport>
</dep:dbimports>
3.2.5 Example configuration file
Example of package setup configuration file:
<?xml version="1.0" encoding="UTF-8" standalone="yes"?>
<con:PluginConfig xmlns:con="com.priint.pubserver.config.manager/20130620" xmlns:dep="http://priint.com/pubserver.appserver.config/v1">
    <con:name>packagingSetup.xml</con:name>
    <con:type>DeploymentPackage</con:type>
     <con:custom>
  <dep:deploymentpackage name="TestPackage" >
    <dep:jarFiles>
      <dep:jarFile jarType="1">
        <dep:path>
repository:com.priint.pubserver.plugins.deploymentmanager.PubServerDeploymentManager/WerkII/TestPackage/DemoDataMapping.jar
        </dep:path>
      </dep:jarFile>
    </dep:jarFiles>
    <dep:pluginconfigfiles>
      <dep:pluginconfigfile>
        <dep:repositoryentry>
          DataProviderManager/WerkII/default/AmountFirstPrice.xml
        </dep:repositoryentry>
      </dep:pluginconfigfile>
      <dep:pluginconfigfile>
        <dep:repositoryentry>
            EntityManager/WerkII/custom/aio/
        </dep:repositoryentry>
      </dep:pluginconfigfile>
    </dep:pluginconfigfiles>
    <dep:dbimports>
      <dep:dbimport order="0" type="ENTITY_DATA_SERVICE">
        <dep:path>
com.priint.pubserver.plugins.deploymentmanager.PubServerDeploymentManager/WerkII/AioModel3/import/AIOData.xml
        </dep:path>
      </dep:dbimport>
    </dep:dbimports>
  </dep:deploymentpackage>
 </con:custom>
 <con:dependencies/>
 <con:instances/>
</con:PluginConfig>
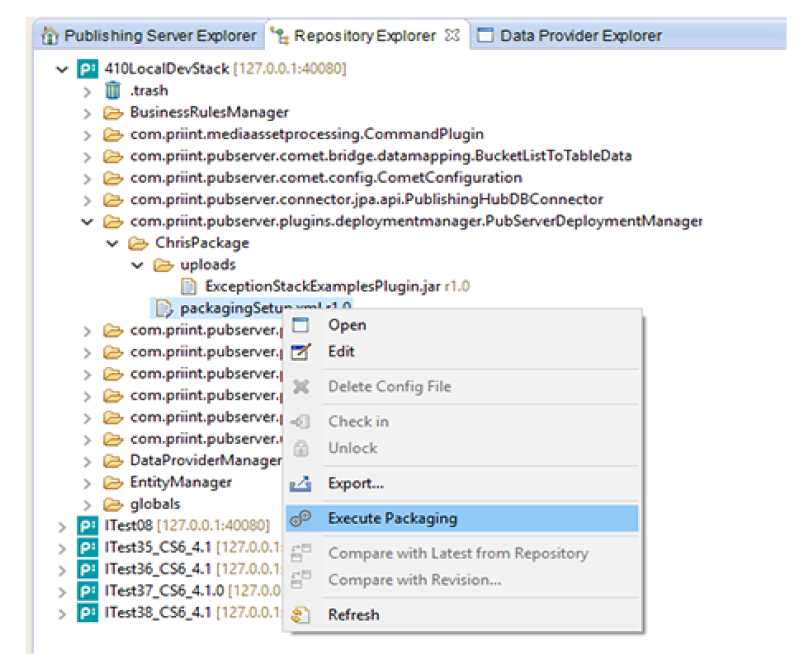
3.3 Execute packaging
After preparing the data and creating configuration file, the user can create the deployment package by running Execute Packaging item from the context menu on the configuration file:
The new config file of type Binary should be created. It contains the data of the zip file:

3.4 Report file
The report file is created using the filename of the zip and the prefix "_report.txt" and attached to the zip file. The Report file has a row for each file which is defined in the DeploymentPackage object using this pattern
<Type><TAB><Subtype><TAB><File><TAB><Status><TAB><Reason>
| Column | Description |
| Type | Type of the file: pluginjar / dbimport / pluginconfigfile |
| Subtype | Depending on the type:Pluginjar: -DBimport: script / xmlPluginconfigfile: - |
| File | Full path (system or repository) of the file |
| Status | OK / Failed |
| Reason | If Status = failed: Errormessage |
Some example:

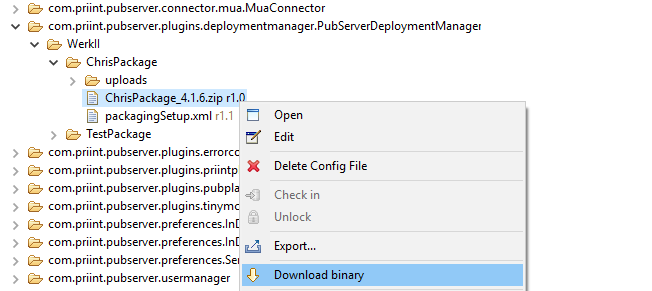
3.5 Download deployment package
To download the deployment package as the zip file, the user should use Download binary item from the context menu:
3.6 Verification of the created package
When the package is created and downloaded, we can open the zip file and check its content. Besides, there is a special log file named like the package name and ended with _raport.txt inside of the package (please look at p. 3.4). It contains a list of package files and a status of them. If something went wrong during creating a package, there is also a proper information.
4 Deployment packages with IsonSOAPServiceClient.jar command line
IsonSOAPServiceClient.jar allows to create a deployment package via command line. This is useful to automatic scripts to create packages.
The basic syntax of the command is java -jar IsonSOAPServiceClient.jar <action> <options…>.
Arguments are passed in GNU-style. Options --help and --help <action> are supported.
4.1 Options
| Short opt. | Long option | Argument | Description |
| --help | Shows general help for the program. | ||
| --help | action | Shows help for the specific command. | |
| -a | --address | address | Address of the server to connect. |
| -p | --port | port | Port of the server to connect (default value is 40081). |
| -u | --user | user | User for login on the server. |
| -s | --password | password | Password for login on the server. |
| -c | --client | client | Project client name. |
| -t | --path | path | Name/path of the file on the server (relative to folder “/pubserver/pluginconfig/com.priint.pubserver.plugins.deploymentmanager.PubServerDeploymentManager/<client>/”). |
| -l | --local-path | local path | Path to a file on local machine. |
4.2 Upload deployment setup configuration file to Jackrabbit Repository
To upload configuration file to the server, call action “upload”. This corresponds to the option “New Config File” in ISON Repository Explorer.
This action accepts options: “--address”, “--port”, “--user”, “--password”, “--client”, “--path” and “--local-path”. All these options except “--port” are required.
Example usage of action “upload”:
java -jar IsonSOAPServiceClient.jar upload -a localhost -p 12345 -u "demo" -s "*******" ↵-c werkii -t packagingSetup.xml -l C:UsersBestEmployeeDesktopmyPackagingSetup.xmljava -jar IsonSOAPServiceClient.jar upload --address=172.16.123.123 --user=demo ↵--password="*******" --client="werkii" --path="packagingSetup.xml" ↵-l="C:UsersBestEmployeeDesktopmyPackagingSetup.xml"
4.3 Execute packaging
To execute packaging, call action “package”. This corresponds to the option “Execute Packaging” in ISON Repository Explorer.
This action accepts options: “--address”, “--port”, “--user”, “--password”, “--client” and “--path”. All these options except “--port” are required.
Example usage of action “package”:
java -jar IsonSOAPServiceClient.jar package -a localhost -p 12345 -u "demo" -s "*******" ↵-c werkii -t packagingSetup.xmljava -jar IsonSOAPServiceClient.jar package --address=172.16.123.123 --user=demo ↵--password="*******" --client="werkii" --path="packagingSetup.xml"
4.4 Download deployment package
To download the deployment package, call action “download”. This corresponds to the option “Download binary” in ISON Repository Explorer.
This action accepts options: “--address”, “--port”, “--user”, “--password”, “--client”, “--path” and “--local-path”. All these options except “--port” are required.
Example usage of action “download”:
java -jar IsonSOAPServiceClient.jar download -a localhost -p 12345 -u "demo" -s "*******" ↵-c werkii -t result.xml -l C:UsersBestEmployeeDesktopdownloadedResult.zipjava -jar IsonSOAPServiceClient.jar download --address=172.16.123.123 --user=demo ↵--password="*******" --client="werkii" --path="result.xml" ↵-l="C:UsersBestEmployeeDesktopdownloadedResult.zip"
5 Deploying packages
Each package and its content can be installed into a system in two ways. First, the package can be used during standard installation/update process. Alternatively, it is possible to install a package manually from the command line on the system where PubServer is installed.
During deployment the tenant will be corrected automatically.
Important! Before installing new packages it is advisable to consider a backup – please read the documentation about it – the document ‘How to back up the publishing server system environment’.
5.1 Deploying packages during update/ installation process
There is a folder named ‘deploymentpackages’ in the ‘update’ folder of the PubServer main folder installation. If one puts a package (zip file) into this folder, it will be automatically installed during install/update process. If we put more than one package, they will be installed in an alphabetical order.

5.1.1 Deployment order
If we want to have more control of the deployment process, we can create a special file named ‘deployment-order.txt’ in the ‘deploymentpackages’ folder. Each line of this file should contain a package filename existing in the folder (‘.zip’ extension is not required (optional)) . If the ‘deployment-order.txt’ file exists during installation/update, the installer gets packages in order of appearance in the file.
Important! If we use ‘deployment-order.txt’ file, only packages listed in it will be deployed. If there are more packages in the ‘deploymentpackages’ folder, they will not be installed but a warning will be displayed during installation process.

5.2 Deploying package manually
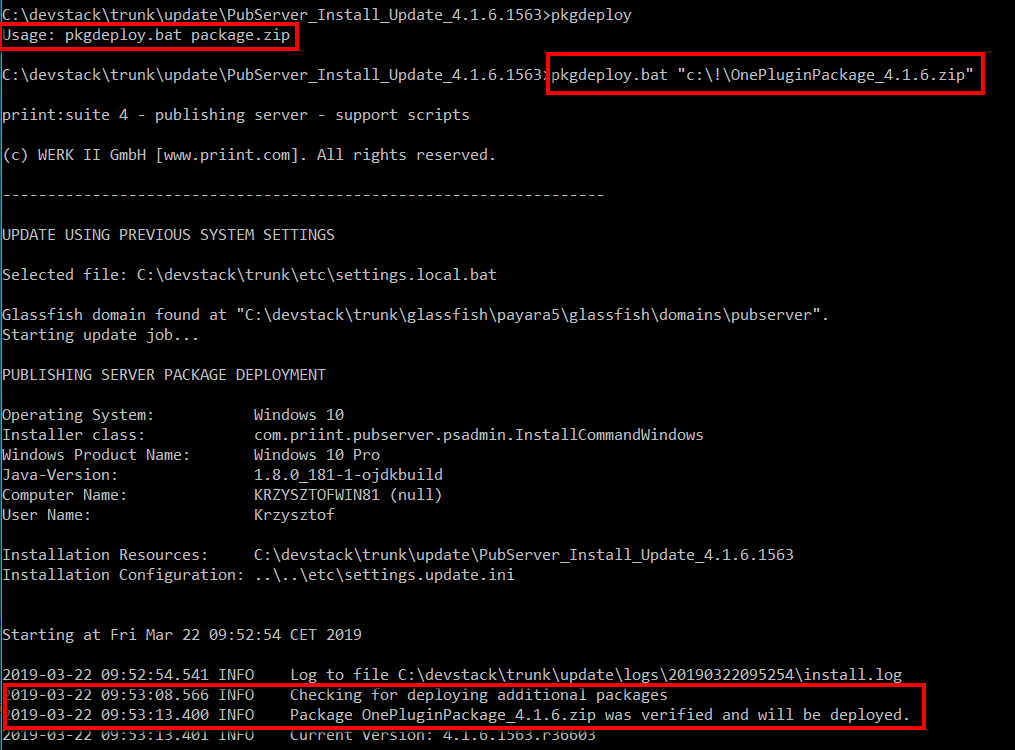
If PubServer is running and we do not need to update it, we still are able to deploy a package. In order to do this, we should use a pkgdeploy.bat script command available in the install/update folder for the specified version.
The script requires one parameter – path to the package we want to deploy.
If a package contains library jar files, the PubServer will be stopped and after deploying them started again.
ATTENTION !!!
Depending on the size of your package it is possible to get an error message “Java heap space”. In this case it is necessary to patch the pkgdeploy.bat. Search in the file for the maximum heap size Xmx and change it to a higher value.

5.3 Customizing deployment process for the package
During deployment, each package can (does not have to) own an external configuration xml file (in the same folder as a package, the name should be like the name of the package with additional extension) to customize deployment process.
The file has the following name:
package name + _configuration.xml
e.g. if package filename is AioModel_4.1.6.zip the configuration file would look like:
AioModel_configuration.xml (AioModel is the package name, it is set in packagingSetup.xml).
A configuration file can be used if we want to map repository files into a different location. It can be helpful if we want to import the entity model (files from EntityManager folder) as a different model name.
The structure of this file is as follows:
<?xml version="1.0" encoding="UTF-8" standalone="yes"?>
<con:PluginConfig xmlns:con="com.priint.pubserver.config.manager/20130620" xmlns:dep="http://priint.com/pubserver.appserver.config/v1">
    <con:name>AioModel_configuration.xml</con:name>
    <con:type>DeploymentConfiguration</con:type>
    <con:custom>
    <dep:deploymentconfiguration >
               <dep:repositoryFolderMappings>
               <dep:repositoryMapping srcPath="EntityManager/WerkII/custom/aio/" destinationPath="EntityManager/WerkII/custom/dev03/"/>
               </dep:repositoryFolderMappings>
               </dep:deploymentconfiguration>
               </con:custom>
    <con:dependencies/>
    <con:instances/>
</con:PluginConfig>
We can define many repository mapping elements. The installer checks the path of the repository file from the package while deploying repository files from the package and if it is matched with the repository mapping from the configuration file, it will be moved to the new location.
In the example above, the files of ‘aio’ model will be uploaded as ‘dev03’ model. The installer recognizes that these are EntityManager files and will change not only the filenames but also the dependencies inside.