1 Introduction
This manual explains how to create a new publishing server plug-in.
publishing server plug-ins are developed as an JavaEE EJB project and deployed via the Glassfish/Payara Application Server deployment mechanism.
A plug-in is implemented as a Stateless Session Bean class tagged as a publishing server plug-In using Java annotations in the EJB project. The project itself can have more than one plug-in, so we call the application itself plug-in library.
2 Prerequisites
The plug-ins described here can be used with any publishing server version starting from 4.0.4. In publishing server 4.1.5 Payara 5 and Java 8 is used instead of Glassfish 3 and Java 7. Payara is a clone of Glassfish. Some details vary because of using another application server. You will find notes about that below. Where this documentation talks about Glassfish, not mentioning Payara, it applies to both application servers.
3 Preparation of Development Environment
It is recommended to use developer stack (devstack) installation of publishing server as development environment for plug-ins. Devstack is available for Windows 64bit systems. There is no support for other configurations (e.g. Mac, Linux) although all components might work on that system too.
Devstack contains
- JDK 1.7 until including all publishing server 4.1.0, JDK 1.8 starting from publishing server 4.1.5
- Glassfish 3.1 until including all publishing server 4.1.0, Payara 5 starting from publishing server 4.1.5
- MySQL 5.5 This is the default RDBMS containing the PubServerKernel database necessary for the installation. Local MySQL can be replaced by a remote installation of MySQL, Microsoft SQLServer or Oracle.
- Eclipse (containing ison): 4.3 (Kepler) in the 4.0.5 base package and 4.7 (Oxygen) in the 4.1.5 base package
You start the devstack by executing PStart.exe in the root folder of devstack. This will establish a starter menu in the Tray. You can open Eclipse/ison, start/stop Glassfish and MySQL from this menu.
| Folder structure of devstack | PStart menu |
|---|---|
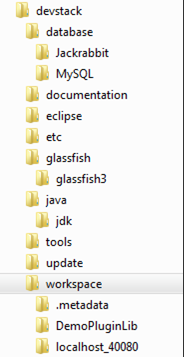 |  |
If you start Eclipse/Ison from the starter menu it will open the devstack workspace folder. This Eclipse workspace already is equipped with practical settings. In case you corrupted the workspace we will show you here how to (re)establish the most important settings.
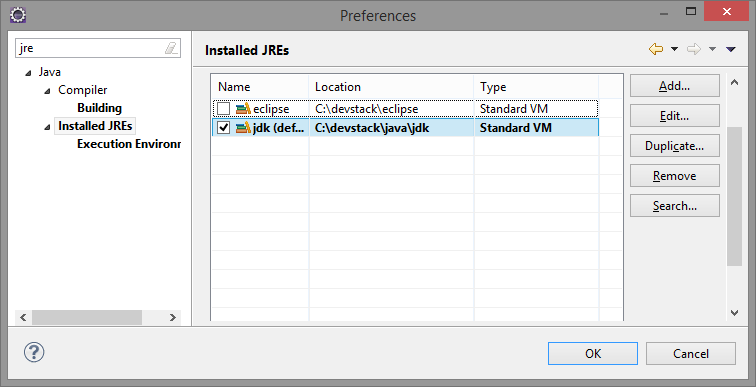
3.1 JDK as default Java Runtime Environment
Eclipse should use the JDK of devstack as default Java runtime.
Open Window->Preferences->Java->Installed JREs. Set jdk from devstack as default. If not existing add it as a new JRE.
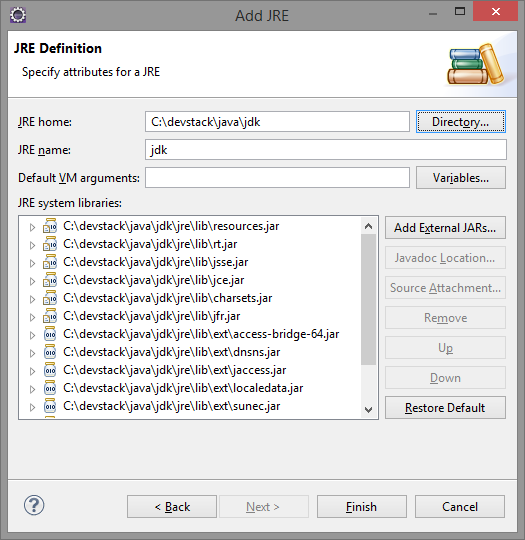
To add a JRE click "Add" and set the JRE home to the devstack java jdk folder. Say "Finish" to save the new JRE.
3.2 Glassfish Server Reference
Normally the Eclipse workspace contains a reference to the devstack Glassfish/Payara installation. You can see this, when you open the "Server" view in Eclipse within the JavaEE perspective. If there is no entry or you accidentally corrupted the reference you have to recreate it as follow:
In the "Server" view select "Add new server" from the context menu. Select "Glassfish 3.1"/"Payara Server 5" and click "Next".
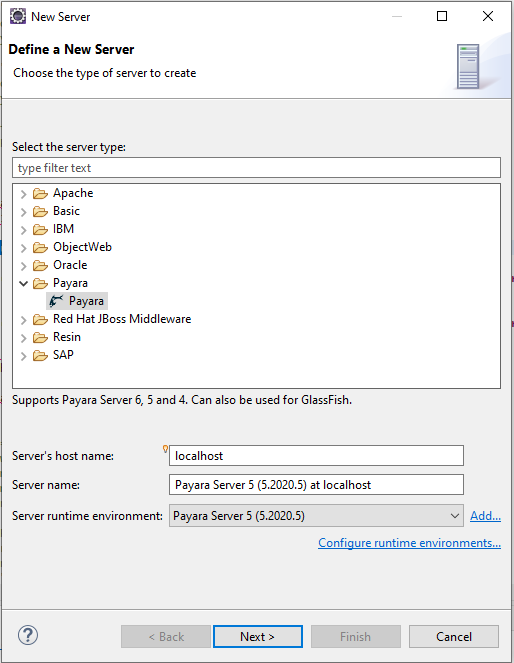
On the next page select the "jdk" as JRE. Set Server Directory to the devstack Glassfish installation, i.e the "glassfish" folder within the "glassfish3" or "payara5" directory. And then click "Next".
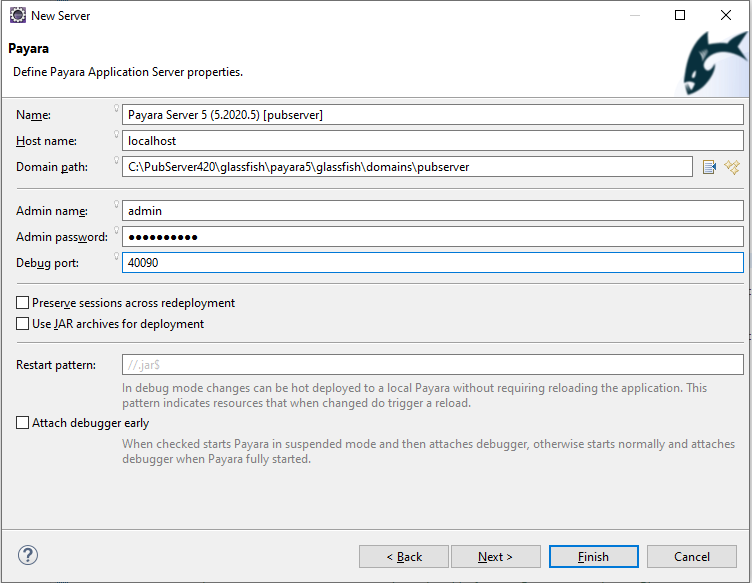
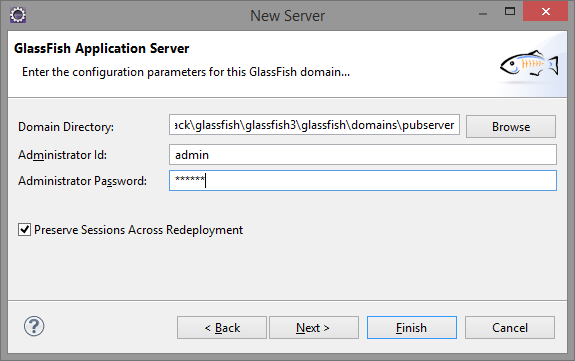
On the next page change the Domain directory from "domain1" to "pubserver". Typical full path is "C:\devstack\glassfish\glassfish3\glassfish\domains\pubserver" or "C:\devstack\glassfish\payara5\glassfish\domains\pubserver".
The default admin password of Glassfish is "adminadmin". For devstack installation please use "Comet4". Then click "Finish" to save the reference.
The "Server" view should now contain an entry for the server. You can use the context menu to start and stop the server or to inspect the applications deployed on the server.

Your plug-in library will be shown as an application here after deployment.
3.3 Common dependencies - "PubServer Libraries"
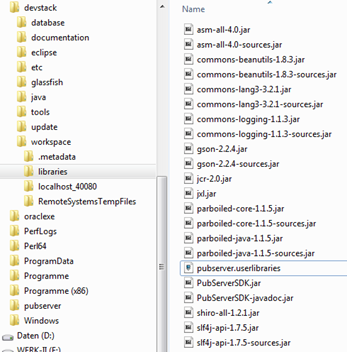
It contains a libraries folder containing necessary libraries for plug-in development. You will also find these libraries in the glassfish/domains/pubserver/lib folder in the Glassfish installation. These libraries are accessable from all plug-ins and dependencies of the publishing server API libraries (most important PubServerSDK.jar).
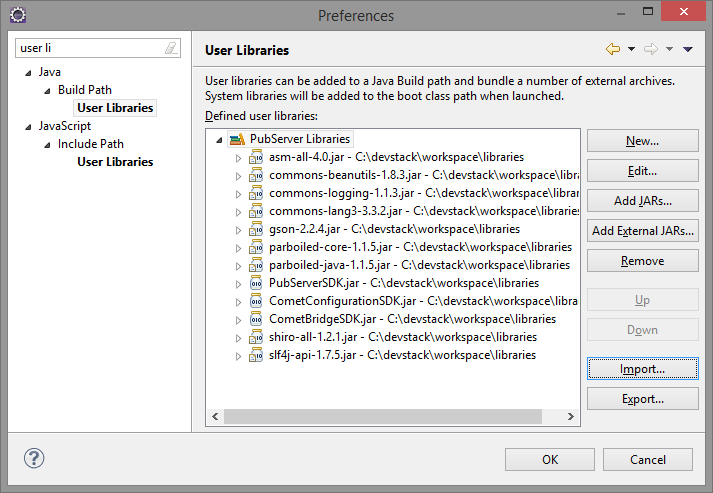
The list of libraries may change by updates to publishing server. There may be additions or version updates. All libraries come with either source code (open source libraries) or at least with javadoc files. The libraries are referenced within Eclipse as a "user library" called "PubServer Libraries". After an publishing server update the workspace will not get automatically updated, except for the jars. You will have to manually update the ison within Eclipse, and you have to update the "PubServer Libraries" references.
3.4 Updating "PubServer Libraries"
Open up Window->Preferences->Java-Build Path->User Libraries. Updating means to re-import the libraries. So click the "Import" button.
On the next page browse for the file "pubserver.libraries" in the "libraries" folder of your workspace on disk. The field may already point to the correct file if "pubserver.libraries" was the last library to get added. Say "OK" and confirm that you want to replace the (old) version by the new one.

3.5 Updating ison
To update the ison plug-in within your Eclipse following a devstack update you do this:
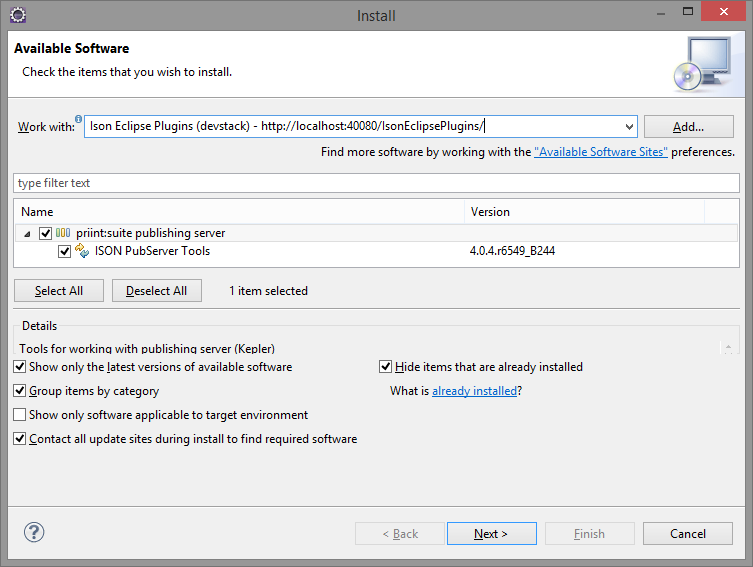
- Go to Help->Install New Software
- Ensure that Glassfish is started
- Type "ison" in the top textbox and select "Ison Eclipse Plugins (devstack) - http://localhost:40080/IsonEclipsePlugins/" as update site.
- Select the new ison version in the list of installabe items and click "Next". Confirm all the following dialogs until Eclipse has been restarted.
4 Create a New publishing server Plug-in
The publishing server plug-in library is an EJB Application that contains EJBs declared as publishing server plug-ins (@PubServerPlugin). The library communicates with the publishing server (a different WebApplication on the same GlassFish Server) to register and unregister the plug-in library and each plug-in in the library to the server. The registration and unregistration happens during the deployment or undeployment of the EJB Application.
To create a new plug-in library with one or more plugins, you have to follow these steps:
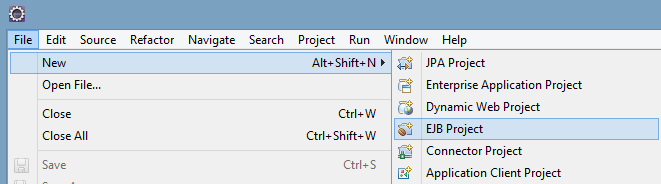
- Create a new EJB Project in Eclipse.
- Create a initiating class that for registering and unregistering the plug-ins and annotate it with some meta data like library description, vendor, version and so on.
- Create plug-in classes and all the helper classes you need.
- Deploy the application (plug-in library)
4.1 Creating a New EJB Project
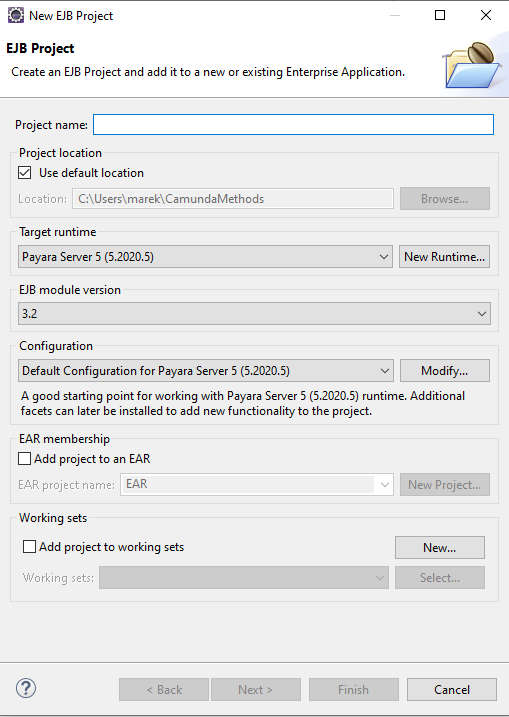
The first step is the creation of a new EJB project in Eclipse. We use the regular EJB Project wizard to do so:
Give the project a name and assign the GlassFish ServerRuntime you created before.
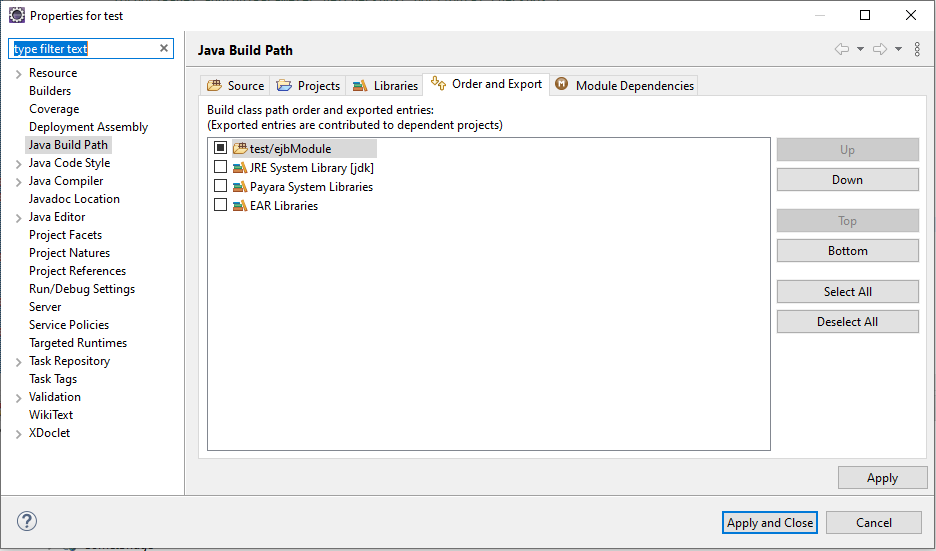
Assign the "PubServer Libraries" to the Build Path of your project:
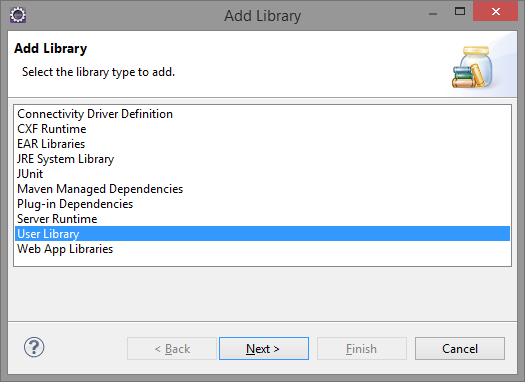

In the Order and Export tab "PubServer Libraries" should be located before JDK and Glassfish libraries, so that jars within the PubServer Libraries take precedence before the default libraries from Java or the Application server.
4.2 Creating a Package
Create a new package. The package name will typically serve as the unique name of your plug-in library within publishing server. So create with care. Typically use your company domain name as base for the package, e.g. "de.contosi.pubserver.connector".
4.3 Creating the Library Class
For the registration and unregistration of the plug-in you have to create a class that automatically starts up during the deployment of the plug-in library.
Create a new package in your project and a new class into this package. The naming of the package and the class is up to you, but the class has to extend the class "com.priint.pubserver.plugin.PluginLibraryControl" from the SDK.
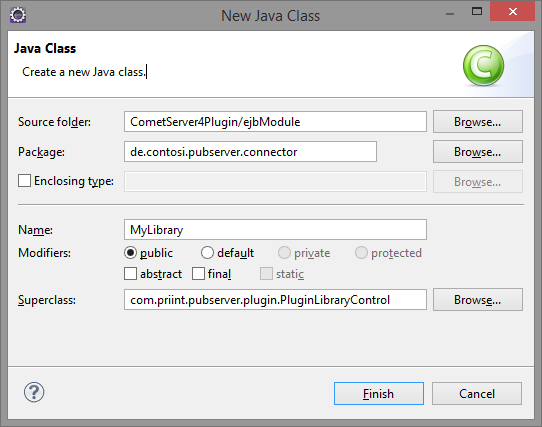
First you have to add the annotations @Singleton and @Startup to the class. The @Startup annotation indicates to the app server that this class must be created and initialized at the application startup and @Singleton defines the class as a Singleton Session Bean. Then you have to add the PubServerPluginLibrary annotation and set the meta data of your library.
package de.contosi.pubserver.connector;

import com.priint.pubserver.plugin.PluginLibraryControl;
import com.priint.pubserver.plugin.PluginLibraryControl.PluginType;
import com.priint.pubserver.plugin.annotation.PubServerPluginLibrary;
import javax.ejb.Singleton;
import javax.ejb.Startup;

@Singleton
@Startup
@PubServerPluginLibrary(
	id="de.contosi.pubserver.connector",
	label="Connector Demo",
	vendor="de.contosi",
	version="1.0",
	type=PluginType.DATAMAPPING
	)
public class MyLibrary extends PluginLibraryControl {
    @PostConstruct
    public void startup() {
    	super.startup();
    }
    @PreDestroy
    public void shutdown() {
    	super.shutdown();
    }
}
| <id> | This is the unique identifier for your Plug-in Library provided to you by WERK II. Typically the package name. |
| <vendor> | Your Company Name |
| <version> | The version of your library, This is especially relevant if your plug-in stores files into the pubserver repository and the xml schema of these files change within versions. |
| <label> | Label as shown in ison plug-in view (Publishing Server View). |
| <type> | Select an enum value describing the type of plug-ins within your library. This setting will e.g. control in which ison dialogs your plug-ins will be shown as selectable options. |
The startup class needs two methods. One has to be executed after the startup of the class to register the plug-in library and each plug-in to the publishing server. The other one has to unregister the plug-in if the class is about to be removed (The application is undeployed or the application server is shutting down)
With @PostConstruct annotation we declare the method that is executed during startup. It calls the method startup from the super class, that reads the config file and registers the library and each plug-in in this library to the publishing server. The @PreDestroy annotation declares the method that is executed before the instance of the class is removed It calls the method shutdown from the super class. In the simplest case you will only call the startup and shutdown methods from the base class (PluginLibraryControl). But you can use the method to add initialization code before or after registration of the library and their plug-ins.
We have now our initialization class. This is the mandatory code you need for the plug-in. You can add additional initialization routines that you might need for your plug-ins to the methods if you need to.
4.4 Creating a Plug-in Class
We can now implement the first plug-in out plug-in library. A plug-in is a stateless session bean that typically is derived from the abstract PluginControlDefault class.

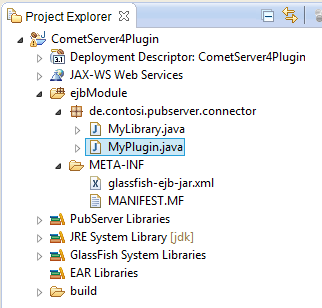
By now we have the following project structure.
We also have to add some annotations to the class:
@Stateless This makes the class to a Stateless Session Bean with the JNDI name "de.contosi.pubserver.connector.MyPlugin". This name has to be unique on the application server. Please use the full class name for convenience. This name will be used by other plug-ins to reference your plug-in.
@LocalBean A technical annotation making all public methods of your plug-in available for other applications on the application server. @PubServerPlugin This annotation declares the class as a plugin, that is registered to the server.
package de.contosi.pubserver.connector;

import javax.ejb.EJB;
import javax.ejb.LocalBean;
import javax.ejb.Stateless;

import org.slf4j.Logger;
import org.slf4j.LoggerFactory;

import com.priint.pubserver.plugin.PluginControlDefault;
import com.priint.pubserver.plugin.annotation.PubServerPlugin;

@Stateless(mappedName = "de.contosi.pubserver.connector.MyPlugin")
@LocalBean
@PubServerPlugin
public class MyPlugin extends PluginControlDefault {

	static Logger logger = LoggerFactory.getLogger(MyPlugin.class);

	@EJB
	MyLibrary myLibrary;
}
As you can see we already added to field variables. A logger to write to the server log file. A reference to the myLibrary singleton object. So we can use the methods of the library initialization class, esp. the base class PluginLibraryControl which is practical in most cases.
4.5 Writing Plug-in Methods
Now we can implement the methods of our class. In case of a connector we must implement the connector interface from the SDK. In case of data mapping or data processing plug-in be can add custom methods and annotate them as PubServerMethod to make them publicly known to other plug-ins and to ison. Methods and their parameters have to be annotated. The annotations contain meta data like name and description, that will be visible in ison, e.g. when selecting a data mapping method.
@PubServerMethod(
	type = MethodType.DATA_MAPPING,
	description = "Selects a bucket list by resultEntityId")
public List<Bucket> getBucketSelection(
	@PubServerMethodParameter(
		name = "sessionId",
		defaultValue = "<Session.Id>",
		description = "ID of the current session")
		String sessionId,
	@PubServerMethodParameter(
		name = "entityModelName",
		defaultValue = "<Model.Id>",
		description = "Name of the entitymodel")
		String entityModelName,
	@PubServerMethodParameter(
		name = "resultEntityId",
		defaultValue = "<Entity.ResultId>",
		description = "Entity ID of the buckets to be filtered")
		String resultEntityId,
	@PubServerMethodParameter(
		name = "context",
		defaultValue = "<Entity.Context>",
		description = "Context as search filter (e.g language)")
		Context context,
	@PubServerMethodParameter(
		name = "inputList",
		defaultValue = "<Entity.Data>",
		description = "result from query")
		List<Bucket> buckets
		) throws MyPluginException {
	List<Bucket> result = new ArrayList<Bucket>();
	// ... implementation code ...
	return result;
}
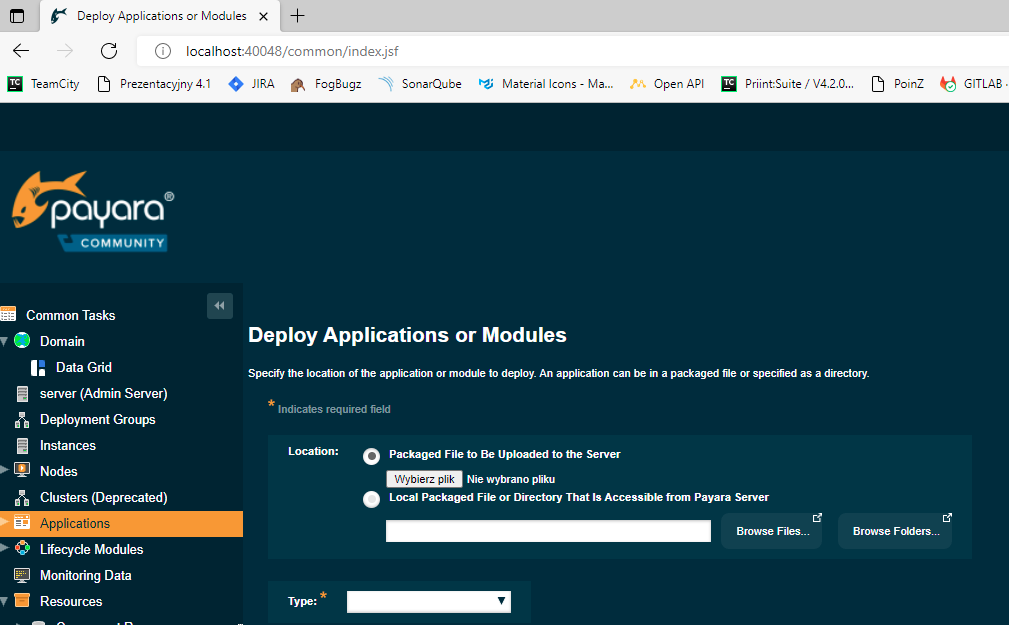
4.6 Deployment of a Plug-in Library
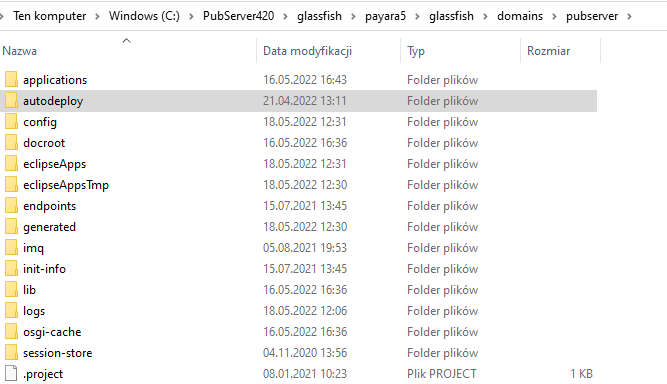
The plug-in library is a regular EJB Application. That means, that you can use the regular deployment mechanism of GlassFish to install the plugin. There are several ways to do this: Autodeploy folder: Export your plug-in project to an EJB jar file and copy it into the autodeploy folder of GlasssFIsh.
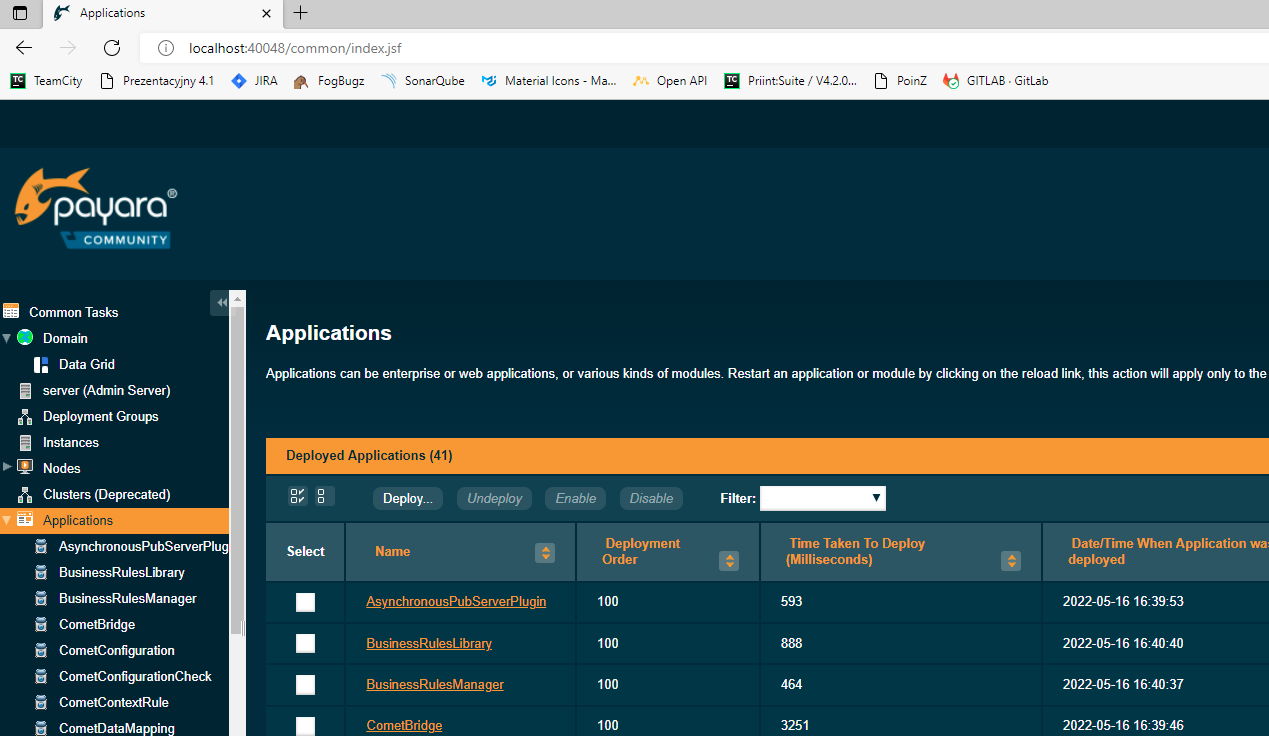
Administration Console: You can also use the GlassFish Administration Console to deploy the plug-in. Chose the exported JAR and click OK. If there is a cluster installed, you have to choose the target (server or cluster) of the deployment. In the Admin Console you can also undeploy your plug-in.
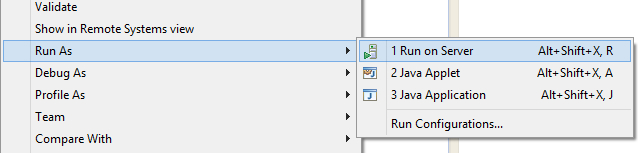
Eclipse: It is also possible to deploy the plug-in via Eclipse. Go to "Run on Server" and choose the GlassFish Runtime Environment as the target. Your plugin will then be immediatly be visible in the server view if you open the Glassfish item.
If the plug-in was successfully deployed, you should get a message like this:
INFO: 17:28:04.996 [AutoDeployer] INFO c.p.c.plugin.manager.PluginManager - register Plugin: PluginClass: plaginfaectori.HelloWorld registered
INFO: PubServerPlugin was successfully deployed in 614 milliseconds.
The plug-in library is deployed and our plug-in is registered to the publishing server.
INFO: 17:29:07.663 [http-thread-pool-8080(2)] INFO com.priint.plugin.test.Test - Hello World Christian
4.7 Call Other Plug-ins
There are two ways to call a plug-in from another plug-in:
- Use the method ParameterInterpreter.interpret from PubServerSDK to call a plug-in. This is the way most data mapping or processing methods work.
- Add a local interface to your plug-in and use the method PluginManager.lookupPlugin to get an instance of the plug-in. This is the way connectors work.
4.7.1 Call by Interpreter
Build a call string using this pattern:
plugin(globalName=‘mappedNameOfMyPlugin’,
        methodName=‘nameOfMyPluginMethod’)
            [<tag>,constant,…]
Bind parameters to values using a HashMap and call the static interpret method of the ParameterInterpreter like in the example below.
private List<Bucket> interpreterCall(String sessionId, String entityModel, String resultEntityId, 	Context context, List<Bucket> bucketList
) {
	List<Bucket> result = new ArrayList<Bucket>();
	String callStr =
		"plugin("
		+ "globalName='de.contosi.pubserver.connector.MyPlugin',"
		+ "methodName='getBucketSelection')"
		+ "[<Session.Id>,<Model.Id>,<Entity.ResultId>,<Entity.Context>,<Entity.Data>]";
	Map<String, Object> argsMap = new HashMap<>();
	argsMap.put("<Session.Id>", sessionId);
	argsMap.put("<Model.Id>", entityModel);
	argsMap.put("<Entity.ResultId>", resultEntityId);
	argsMap.put("<Entity.Context>", context);
	argsMap.put("<Entity.Data>", bucketList);
	Bucket bucket = null;
	try {
		Object obj = ParameterInterpreter.interpret(callStr, argsMap);
		result = (List<Bucket>) obj;
	} catch (ParameterInterpreterException | ClassCastException e) {
		logger.warn("interpreterCall failed: "+callStr + " for " + argsMap);
	}
	// ... further implementation code ...
	return result;
}
4.7.2 Call by Interface
For a call by interface the interface of the target plug-in must be publicly available, e.g. from the PubServerSDK. If in need, you may add a library dependency jar containing your own interfaces to the Glassfish domain lib folder. We demonstrate the call by interface using the entity manger plug-in provided by WERK II. It implements the EntityManagerLocal interface that is defined in the PubServerSDK. For the call you first have to get a reference to the plugin manager in the PubServer Kernel application and then lookup the target plug-in. After you got the plugin you can easily call the methods. As you can see this example also makes use of an own exception as explained in the next sub section.
private List<Bucket> interfaceCall(String sessionId, String entityModel, String resultEntityId,
		Context context, List<Bucket> bucketList) throws MyPluginException  {
	List<Bucket> result = new ArrayList<Bucket>();
	PluginManagerLocal pluginManager = this.myLibrary.getPluginManager();
	EntityManagerLocal entityManager = pluginManager.lookupPlugin(
		"de.contosi.pubserver.connector.MyPlugin", sessionId, EntityManagerLocal.class
		);
	if (entityManager==null) {
		throw new MyPluginException("could not find entityManager", null, 0, this);
	}
	try {
		result = entityManager.getEntityRootBuckets(
				sessionId, entityModel, resultEntityId, context, "");
	} catch (PubServerException e) {
		throw new MyPluginException("interfaceCall failed", e, 0, this);
	}
	// ... further implementation code ...
	return result;
}
4.8 Handling of Exceptions
Be careful in handling your exceptions. The only exceptions that are allowed to be thrown from plug-ins are exceptions derived from the PubServerException class within the PubServerSDK. All other exceptions will indicate a malfunctioning of the server in general and might bring down other processes or the server as a whole. So typically use overall try catch constructs in your method implementations. You find an example use of the exception class below in the "Call by Interface" example.
package de.contosi.pubserver.connector;
import com.priint.pubserver.exception.PubServerException;
public class MyPluginException extends PubServerException {
	private static final long serialVersionUID = 1L;
	public MyPluginException(String message, Throwable cause, int errorCode, Object caller) {
		super(message, cause, errorCode, caller);
	}
}
4.9 Plug-in Configuration
Configuration classes should implement serializable and use JAXB annotations for serialization rules. This simple class uses two string fields that will come up as different XML elements as shown in the example file below.
4.9.1 Example config class
package de.contosi.pubserver.connector;

import java.io.Serializable;
import javax.xml.bind.annotation.XmlAccessType;
import javax.xml.bind.annotation.XmlAccessorType;
import javax.xml.bind.annotation.XmlRootElement;
import com.priint.pubserver.config.PluginConfig;

@XmlRootElement
@XmlAccessorType(XmlAccessType.FIELD)
public class MyConfig implements Serializable {
	public String myFirstProperty = "Hello";
	public String mySecondProperty = "World";
}
4.9.2 Example config xml file
<?xml version="1.0" encoding="UTF-8" standalone="yes"?>
<con:PluginConfig xmlns:con="com.priint.pubserver.config.manager/20130620">
    <con:name>DemoConfig.xml</con:name>
    <con:type>Demo</con:type>
    <con:description></con:description>
    <con:custom>
        <myConfig>
            <myFirstProperty>Hallo</myFirstProperty>
            <mySecondProperty>Welt</mySecondProperty>
        </myConfig>
    </con:custom>
    <con:dependencies/>
    <con:instances/>
</con:PluginConfig>
4.9.3 Where to place config files?
Config files should be stored in the repository via ison repository browser. Per default use the following location pattern:
<pluginMappedName>/<client>/default/<configFileName>.xml
For example:
de.contosi.pubserver.connector.MyPlugin/WerkII/default/DemoConfig.xml
4.9.4 Read Configuration XML in the plug-in
To get the Configuration data you have to use getConfigForPlugin method from the library class as shown in the snippet below.
public void getConfigFile() {
	List<PluginConfig> pluginConfigs = myLibrary.getConfigForPlugin(
				"de.contosi.pubserver.connector.MyPlugin");
	if (pluginConfigs.size() > 0) {
		MyConfig myConfig = pluginConfigs.get(0).getCustomConfig(
				MyConfig.class);
		if (myConfig != null) {
			logger.debug("I read plugin config as: {} {}",
					myConfig.myFirstProperty, myConfig.mySecondProperty);
		}
	}
}
4.9.5 Important notes
In the plug-in library the configuration classes must be listed in the @PubServerPluginLibrary annotation attribute configClasses. For example:
@PubServerPluginLibrary(id = "de.contosi.pubserver.helpers.exampleLibrary",
		label = "Helpers Library", vendor = "contosi.com",
		url = "contosi.com", version = "1.0",
		type = PluginLibraryControl.PluginType.DATA_MAPPING,
		configClasses= {HelperAConfig.class, HelperBConfig.class})
While loading configurations from the repository the library super class PluginLibraryControl uses the root element of the custom configuration to find out which of these classes applies. Use unique root element names or name spaces, if you overwrite the default behavior.