How-To Connecting priint:pdf renderer to the priint:publishing server / priint:planner
1 Overview
You can use the priint:comet pdf renderer for rendering pages, exporting PDF documents, create previews and several more rendering tasks. Connecting publishing server with priint:comet pdf renderer requires some additional setup steps, which are described in this document.
2 Requirements
These are the minimum versions required to use priint:renderer with the publishing server:
- priint:publishing server Version 4.1 >= Build 205
- priint:renderer Version 4.1 >= R10502
Recommended minimum versions:
- priint:publishing server Version 4.1 >= Build 1586
- priint:renderer Version 4.1 >= R13800
3 Installation Hints for priint:renderer
3.1 Basic Installation
Please follow the installation instruction delivered with your priint:renderer release. This contains detailed information about licensing, configuring fonts and pdf presets ("joboptions") and additional requirements.
For a quick test ater installation, you can just open a terminal or a command prompt, change into the installation directory and type
comet_pdf -s hello
If the basic installation works, this will generate a PDF welcome page and open the system default PDF viewer.
3.2 System Privileges
Please make sure, that the Java Application Server user (service account or local system account) can access the priint:renderer installation directory. Minimal requirement is read the directory content and run the comet_pdf.exe resp. comet_pdf programm.
Depending on the path configuration (see below), you may also have to grant write privileges on this directory (or subdirectories) to this user.
4 Connecting priint:publishing server to priint:renderer Instances
To use the priint:renderer with the publishing server, it first must be configured in the comet_admin database resp. priint:suite administration console.
During installation, you can choose whether to support priint:renderer or not, and choose the number of instances, installation path etc. You can change this configuration later, however some of these settings can only be edited directly in the database and will require a server restart.
4.1 Basic Configuration
The priint:renderer instances need to connect back to the publishing server (actually to the Comet3 WebService provided by the CometBridge priint:publishing server plug-in), this is a SOAP over HTTP connection.
The callback address and credentials can be configured in priint:suite > Administration > Preferences > AdminDB property.
Furthermore, you can configure some basic settings for all priint.pdf renderers connected to the publishing server.
Settings in this panel:
- Bridge Address: this is the
IPornameplusportof the publishing server. This IP or name must be resolveable from the priint:renderer host. The port must accept requests from the priint:renderer host, but should deny requests from other hosts. - Bridge User: global user name for callback connections. The user must have sufficient privileges to connect to any required Comet project, but should not have any UI privileges.
- Bridge Password: global password for callback connections
- Working Directory: relative or absolute path for log files and cache folders used by priint:renderer, see comments on paths below. This setting applies for
localinstances only. - Log Renderer Calls: log commands sent to the priint:renderer and
stdout / stderrin the server application log. - Write Renderer Logs: let the priint:renderer write log files (
comet.logandapi.log). Location of the log files is defined by the Working Directory setting. This setting applies forlocalinstances only. - Renderer File Type: the type of documents supported on this server. This is a system wide setting and can be either InDesign Document (
.indd) or Comet Interchange Format (.w2ml). For the priint:renderer, this value must be set to Comet Interchange Format (.w2ml). - Check Renderer File Type: check the renderer file type before processing documents with a certain renderer. Usually this should be set to
false.
Note: the latter two settings will probably be obsolete in the final 4.1 Release. Handling of heterogenous document types is currently being developed, in later versions this will not require any extra configuration.
Note II: by setting Check Renderer File Type to true and configuring both priint:renderer and InDesignServer instances, you can process different document types on the same server at the same time. The alpha and beta Releases of the 4.1 version only support one document type - either InDesign or W2ML - at the same time, so using different document types is an inofficial feature, which might help you in certain situation, but is not supported by Werk II.

4.2 priint:renderer Configuration
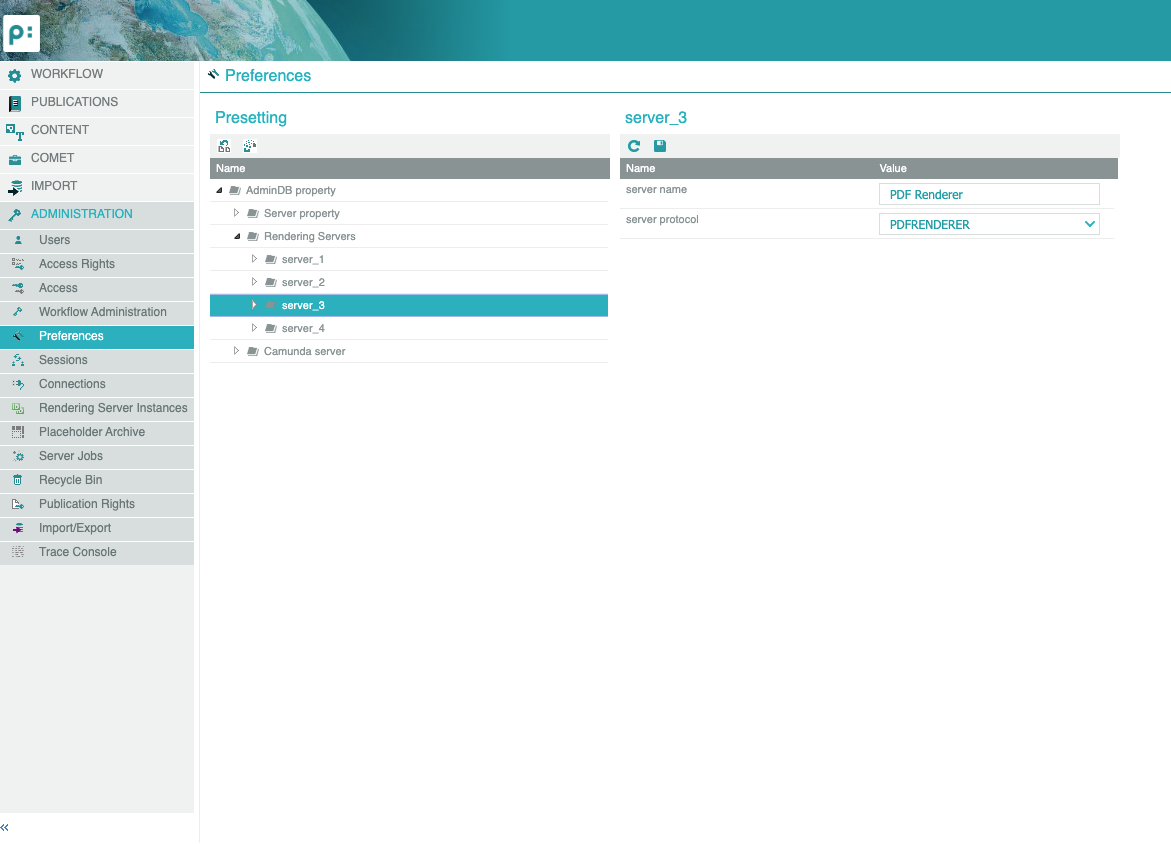
There should be at least two preconfigured server entries in the priint:suite > Administration > Preferences > AdminDB property > Indesign servers node. Actually we do not configure physical servers here, but only server types (LOCAL, REMOTE etc.), see screenshot below. If for any reason these nodes do not exist in your installation, you have to edit the /pubserver/pluginconfig/com.priint.pubserver.preferences.InDesignServers/custom/InDesignServers.xml config file in the configs repository (using ISON Eclipse [Repository view]). This file should look like the following:
<?xml version="1.0" encoding="UTF-8"?><con:PluginConfig xmlns:con="com.priint.pubserver.config.manager/20130620">
    <con:name>InDesignServers.xml</con:name>
    <con:type>InDesignServers</con:type>
    <con:description/>
    <con:custom>
        <cfg:InDesignServers xmlns:cfg="http://priint.com/pubserver.appserver.config/v1">
            <cfg:InDesignServers serverId="2">
                <cfg:serverName>Remote Server</cfg:serverName>
                <cfg:serverProtocol>REMOTE</cfg:serverProtocol>
            </cfg:InDesignServers>
            <cfg:InDesignServers serverId="3">
                <cfg:serverName>Offline Server</cfg:serverName>
                <cfg:serverProtocol>COMETOFFLINE</cfg:serverProtocol>
            </cfg:InDesignServers>
            <cfg:InDesignServers serverId="4">
                <cfg:serverName>PDF Renderer</cfg:serverName>
                <cfg:serverProtocol>PDFRENDERER</cfg:serverProtocol>
            </cfg:InDesignServers>
        </cfg:InDesignServers>
    </con:custom>
    <con:dependencies/>
    <con:instances/>
</con:PluginConfig>
If the configuration file or the entry for PDF renderer is missing, add the file respective add the lines marked in the example above to the file and restart the publishing server.
Note: in future versions, configuration of PDF Renderer and PDF Renderer instances might also be supported by the installer.
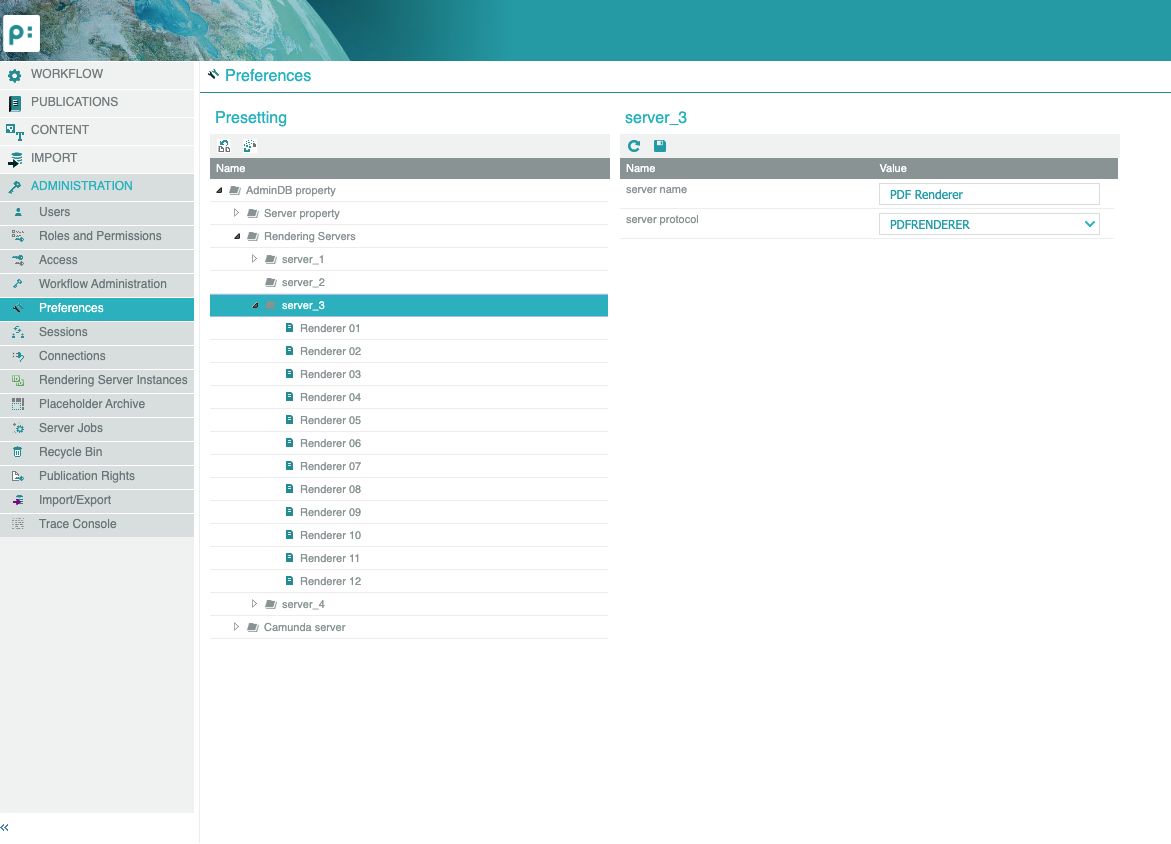
4.3 priint:renderer Instance Configuration
By opening the PDFRENDERER server node, you should see instances configured for this server type (see screenshot).
If there are no or not enough instances, you must add them to the /pubserver/pluginconfig/com.priint.pubserver.preferences.InDesignServerInstances/custom/InDesignServerInstances.xml config file in the configs repository (using ISON Eclipse [Repository view]). This file should look like this:
<?xml version="1.0" encoding="UTF-8"?><con:PluginConfig xmlns:con="com.priint.pubserver.config.manager/20130620">
    <con:name>InDesignServerInstances.xml</con:name>
    <con:type>InDesignServerInstances</con:type>
    <con:description>InDesignServerInstances.xml</con:description>
    <con:custom>
        <cfg:InDesignServerInstances xmlns:cfg="http://priint.com/pubserver.appserver.config/v1">
            <cfg:InDesignServerInstance instanceID="001" serverID="4">
                <cfg:instanceName>PDF Renderer 1</cfg:instanceName>
                <cfg:endpoint>local://C:\pdf_renderer\</cfg:endpoint>
                <cfg:active>1</cfg:active>
                <cfg:typeID>1</cfg:typeID>
            </cfg:InDesignServerInstance>
            <cfg:InDesignServerInstance instanceID="002" serverID="4">
                <cfg:instanceName>PDF Renderer 2</cfg:instanceName>
                <cfg:endpoint>local://C:\pdf_renderer\</cfg:endpoint>
                <cfg:active>1</cfg:active>
                <cfg:typeID>2</cfg:typeID>
            </cfg:InDesignServerInstance>
        </cfg:InDesignServerInstances>
    </con:custom>
    <con:dependencies/>
    <con:instances/>
</con:PluginConfig>
You can add or remove instances by directly editing the XML file. Please note the restrictions for element and attribute values listed below:
INSTANCEID must be unique
SERVERID must be the ID of the PDFRENDERER entry in the InDesignServers.xml configuration file.
INSTANCENAME must be unique (see path information above)
Once created, the priint:renderer instances can be configured in the priint:suite administration console.
Settings for each instance are
-
Instance name: UI name for this instance, this name must be unique for all renderers running on the same host, because cache and log path are derived from this name
-
Endpoint: Service endpoint The publishing server connects to priint:renderer by executing system calls. Optionally, the publishing server can also connect to a WebService component to call renderers installed on remote hosts. To call priint:renderer, the publishing server needs to know the installation path or the host. This is configured with the serviceendpoint property for each pdf renderer instance:
- schema for local connections (PDF Renderer and priint:publishing server running on the same host):
local://Absolute\installation\path
- schema for local connections (PDF Renderer and priint:publishing server running on the same host):
a) Example Windows: local://C:\\comet_pdf\\
b) Example Mac: local:///Applications/comet_pdf/
- schema for remote connections (PDF Renderer and priint:publishing server running on different hosts):
http://server[:port]- Example Windows:
http://192.168.130.217:8080 - Example Mac:
http://192.168.130.217:8080
- Example Windows:
- Active: whether this instance is active (i.e. should be used) or not
- Type: type / purpose of this instance, see description in section 3.4 pdf renderer instance type or purpose.
- Login: optional, override the global login (
Bridge User) for callback connections. - Password: optional, override the global password (
Bridge Password) for callback connections
Note: using dedicated credentials for each priint:renderer instance can be very useful when tracking problems in the Glassfish / publishing server log file.

4.4 priint:renderer Instance Type or Purpose
To seperate long running tasks like generating pages from tasks, which require fast response times, priint:renderer instances can be assigned to a certain type.
MIXED: this is the default type and allows the instance to be used for any purposeJOB: this instance can be used for server jobs, such as page generation and server workflow stepsWHITEBOARD: this instance can be used for online editing e.g. using the Whiteboard Spread EditorPRINTONDEMAND: this instance can be used for API calls from a Java / SOAP client
Which configuration best fits your requirements, depends on the usage scenario: the number of concurrent Whiteboard users, the kind of jobs executed in your system, the number and type of Java clients etc. You should avoid instances of type MIXED, unless in small installations (only one or two InDesignServer instances) or for testing purposes.
5 Installation and Configuration of remote priint:renderers
Connecting to remote priint:renderers requires an additional server component. This is a very tiny WebService component delivered as an EJB ear file called CometPdfRemote.ear. The CometPdfRemote component can be installed on Windows and Mac.
5.1 Installation
The WebService component requires a Java EE 6 compliant application server. It's recommended using the same application server like for the priint:publishing server installation, at the time, this is the Glassfish 3.1.2 Java EE 6 reference implementation.
Installation instructions
- download and install Glassfish 3.1.2 from the Oracle resp. Java download site
- start the server and deploy the
CometPdfRemote.eararchive (using the web administration UI, asadmin console or autodeploy folder) - configure the system properties explained in Section 4.2
Note: if you update a previous (pre 4.1 Build 1580) version of the CometPdfRemote component, please undeploy the old CometPdfRemote_.jar_ application first, shutdown Glassfish and remove the following libraries from your domain lib directory:
PubServerSDK.jarCometServer4SDK.jarlogback-classic-1.1.0.jarlogback-core-1.1.0.jarshiro-all-1.2.1.jarslf4j-api-1.7.5.jar
5.2 Configuration
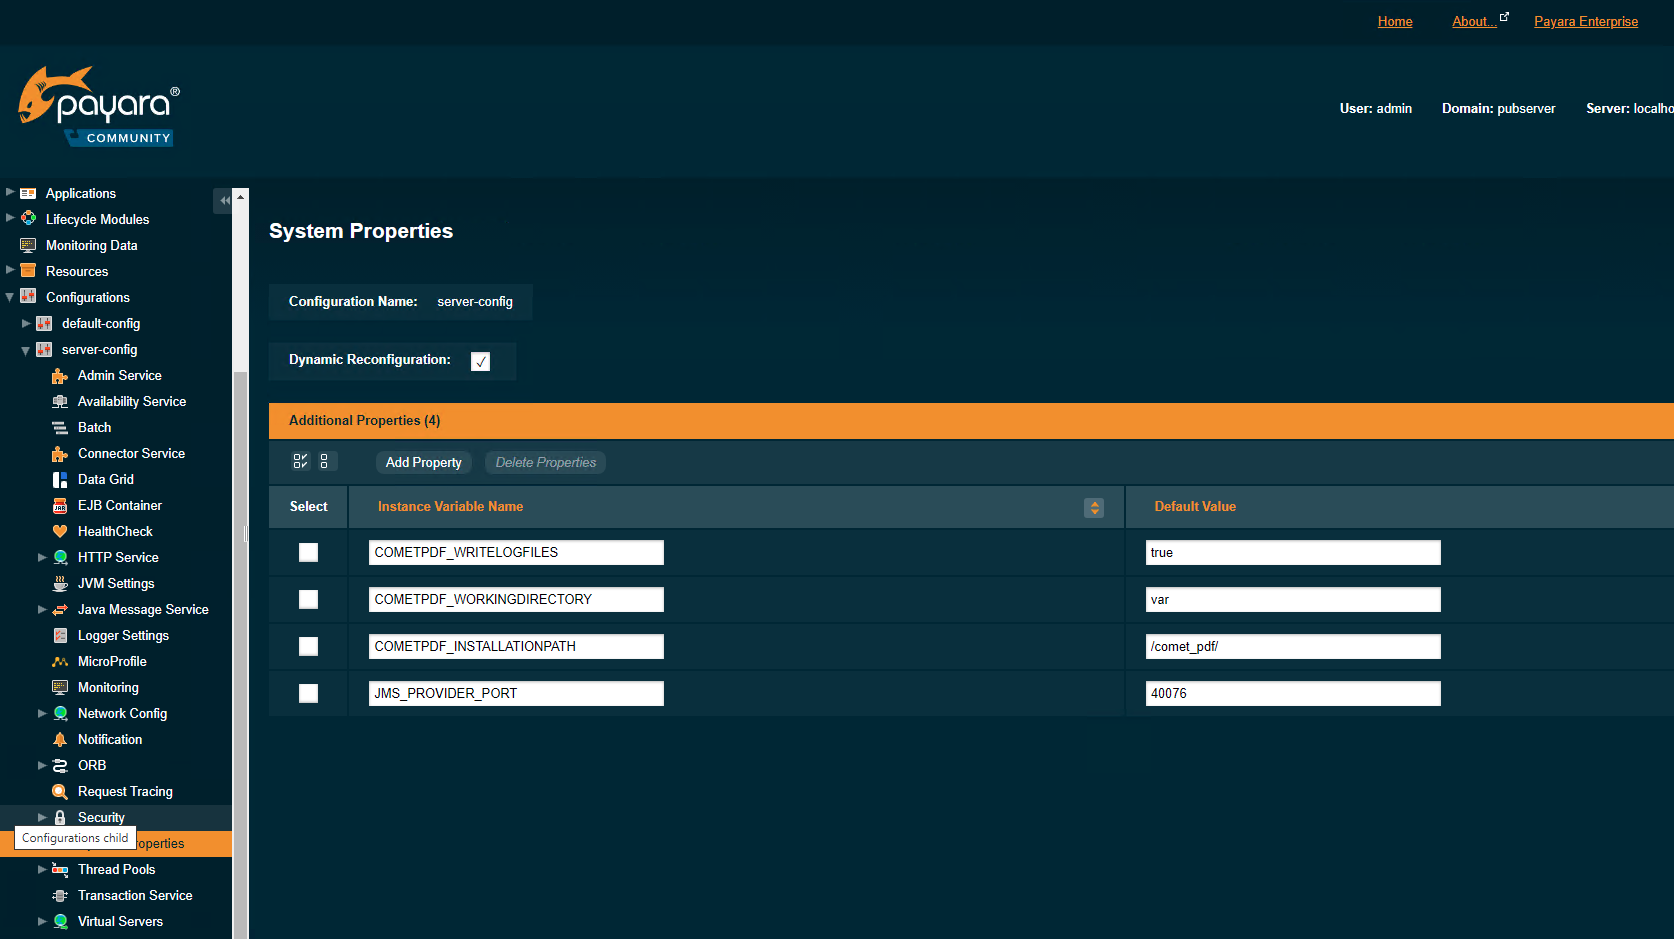
A couple of system properties must be configured, before you can connect to this pdf remote service.
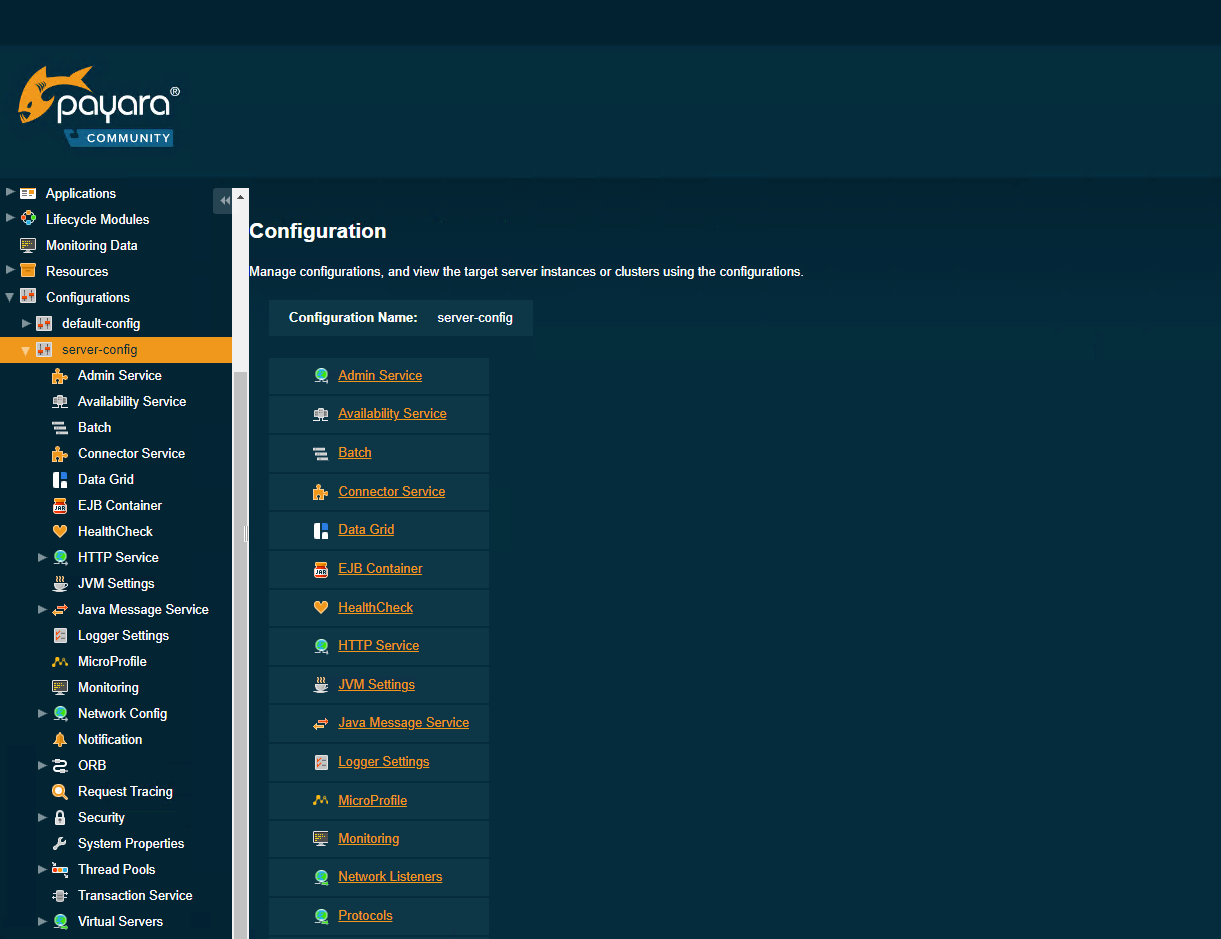
To do so, open the application server administration UI and navigate to Configurations > server-config > System properties:
At least the following two properties must be set:
- COMETPDF_INSTALLATIONPATH: absolute installation path of PDF renderer, e.g.
C\comet_pdf\or/Applications/comet_pdf/ - COMETPDF_WORKINGDIRECTORY: relative (to installation path) or absolute path for priint:renderer log and cache files, see from Section 5.1
There is no default value for these two properties. If either of these properties is undefined or empty, the CometPdfRemote service will refuse to work.
Note: when editing Windows path, you should be aware of a bug in the Glassfish administration console: Backslashes must be escaped (e.g. C:\comet\_pdf\) but will appear unescaped in the input fields after committing changes. When submitting the form for several times, each value must be revised, even if the value has not changed.
The following two properties are optional:
COMETPDF_WRITELOGFILES: (true or false), write log files or not. In a productive environment you should disable logging for performance reasons. Default istrue
6 Paths and Folders
You must setup the following paths and folders to use the priint:renderer
6.1 Cache Path
This path is used by the priint:renderer to store temporary data (downloaded templates, actions etc.). The name of this folder is derived from the instance name and the base Working Directory (relative to the installation directory or absolute path), which you configure in the priint:suite administration panel (see screenshot below).
Directory layout, when using a relative Working Directory path (e.g. "var"):
<PDF renderer Installation directory>
 + **var**
   + InstanceName
     + XCache
Directory layout, when using an absolute Working Directory path (e.g. D:\data\pdf_renderer\):
D:\\data\\pdf\_renderer\\
 + **var**
   + InstanceName
    + XCache
InstanceName, in both cases, is the name of this priint:renderer instance as configured in the priint:suite administration panel, see Section 4.3 above. Therefore, it is mandatory, that the instance name is unique, otherwise cache and other output of several instances might get mixed up.
Requirements
- must be a folder on the local filesystem
- full read and write access for the priint:renderer user
- must be unique for each priint:renderer instance
- must be excluded from real time virus scanning and the like
Configuration: priint:suite administration panel, see description and screenshot above. Example: var or D:\data\pdf_renderer\
6.2 Comet Log
This is the file comet log messages are written to. The name of this file is derived from the instance name and the base Working Directory (relative to the installation directory or absolute path), which you configure in the priint:suite administration panel (see screen shot below).
Directory layout, when using a relative Working Directory path (e.g. var):
<PDF renderer Installation directory>
 + **var**
   + InstanceName
    + comet.log
Directory layout, when using an absolute Working Directory path (e.g. D:\data\pdf_renderer\):
D:datapdf\_renderer
 + **var**
   + InstanceName
    + comet.log
InstanceName, in both cases, is the name of this priint:renderer instance as configured in the priint:suite administration panel, see Section 4.3(configuring pdf renderer instances) above. Therefore, it is mandatory, that the instance name is unique, otherwise log messages of several instances might get mixed up.
Requirements
- must be a file on the local filesystem
- full read and write access for the priint:renderer user
- must be unique for each priint:renderer instance
- must be excluded from real time virus scanning and the like
Configuration: priint:suite administration panel, see description and screenshot above. Example: var or D:\data\pdf_renderer\
6.3 Comet API Log
This is the file comet API log messages are written to. The name of this file is derived from the instance name and the base Working Directory (relative to the installation directory or absolute path), which you configure in the priint:suite administration panel (see screenshot below).
Directory layout, when using a relative Working Directory path (e.g. var):
<PDF renderer Installation directory>
 + **var**
   + InstanceName
    + api.log
Directory layout, when using an absolute Working Directory path (e.g. D:\data\pdf_renderer\ ):
D:\\data\\pdf\_renderer\\
 + **var**
   + InstanceName
    + api.log
InstanceName, in both cases, is the name of this priint:renderer instance as configured in the priint:suite administration panel, see Section 4.3 above. Therefore, it is mandatory, that the instance name is unique, otherwise log messages of several instances might get mixed up.
Requirements
- must be a file on the local filesystem
- full read and write access for the priint:renderer user
- must be unique for each priint:renderer instance
- must be excluded from real time virus scanning and the like
Configuration: priint:suite administration panel, see description and screenshot above. Example: var or D:\data\pdf_renderer\
6.4 Temporary Session Files
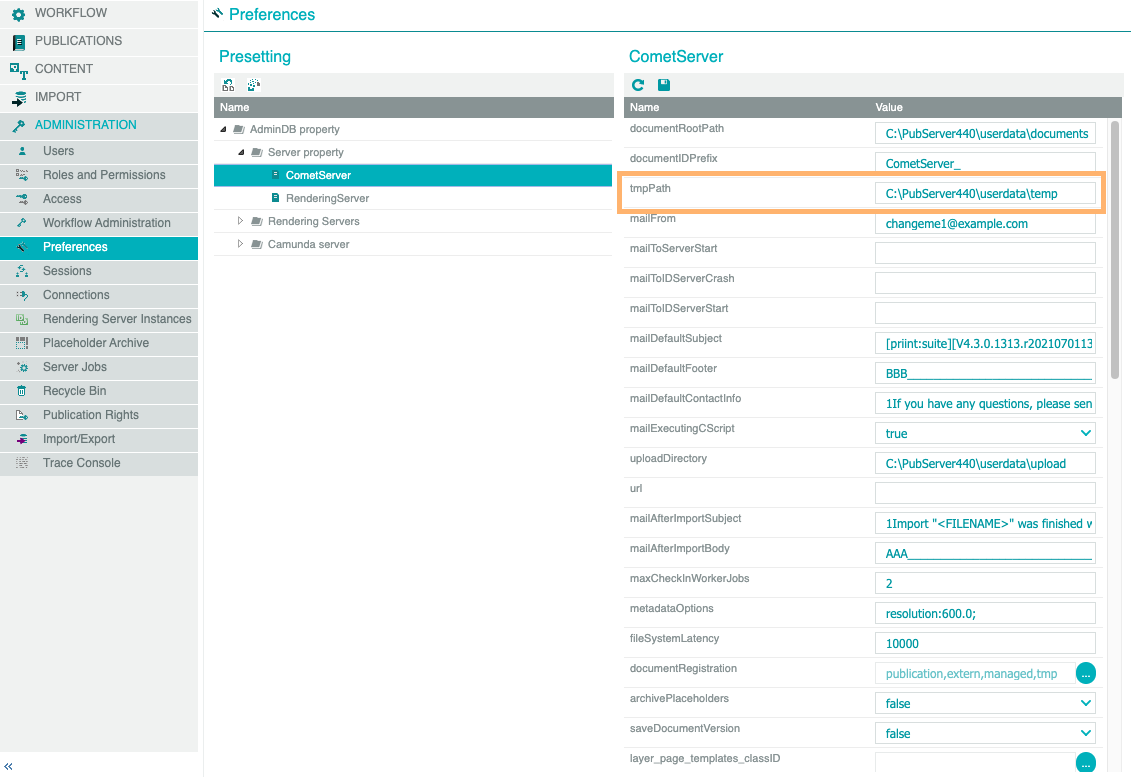
This is the folder, temporary session data is written to and read from. Typically, this is a network mount, because other components (publishing server / CometServer) access this folder too.
Requirements
- the folder must exist
- full read and write access for the priint:renderer user and full read and write access for the Glassfish / publishing server user
- system wide setting for all priint:renderer instances and other components
- must be excluded from real time virus scanning and the like
Configuration: priint:suite adminstration, variable tmpPath. See screenshot below. Don't forget to click the "save" button after changing this value! Example: \Shared\publishing_server\tmp
6.5 Document Files
This is the folder, documents (e.g. publication documents) are written to and read from. Typically this is a network mount, because other components (publishing server / CometServer) access this folder too.
Requirements
- the folder must exist
- full read and write access for the priint:renderer user and full read and write access for the Glassfish / publishing server user
- system wide setting for all priint:renderer instances and other components
- must be excluded from real time virus scanning and the like
Configuration: priint:suite administration, variable documentRoot. See screenshot below. Don't forget to click the "save" button after changing this value! Example: \Shared\publishing_server\documents
Screenshot Temporary Session Files and Document Files configuration:
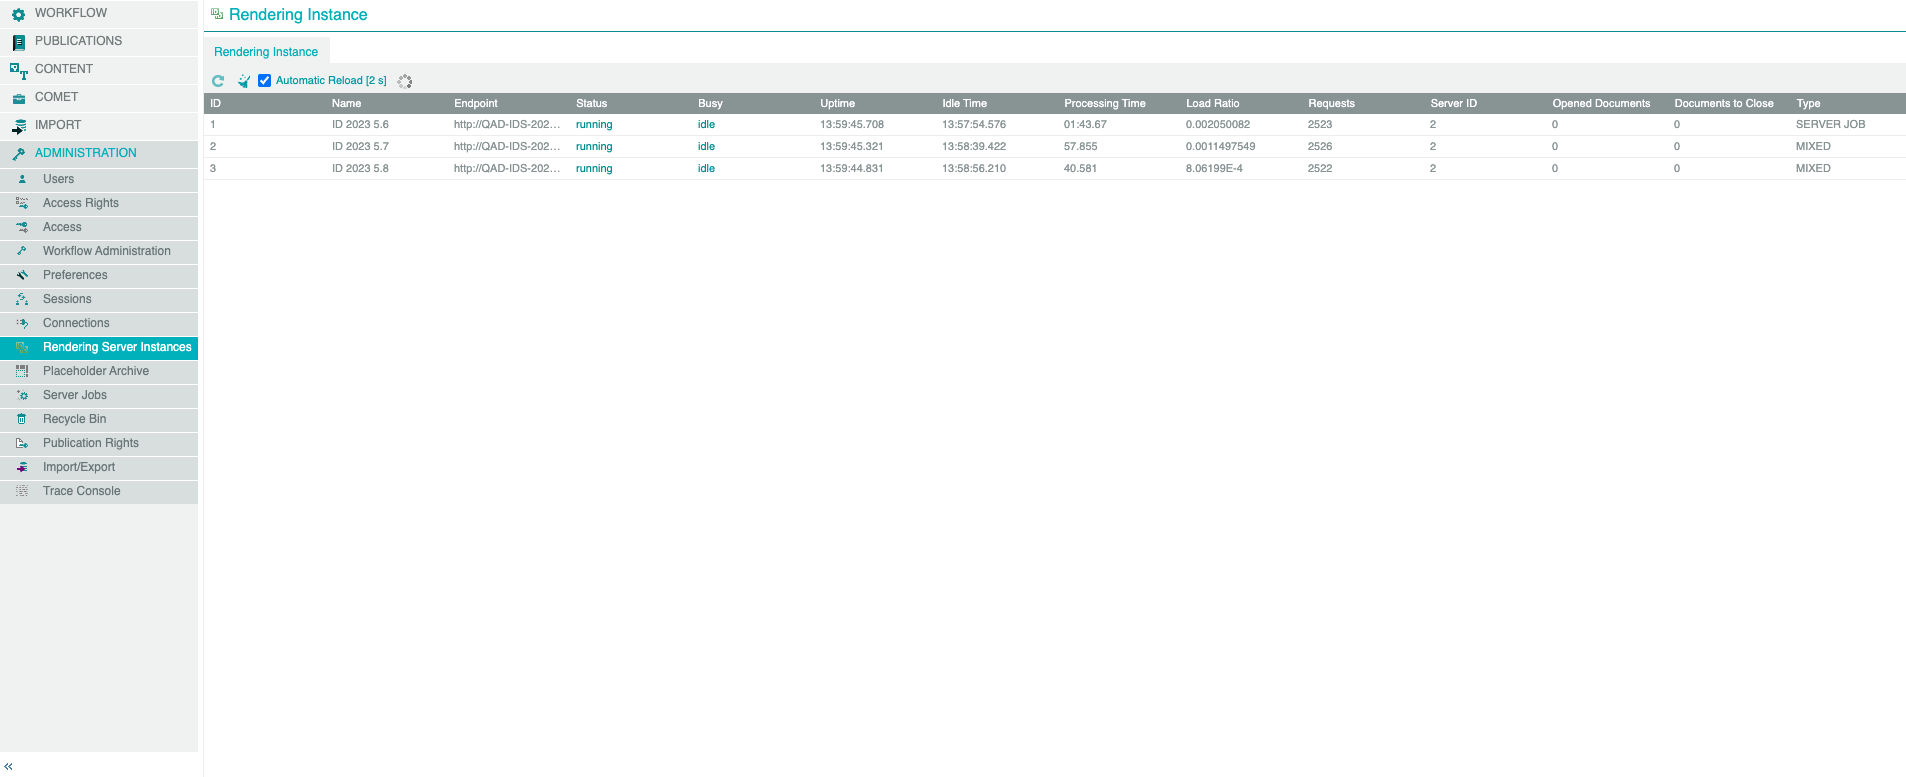
7 Monitoring priint:renderer Instances
Under priint:suite > Administration > InDesign instances you find a list of configured InDesignServer instances and information about the current status, whether it is currently processing a job or not, the number of opened documents on this instance, usage statistics etc. (again: for historical reasons this is still called InDesign instances in the UI, though this view refers to all type of renderers).
Double-clicking an entry opens a separate panel, which shows the documents currently opened on this instance.
- Status: can be running or not available. If an instance stays not available for a long time, you should check for server crashes, network problems or misconfiguration.
- Busy: can be idle or busy. Idle means: this instance currently does not process anything and can accept requests. Busy means: this instance is currently processing a rewuest and cannot accept further requests, until this task is finished. If an instance stays busy for a very long time, you should check this instances log files for crashes or hangs.
- Requests: the total number of requests sent to this instance. In a well-balanced system, the number of requests should be about the same for all instances of the same type.
- Opened documents: the number of documents currently opend on this instance. In a well-balanced system, the number of opened documents should be about the same for all instances of the same type.
- Documents to close: documents currently scheduled to be closed on this instance. This should be a low number (2, 1 or zero).
8 Example Configurations
This section describes some typical path configurations for priint:publishing server / priint:renderer running on the same or on dedicated hosts. Please note:
- if running on the same host, the publishing server and priint:renderer process should be started under the same user account
- if running on different hosts, files and folders created by the publishing server user must be readable and writeable for the priint:renderer user and vice versa
8.1 priint:publishing server and priint:renderer on the same physical Machine (Windows)
- set documentRootPath to a local folder (e.g.
C:\pubserver\userdocuments\, see Section 6.5 Document Files - set tmpPath to a local folder (e.g.
C:\pubserver\tmp, see Section 6.4 Temporary Session Files
If document or temporary files are located on a network drive, assign the target volume to a drive letter (e.g. Z:) before and use local paths for the configuration settings.
8.2 priint:publishing server and priint:renderer on dedicated Windows Machines
- assign the target volume (local drive on one of the machines or network mount) for document files to a drive letter on the publishing server host, e.g. F:
- assign the target volume (local drive on one of the machines or network mount) for temporary session files to a drive letter on the publishing server host, e.g. T:
- do the same on the priint:renderer host using the same drive letters
- set documentRootPath and tmpPath in the priint:suite administration using the same drive letters (e.g.
F:\documentsresp.T:\tempfiles\, see Section 6.5 Document Files and Section 6.4 Temporary Session Files)
8.3 priint:publishing server on Windows, priint:renderer on Mac
-
Document and temporary files on the Windows host
- set documentRootPath to a local folder (e.g.
C:\pubserver\userdocuments\, see Section 6.5 Document Files) - set tmpPath to a local folder (e.g.
C:\pubserver\tmp\, see Section 6.4 Temporary Session Files)
If document or temporary files are located on a network drive, assign the target volume to a drive letter (e.g. Z:) before and use local paths for the configuration settings.
-
mount this volume or folder on the Mac server
-
create a symbolic link on root level to respect the folder hierarchy:
sudo ln -s /Volumes/pubserver/pubserver
- set documentRootPath to a local folder (e.g.
-
Document and temporary files on the Mac host
- mount and assign the volume for Document Files to a drive letter on the publishing server host, e.g. F:
- mount and assign the volume for temporary session files to a drive letter on the publishing server host, e.g. T:
- set documentRootPath and tmpPath in the priint:suite administration using the same drive letters (e.g.
F:\documents\resp.T:\tempfiles\, see Section 6.5 Document Files and Section 6.4 Temporary Session Files) - create symbolic links on root level to respect the folder hierarchy:
sudo ln -s /Volumes/Data/appserver/documents /documents
sudo ln -s /Volumes/Data/appserver/tempfiles /tempfiles