How-to implement Adaptive Templates for Grid Planning
1 Introduction
The Grid Planning in Neowise enables the possibility to position different products on predefined areas of a spread. They can be merged with each other to create an even larger area for the assigned product. Of course, there are many more features like selecting specific content of the product and articles or assigning briefing comments for the designer etc. With a custom build script, the products can be established according to the selections in the Grid Planning. (Find more information about the Grid Planning here)
The areas, in which the products can be placed, are called RealGridElements. They are defined and configured in special page templates.
2 General idea behind the “Adaptive Templating”
In the Grid Planning it is possible to assign several buckets to one RealGridElement. But for the “Adaptive Templating”, another approach shall be made. Only one bucket will be assigned and planned, irrespective whether the grid will be merged or not. During the executed build script, the frames of the product template shall be arranged and resized dynamically according to its defined area.
The idea is to implement custom layout rules that will get the specific information out of the planning record of the document and adapt the frames of the built template accordingly. In that way, one template configuration can be used for different grid sizes and merged areas.
As a result, the list of templates will be much smaller and the catalogue manager needs only to choose the template by its general layout. By merging two or more grid elements the template can adapt its frames to the grid area. For example, some frames could be moved or enlarged to a grid edge or sub-templates could be placed depending on the merged grid area (like small or big price templates). That way, each template is flexible and can even be used as normal or hero template.
3 Implementation Hints
3.1 General implementation
Like each project needs its own custom templates, the layout rules for the “Adaptive Templating” have to be implemented project-specific, as well. In this chapter the basic implementation steps for possible layout rules and conditions are described.
The most important information for this feature is saved in the planning record of the document, which are the coordinates for the defined (and possibly merged) RealGridElement. The planning record contains a lot of information which could be essential for a custom build script as well. These attributes are part of the planning record of each element:
<planning>

<bucketId>

<bucketRefs>

<contextAssortment>

<contextCountry>

<contextDocumentId>

<contextLanguage>

<contextMarket>

<contextPublication>

<contextTargetGroup>

<contextWell>

<cordRefs>

<createdBy>

<createdOn>

<deleted>

<dpTemplateId>

<entityBucketId>

<entityModelId>

<entityPlanningId>

<id>

<identifier>

<importId>

<keyValueRefs>

<label>

<children>

<mediaAssetRefs>

<metaData>

<origin>

<pageId>

<pageTemplateElementId>

<pageTemplateId>

<parentPlanningId>

<priceRefs>

<printTemplateId>

<sequence>

<tableDataRefs>

<textRefs>

<timestamp>

<updatedBy>

<updatedOn>

<usePrintPageTemplate>

<version>

<xPosBottomRight>

<xPosTopLeft>

<yPosBottomRight>

<yPosTopLeft>

</planning>
Each “planning” entry of the planning record represents one RealGridElement. To fetch the planning record of the whole document or just a single entry, a custom java plugin needs to be implemented.
Use the EntityManager method getEntityPlanningsOfDocument() to get all entries of the document (e.g. for your custom build script) or the method getEntityPlanningsByIdentifier() to get just the entry of the current planning (recommended for the layout rules).
To map the planning from CScript, convert the type List<com.priint.pubserver.plugin.entitydata.Planning> into List<Planning>. To do so, transform each entry of List<com.priint.pubserver.plugin.entitydata.Planning> with Planning.createFromPlanning() and add it to the List<Planning> or just return a single Planning.
The received Planning object contains all the information of the corresponding RealGridElement that are mentioned above. To get a specific attribute, several CScript functions are implemented:
publication::planning::get()
publication::planning::gets()
publication::planning::getfloat()
publication::planning::getlist()
3.2 Implementation Example
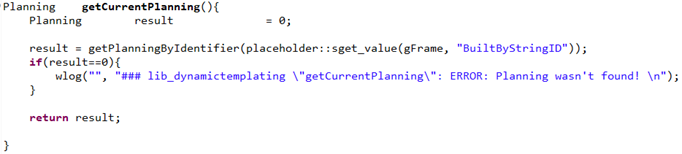
The CScript of a layout rule needs some information of the planning record entry of the linked bucket / planning, e.g. the coordinates of the corresponding RealGridElement.
The Java call in CScript could be like this:
The corresponding Java method could be implemented this way:
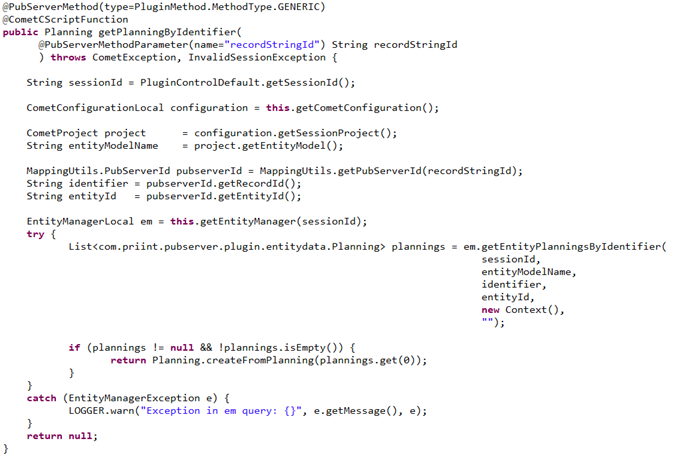
The returned Planning contains the information about the RealGridElement. A CScript function to get the coordinates could look like this:

The variables gridL, gridT, gridR, gridB can be used in many different layout rules for the “Adaptive Templating”. Common functionalities would be to move or enlarge the current frame (gFrame) to one of the RealGrid edges or to place a sub-template at one of the RealGrid corners. Moreover, layout conditions can be defined that some layout rules will only be executed e.g. if the merged RealGridElement is in a specific range.
You will find more detailed information about how to create and configure layout rules and conditions in the comet documentation: https://kb.priint.com/comet/InDesign/Plugins/layoutrules.html
4 Template configuration
After the layout rules and conditions for the “Adaptive Templating” are implemented, the template creation and configuration are the next steps.
One of the most important aspects is to ponder about a reasonable order of events during the template built. The frame order might affect the behaviour of the layout rules, but also the other way around. It might be useful to work with the “Send Event” layout rule in special cases. Moreover, the events, at which a layout rule or condition will be executed can lead to completely different results.
You will find more detailed information about template behaviour in the comet documentation: https://kb.priint.com/comet/InDesign/Plugins/pageitems.html#Vorlagenrahmen
Of course, it is possible to use layout rules and condition, that are independent the RealGrid size and combine them with those of the “Adaptive Templating”. That includes custom implemented rules as well as those of the standard Comet plugins.
Moreover, the “Nails and Magnets” feature might become very handy if a frame shall be moved or resized in dependency of another one, e.g. a frame that was moved to one of the RealGrid edges. (You will find more detailed information about the “Nails and Magnets” feature in the comet documentation: https://kb.priint.com/comet/InDesign/Plugins/pageadapter.html )
In some projects it might be wise to distinguish between landscape and portrait formatted templates for an even better reduction of white spaces in the layout. In dependency of the format of the merged area the catalogue manager has to select the appropriate template version.